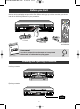
R8323UR/GB/MR-BEI/910 8/10/99 17:11 Page 1 FV 400 L VHS VIDEO RECORDER OPERATING INSTRUCTIONS
R8323UR/GB/MR-BEI/910 8/10/99 17:11 Page 1 Guarantee The type and production number of your appliance are printed on the guarantee certificate delivered with your video recorder. Keep this certificate as well as the invoice. These documents are indispensable for claiming your guarantee rights. • All repairs during the guarantee period must be carried out by an authorised technician representing our brand. • If this condition is not met, your rights will no longer be valid.
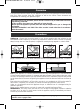
R8323UR/GB/MR-BEI/910 8/10/99 17:11 Page 2 Some information before you start Mains connection This video is suitable for use on A.C. mains supply, 220-240 V - 50 Hz only. It must not be connected to D.C. mains. Note: The mains lead of the video is fitted with a moulded plug. If the mains sockets are not compatible or if for any reason the plug is removed please follow the directions below. The moulded plug cannot be rewired and if removed must be disposed of safely.
R8323UR/GB/MR-BEI/910 8/10/99 17:11 Page 3 Contents Guarantee . . . . . . . . . . . . . . . . . . . . . . . . . . . . . . . . . . . . . . . . . . . . . . . . . . . . . . . .1 Precautions . . . . . . . . . . . . . . . . . . . . . . . . . . . . . . . . . . . . . . . . . . . . . . . . . . . . . . .1 Some information before you start . . . . . . . . . . . . . . . . . . . . . . . . . . . . . . . . . . . .2 Before you start . . . . . . . . . . . . . . . . . . . . . . . . . . . . . . . . . . . . . . . . . . . .
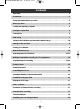
R8323UR/GB/MR-BEI/910 8/10/99 17:11 Page 4 Before you start Remove all the packaging and protective films. Before setting up your video recorder, you should have all the following elements in your possession. SIZE AAA 1,5 V 0%MERCURY EXTRA HEAVY DUTY + - GREENE LL R.F.
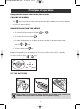
R8323UR/GB/MR-BEI/910 8/10/99 17:11 Page 5 Principles of operation Always point the remote control at the video recorder. CALLING UP A MENU The key on the remote control calls up the menu which enables you to use the features of your VCR and to adjust it. NAVIGATION WITHIN THE MENUS 1 - To choose a function, select a line with 2 - To confirm your choice, press or . . 3 - To make an adjustment (i.e. to select an option, increase or decrease a given value), use the or keys.
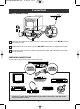
R8323UR/GB/MR-BEI/910 8/10/99 17:11 Page 6 Connections BASIC CONNECTIONS 3 1 2 1 Disconnect the outside aerial cable from the TV set and reconnect it to the RF IN socket on your video recorder. 2 Connect the TV set to the video recorder (RF OUT socket) with the supplied aerial cable. 3 Connect the video recorder to a mains socket with the mains lead.The display on the video recorder comes on. FURTHER CONNECTIONS To view and/or copy pictures from a connected AV unit.
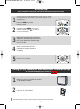
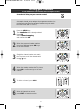
R8323UR/GB/MR-BEI/910 8/10/99 17:11 Page 7 VCR set-up Upon completion of the basic connections described on the previous page 1 2 3 4 5 To set up your VCR, you will need the user manual of your TV set.We recommend that you proceed step by step with all stages up to and including page 7. Press the VCR key on the remote control. Hold down the MENU key on the remote control until CH - - comes up on the VCR display.
R8323UR/GB/MR-BEI/910 3 4 5 6 7 8 8/10/99 17:11 Page 8 From the TV User Manual, follow the instructions to find the VCR signal. As soon as you have found the output channel of the VCR, a message comes up on the TV screen. Note:When the picture quality is poor (snowy or torn image), change the output channel of the VCR with the PR+/PR- keys (when doing so, the picture will disappear until you return the TV set to the new channel.
R8323UR/GB/MR-BEI/910 8/10/99 17:11 Page 9 Sorting your channels To ease identification of the channels, have a TV magazine to hand. Press the VCR key on your remote control. Automatic channel set-up assigns the programme numbers in a pre-defined order.These programme numbers may not match the usual order (BBC 1 on Pr 1). 1 Press the MENU key. The Installation line is already selected. Press OK. Select Channel swapping and confirm with OK.
R8323UR/GB/MR-BEI/910 8/10/99 17:11 Page 10 Manual channel set-up Press the VCR key on your remote control. 1 Press the MENU key. The Installation line is already selected. Press OK. Select Manual set up, and confirm with OK. 2 With W first select Reception and then choose CH or CC with C or B (CH stands for the channels received via your aerial antenna and CC for the cable network programmes). 3 Press W to select the Autosearch line.
R8323UR/GB/MR-BEI/910 9 8/10/99 17:11 Page 11 If you wish to continue with channel set-up, repeat steps 2 to 8, otherwise press EXIT. Operating basic VCR functions Press the VCR key on your remote control. To switch the VCR or put it into standby: press the B key. Playing back a video tape: Press the PLAY key. Stopping video tape playback: Press the STOP key. Making a forward search on a video tape: Press the FWD. key while in playback mode.
R8323UR/GB/MR-BEI/910 8/10/99 17:11 Page 12 Releasing the pause mode on a video tape: Press the PLAY key. Winding a tape forwards: Press the FWD. key while in stop mode. Rewinding a video tape: Press the REW. key while in stop mode. If the picture is poor (tracking): Press PR+ / PR- key (VCR in play or pause). Restore the standard setting with 0000 key (If you cannot improve the picture, the tape may be faulty). To display the information screen (source, SP/LP, counter status): press the STATUS key.
R8323UR/GB/MR-BEI/910 8/10/99 17:11 Page 13 Making an immediate recording of a TV programme 1 Press the digit (0-9) or PR+ / PR- keys to select the TV programme to be recorded. 2 Press the REC. key with a video tape inserted. 3 To start recording, press the REC or the PLAY key again. Note: an information screen comes up on your TV, but it will not be recorded on the tape.To delete this screen, press the EXIT key. Programming of a recording Press the VCR key on your remote control.
R8323UR/GB/MR-BEI/910 4 8/10/99 17:11 Page 14 Use the number keys (0-9) to enter the start and stop time. Note: make sure that the start and stop times do not overlap another timer recording. 5 Press number keys (0-9) to enter the Date of the timer recording in day and month format. 6 Press OK key to select between Once, Monday to Friday (5/7) or Weekly (1/7) timer recording. 7 8 9 10 Press SP/LP key to select between Standard Play or Long Play recording.
R8323UR/GB/MR-BEI/910 8/10/99 17:12 Page 15 Erasing a timer Press the VCR key on your remote control. 1 2 3 4 Press the MENU key. Select Record timer with W, and confirm with OK. Press V or W key until the menu line you wish to erase is selected. Press 0000 key to permanently erase the timer recording menu line selected. Press EXIT key to leave menu.
R8323UR/GB/MR-BEI/910 8/10/99 17:12 Page 16 Controlling the TV set Your remote control can be used for controlling certain functions of most of our brand of TV sets. For this, you need to enter one of the following codes: 000 for the most recent sets and 001 for the others. Depending on the type of TV set you own, this remote control may not be compatible or certain functions may not be available. Storing the TV code: - Press the TV key on your remote control.
R8323UR/GB/MR-BEI/910 8/10/99 17:12 Page 17 Transition to the year 2000 On December 31st 1999 at midnight, the clock of your video recorder will switch over to the year 2000. However, should it be disconnected from the mains at that moment, you will have to change the year manually. 1 2 Press the MENU key. Select Clock set with W, and confirm with OK. With the keys C / B, position the cursor on the 1 of 199- and press 2.To replace the other digits, proceed likewise. Store by pressing OK.
R8323UR/GB/MR-BEI/910 8/10/99 17:12 Page 18 Technical features Mains supply Consumed power Clock backup Dimensions (W/H/D) Weight Functioning conditions 200 to 240 V ±10% - 50/60 Hz 16 W when ON - 4 W in the eco mode approx. 30 minutes 393 x 94 x 278 mm approx. 4.
R8323UR/GB/MR-BEI/910 8/10/99 17:12 Page 19 Guarantee FOR COMPLETION BY THE PURCHASER Purchaser's Name ......................................... This guarantee is automatically effective from the date of purchase of the equipment. The appropriate sections should be completed by the dealer and purchaser at the time of purchase. Address ......................................................... ......................................................................