T 7025 UD COLOUR TELEVISION WITH NICAM DIGITAL STEREO SOUND AND FASTEXT
de couv.
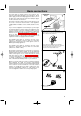
About this manual This document is common to several television models. Therefore, certain functions or settings may not apply to the model you have purchased About the switch The position of the ON/OFF switch differs depending on the model. It may be located on the front or on the right-hand side of your set (see the drawing inside the cover page of your manual). About safety To ensure your own safety and safe operation of the equipment, observe the following instructions thoroughly.
Contents Using the remote control and fitting the batteries. How to call up a menu and how to select a function, a setting or an option. About this manual . . . . . . . . . . . . . . . . . . . 1 About the switch . . . . . . . . . . . . . . . . . . . . . 1 About safety . . . . . . . . . . . . . . . . . . . . . . . . 1 About cleaning . . . . . . . . . . . . . . . . . . . . . . 1 About degaussing . . . . . . . . . . . . . . . . . . . 1 Basic connections . . . . . . . . . . . . . . . . . . . .
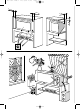
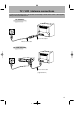
Basic connections Basic connections The mains plug (1) supplies power to the television. The television must only be plugged in to a 220-240 V - 50 Hz power supply. It must never be plugged in to a DC source. If the plug comes away from the lead, never attempt to plug it in: this could cause electrocution.
TV / VCR / Antenna connections TV / VCR / Antenna connections In order to avoid any interference, use the male to male adaptor and the male to female cable supplied with your TV set as shown below: TV / Antenna Male to male adaptor Male to female cable TV / VCR / Antenna + + AUDIO/VIDEO 1 + + AUDIO/VIDEO 1 + Male to female cable (supplied with TV)
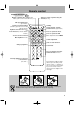
Remote control Remote control Television Functions Other Connections Display of channel, time, sound (yellow This key is active only when using the Teletext (blue key) button) (and zoom for models with zoom) Call up programme list (green button) Standby Fastext or Toptext headings (red button) (picture freeze for models with this function) Right/Left Selection within menus and Zoom Function (for models with this function) Call up Teletext / Toptext / Fastext function (purple button) Press to operate
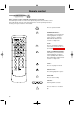
Remote control Video Recorder Functions Video cassette recorder commands using TV remote control unit Selected Ferguson Video recorders can be operated by direct infra-red remote control. This facility will be referred to in the appropriate video recorder operating instructions. Contact your Ferguson dealer for more details. Press to operate the VCR. REWIND/SEARCH : If this button is pressed and held in during playback, fast picture search (reverse) is obtained.
Navigation principles Navigation principles Calling up the INSTALLATION MAIN MENU INSTALLATION MAIN MENU If there is no menu displayed on the screen, key on the remote press and hold the control. The settings SUMMARY is displayed first, followed by the INSTALLATION MAIN MENU which you can use to operate your television.
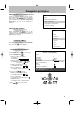
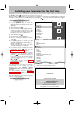
Installing your television for the first time Installing your television for the first time First plug the television into a mains power outlet and to the external aerial or a cable network, then switch on using located on the front or the side of your set. the ON/OFF switch When you switch on your television for the first time, the language selection menu* is displayed (Fig. 1). If this does key on the television until this menu appears.
Automatic installation Automatic installation The Automatic installation function is useful if you have to go through the installation procedure again, such as when moving house. This function deletes all previously memorised programmes. To install a new channel, you should use the Manual programming function. Before running AUTO INSTALLATION, check the PERSONAL SETTINGS menu to ensure that the country displayed is correct.
Programme organisation Programme organisation During automatic installation, your television will search for the channel name and assign it a programme number according to the selected country. You can use the PROGRAMME ORGANISATION menu to name any channel name not found, to change the order in which the channels are displayed, or to delete channels for which reception is too poor. Follow the messages at the bottom of the screen. For further details, read the information below.
Manual programming Manual programming The manual installation function is useful if some programmes have not been installed even after AUTOMATIC INSTALLATION. , the SUMMARY is 1. Press and hold displayed first, followed by the INSTALLATION MAIN MENU. 2. Select the line marked Manual programming. . 3. Display the menu using 4. Now continue by following the messages at the bottom of the screen. For further details, read the information below.
Manual Programming Channel number guide Only the main transmitters are listed. There are in addition many relay stations, and full lists are available from the Broadcasting Authorities.
Manual Programming &KDQQHO QXPEHU JXLGH ,UHODQG In addition to the RTE main transmitters listed, there are many RTE transposers throughout the country. If your area is not covered by a main transmitter and you are not sure of the channel numbers of your local transmissions, your television dealer is the best person to advise you. He will also know whether you need a horizontal or vertical aerial to suit the transmissions.
Personal settings Personal settings 1. Press and hold the key: the SUMMARY is displayed first, followed by the INSTALLATION MAIN MENU. 2. Select the line marked Personal settings. INSTALLATION MAIN MENU Exit Manual programming . 3. Display the menu using 4. Continue by following the messages at the bottom of the screen. Auto installation For further details, read the information below. Personal settings Menu language : Select the language in which the menus are to be displayed.
Preferences Preferences 1. Display the SUMMARY by pressing and releasing the key on the remote control . 2. Select the line marked Preferences. 3. Display the menu using . Make your choice from the proposed options. Use the information below to help you. Show program. number : If you wish to permanently display the number of the programme you are watching, tick the box using the Left/Right keys. Press the Left/Right keys again to deactivate this function. PREFERENCES Return Show program.
Daily viewing Daily viewing Sound Settings The television set fitted with a Dolby Pro Logic decoder lets you create a cinema studio sound quality in your own home with a coded Dolby Surround signal or you can enjoy special sound effects (with a stereo or mono signal) by connecting 2 pairs of loudspeakers (on some models), one pair of speakers or simply using the sound facilities of the television set. Turn on the main switch and connect the speakers to the appropriate sockets.
Daily viewing Stereo amplifier: - Connect the left (L) and right (R) CINCH plugs from the television set to your amplifier. - Connect the rear speakers (Surround) to the television set. - Activate the Surround line in the SOUND SETTINGS menu. - Set the sound of the Left and Right channels using the amplifier and the sound of the Center and Rear channels (Surround) using the television set (SOUND SETTINGS menu). In both cases, activate the Ext.
Daily viewing Picture Adjustment Display the SUMMARY using the key on the remote control. Select Picture. Validate . The PICTURE menu is displayed. using Select and set the proposed options. Use the information below to help you. Brightness, Colour, Contrast, Sharpness: Select each of these lines one after the other and set as required. Contrast expand : Select this line then choose the desired Contrast expand setting (High or Low).
Daily viewing Time You can use this menu to switch your television on or off automatically at a set time. Display the SUMMARY using the key on the remote control. Select the line marked Time. Validate using . The TIME menu is displayed. Sleep timer : Use the Left/Right keys to choose how long you wish to view before the television switches off. The television will switch off automatically at the end of this period. To cancel, set to 00:00.
Daily viewing Selecting Programmes For channels 1 to 9, press the number key corresponding to the desired channel on the remote control. For programme numbers higher than 10, press the key on the remote control: ”- -” appears on the screen. Now use the number keys on the remote control to enter first the tens digit then the units digit. If you press while ”- -” is already displayed, the display returns to 0- , in which case you can only select programmes 1 to 9.
Teletext Teletext Certain channels broadcast an electronic news page service with a range of different information services. The presentation and use of the Teletext differ from one country to another and from one programme to another (Teletext, Fastext or Toptext). Press the key to display the Teletext Index (page 100). A message will inform you if the programme you are watching has no Teletext service. To call up a page: Enter the 3 digits of the page number you wish to consult (for example, 150 or 170).
Other Connections Other Connections The CINCH Video and Audio sockets (1)* are provided to connect a VHS or 8mm camcorder. The S and CINCH Audio sockets (1)* are provided to connect a S-VHS or Hi-8 camcorder. To use the appliance you have connected, press the key several times until the AV3 programme is selected on the screen. When you switch off the connected appliance, the television will remain on the AV3 programme and you must use the numerical keys on the remote control to select a programme.
Euro-AV socket connections Euro-AV socket connections The socket is shown as viewed from the rear of the TV. Pin 20 (pin 17 return). RGB: Red Pin 15 (pin 13 return). Green Pin 11 (pin 9 return). Blue Pin 7 (pin 5 return).
Guarantee This guarantee is automatically effective from the date of purchase of the equipment. The appropriate sections should be completed by the dealer and purchaser at the time of purchase. This guarantee should then be retained by the purchaser and kept safely so that it may be referred to and produced if required should a claim be made during the guarantee period. Terms of Guarantee 1.