Lyra Micro Jukebox User’s Guide PDP2810
Important Information WARNING CAUTION To reduce the risk of fire or electric shock, do not expose this product or AC charger to rain or moisture. RISK OF ELECTRIC SHOCK DO NOT OPEN To reduce the risk of electric shock, do not remove cover (or back). No user serviceable parts inside. Refer servicing to qualified service personnel. This symbol indicates "dangerous voltage" inside the product that presents a risk of electric shock or personal injury.
Important Information Product Registration Please fill out the product registration card and return it immediately. Returning this card allows us to contact you if needed. Product Information Keep your sales receipt for proof of purchase to obtain warranty parts and service and attach it here. Record the serial number and model numbers — both numbers are located on the product. Model No. ___________________________ Serial No.
Table of Contents Important Information ........................................................................................................... i Warning ........................................................................................................................ ii Important Information ......................................................................................................... iii Before You Begin .................................................................................
Table of Contents Additional Features ............................................................................................................. 32 Program Play ............................................................................................................... 32 User Playlist ................................................................................................................. 33 Favourite List .......................................................................................
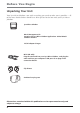
Before You Begin Unpacking Your Unit Your Lyra Micro Jukebox came with everything you need to make music portable — all of the items shown below should have been packed in the box with your Lyra Micro Jukebox. Lyra Micro Jukebox off stop rev fwd play on Music Management CD Contains the Lyra Micro Jukebox Applications & MusicMatch Jukebox software AC/DC adapter charger Mini USB cable Plug the small end into your Lyra Micro Jukebox , and plug the other end into your computer’s USB port.
Before You Begin Things to consider before you get started... Computer System Requirements • • • • • • • • • • Pentium 233MHz or higher (Pentium II 300 MHz or higher recommended) Macintosh iMac G3 or higher Windows® 98SE, Me, 2000, or XP Mac OS X Version 10.1.5 or higher Internet Explorer 4.0 or higher Internet access 4 MB free hard disk space for the software plus 0.5 MB for every minute of CD quality music you store on your hard drive.
Before You Begin Back up your data As with any device that has a hard drive or rotating magnetic media, you should back up the drive regularly. RCA and Thomson are not responsible for lost data. Important Battery Information • The battery used in this device may present a risk of fire or chemical burn if mistreated. Do not separately recharge, disassemble, heat above 100C (212F), or incinerate. • Battery replacement should only be made by trained technicians. • Do not attempt to open the unit.
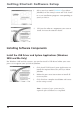
Getting Started: Software Setup The Music Management CD that came with your Lyra Micro Jukebox contains all of the necessary software components you need to make your Lyra Micro Jukebox work properly.
Getting Started: Software Setup 3. Select your Lyra model (PDP2810 (Lyra Micro Jukebox)) on the startup screen and click Install to access installation programs corresponding to your Lyra device. 4. Click on the software component you want to install. See next Section for details.
Getting Started: Software Setup Install System Applications (Windows 2000 or XP) 1. Click Install System Application to install applications that will help you better manage your Lyra Micro Jukebox. 2. Follow the on-screen instructions to install all necessary files. 3. Click Finish to complete installation and return to the startup screen.
Getting Started: Software Setup 2. The Welcome Screen appears, click Next to continue and show the License Agreement. 3. After you’ve read the license agreement, click Yes to accept (to continue, you must click Yes), or No to decline. If you click Yes, the User Registration Information screen appears. 4. Enter your name, e-mail address, postal code, country, year of birth and sex (male or female). Click Next to continue. Note: You must enter an e-mail address to proceed.
Getting Started: Software Setup 7. After installation is complete, click Finish. 8. If necessary, close the main setup screen. 9. Some computers might require you to restart your computer. If this is necessary, a dialog box will appear on the computer screen. Note: As with any device that has a hard drive, you must back up the drive. RCA and Thomson are not responsible for lost data. For more information on MusicMatch Jukebox, click Tutorials on the CD or go to www.musicmatch.com.
Getting Started: Software Setup Launch the MusicMatch software The MusicMatch icon found in your computer’s system tray. The MusicMatch software converts audio files to the mp3, mp3PRO and WMA format so you can play them on your Lyra Jukebox. 1. Remove the Music Management CD from your computer. 2. Start the MusicMatch Jukebox software (click on the MusicMatch icon in your system tray or on your desktop). 3.
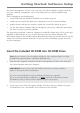
Getting Started: Software Setup Connecting Lyra Micro Jukebox to the Computer Connect the Lyra Micro Jukebox to your computer with the mini USB cable provided. Battery charging will commence as soon as the screen below appears. Turn on the unit by pressing the ON/PLAY button. The Lyra Micro Jukebox will appear as a Removal Disk drive letter. Note: It might take several seconds for the device (the Lyra Micro Jukebox) to be detected, especially in Windows 2000/XP.
Getting Started: Software Setup Transfer Files via MusicMatch Jukebox 1. Drag and drop desired tracks from the Music Library to the Playlist display. 2. From the menu area, select Files/Send to Portable Device to display the Portable Device Manager screen. Under the Attached Portable Devices item, select Lyra Micro Audio Player. 3. Select the playlist item and drag it to the Lyra Personal Audio Player. The songs in the playlist will now be automatically transferred to your Lyra Micro Jukebox.
Getting Started: Software Setup Transfer Files via Windows Explorer (Drag and Drop) If your Lyra Micro Jukebox isn’t already connected to your computer, connect the Lyra Micro Jukebox to the computer using the provided USB cable. From Windows Explorer, highlight all the files/folders you want to transfer to your Lyra Micro Jukebox and drag them to the drive letter that is associated with it.
Getting Started: Software Setup Disconnecting Your Lyra from the Computer (Windows 2000 or XP) From the System Tray, left click on the icon and select Unplug or eject hardware. The Unplug or Eject Hardware screen appears. Select the drive corresponding to your Lyra Micro player and click Stop. The Stop a Hardware device screen appears. Select the device to be stopped again for confirmation and click OK.
Getting Started: Software Setup System Tray Applications Profile New files that are transferred to your Lyra Micro Jukebox using Windows Explore (drag and drop) will not appear in the Navigation Menus until you profile the contents. If MusicMatch Jukebox was used to transfer files, profiling will be done automatically. 1. Connect your Lyra Micro Jukebox to the computer using the provided USB cable if it is not already connected. 2.
Getting Started: Software Setup Updating System File You can upgrade your Lyra Micro Jukebox or repair system files on your device if it becomes damaged by downloading the latest firmware from http://www.thomson-lyra.com. After you have downloaded the latest firmware, follow the steps below to update your system files. 1. Connect your Lyra Micro Jukebox to the computer using the provided USB cable if it is not already connected. 2.
Getting Started: Software Setup LyraSync Files and folders can be synchronized between your PC and your Lyra Micro Jukebox. 1. Connect your Lyra Micro Jukebox to the computer using the provided USB cable if it is not already connected. 2. 3. Right click on the Lyra icon in the System tray (bottom right hand corner of the computer screen and select LyraSync. The LyraSync Options screen appears.
Getting Started: Software Setup 4. Click Insert to select the paths of files and folders to synchronize between your PC and the Device. Click OK. 5. Select the desired LyraSync direction. • PC overwrites Device • Device overwrites PC • Synchronize PC and Device 6. 22 Click Synchronize to start.
Lyra Micro jukebox Overview of General Controls enter VOL 7 5 8 6 LOCK off stop 1 rev fwd 2 3 11 play MENU 9 on 4 10 1. 2. STOP - Stop playback / press and hold to turn unit off . Skip backward- Skip back to last track. Press and hold to search backward within the same track. 3. Skip forward - Skip to next track. Press and hold to search forward within the same tracks. 4. PLAY/PAUSE - Press and hold to turn the unit on; in stop mode, press to start playback and pause during playback. 5.
Lyra Micro jukebox Display Overview 2 3 AC/DC Ain’t No Fun 1 Back in Black Rock 1980 128k 0001/0037 EQ=Rock 01:33 10 11 7 4 5 9 8 6 1. Song title. 2. The lock icon is displayed when the key lock function is activated. This can be activated by pressing and holding the Lock button until the lock icon is displayed. To unlock, press and hold again until the lock icon is turned off. 3. The battery indicator shows battery level. - Battery full - Battery empty 4.
Lyra Micro jukebox Basic Operation The information in this section presumes you’ve successfully transferred files to your Lyra Jukebox, and you’re ready to play some music. If you need specific set-up information (downloading music, transferring files, installing software), go to page 15. If you want more detailed information about the Lyra Jukebox’s features, go to page 32.
Lyra Micro jukebox Playback Operation • Once the item that you want to play is on the screen, press Play/Pause to begin playback. This item can be an artist, an album, a playlist, or a song. Press again to pause playback. The unit will automatically power off after remaining in pause mode for more than the Power Save interval (Length of this Power Save interval can be modified in the Setting menu). • To scan backwards in the track that’s playing, press and hold the Previous button.
Lyra Micro jukebox Smart Tagging menu • If you want to add the entire album, press and hold the ENTER button to bring up the Smart Tagging Menu, scroll the ENTER button to highlight “Tag group”, then press the ENTER button again to confirm. • To add song to the Favourite List, press and hold the ENTER button to bring up the Smart Tagging Menu, scroll the ENTER button to highlight “Save to Favourites list”, then press the ENTER button again to confirm.
Lyra Micro jukebox Step-by-Step Example The following example illustrates (with more detail than the previous information) how you find the song you want to play. 1. These instructions presume you’ve already done the following: • Installed the MusicMatch Jukebox software and the Lyra mp3/Micro Jukebox profiler application (go to page 9 for detailed instructions).
Lyra Micro jukebox 4. Connect the clip phones to your Lyra Micro Jukebox (insert the end of the clip phones connector into the phones jack on the side of the Lyra). How to Use Your Clip Phones (The e.clipz) R L The right ear clip phone is labeled R while the left ear clip phone is labeled L. a. Pull the ear hook away from the ear pad slightly. You will hear a click sound. b. Slide the ear hook behind the ear with the ear pad on the front of the ear.
Lyra Micro jukebox Navigation Menu The following example illustrates steps to select and play songs in the Artist/Album category. 1. Highlight Artist/Album (press the ENTER button). 2. Press the Enter button (the Artist menu appears with the artists stored on your Lyra Jukebox listed in alphabetical order). TOP MENU Artist Album Title Genre Year ARTIST Artist 1 Artist 2 Artist 3 Artist 4 • To scroll up and down the Artist menu, slide the Scroll button.
Lyra Micro jukebox ALBUM 1 Song 1 Song 2 Song 3 Song 4 ARTIST 1 Highlight the desired song. • To play the song, press the Play/Pause button. • To go to the previous menu, press the MENU button. All songs... Album1 Album 2 Album 3 • The song information (Artist name, Album name, Title, Genre & Year) will show on the display during playback. • To end playback, press the Stop button.
Lyra Micro jukebox Additional Features Lyra Micro Jukebox has five System Playlist selections: Program play, Favourites list and User playlist. Note: Visit http://ww.thomson-lyra.com for updates on these features. Program Play You can play all the tagged items in the sequence of tagging. TOP MENU Artist Album Title Genre Year ARTIST Artist 1 Artist 2 Artist 3 Artist 4 1. In navigation mode, move the cursor to highlight the item to be selected.
Lyra Micro jukebox User Playlist * You can create a User PlayList using the Lyra Micro Jukebox. TOP MENU Artist Album Title Genre Year 1. In navigation mode, move the cursor to highlight the item to be selected. • To scroll up and down the display, scroll the ENTER buttom. • To enter the highlighted folder, press the Enter button.
Lyra Micro jukebox Favourite List During playback, you can select and place songs you like into the Favourite playlist. 34 1. • To add song to the Favourite List, press and hold the ENTER button to bring up the Smart Tagging Menu, scroll the ENTER button to highlight “Save to User Playlist”, then press the ENTER button again to confirm. 2. To de-select a song from the Favourite list, untag the song within Smart Tagging menu.
Lyra Micro jukebox View Playlists TOP MENU Playlists Audio Files All Files Setting Profiler 1. Scroll the ENTER button to highlight Playlists on the TOP MENU screen. 2. Press the ENTER button to show all the predefined system playlists. 3. Scroll the ENTER button to select the desired playlist to be viewed. 4. Press the ENTER button to view tagged items in the selected playlist. Note: All items added will be shown as individual songs.
Lyra Micro jukebox Pre-defined Playlists Pre-defined playlists are those playlists created on the PC and transferred to the Lyra Micro Jukebox. Refer to page 14 for details on creating Pre-defined Playlists and transferring them to your Lyra Micro Jukebox. Follow the steps under “View Playlists” to enter the Playlists menu. Playlists shown under the dividing line are the predefined playlists All Files * Your Lyra Micro Jukebox is a USB mass storage device that can be used to store any files.
Lyra Micro jukebox Additional Menu Settings TOP MENU Playlists Audio Files All Files Settings Profiler 1. Scroll the ENTER button to highlight Settings on the TOP MENU screen. 2. Press the Enter button to view the Settings Menu. SETTING MENU Shuffle Off Repeat Off DSP Flat Contrast 0 Backlight 10sec Shuffle When Shuffle is On, songs are played in random order. If shuffle is activated, the songs in the folder where playback begins are played randomly.
Lyra Micro jukebox TOP MENU Playlists Audio Files All Files Setting Profiler 3. Press the MENU button to return to the main menu. 4. Scroll the ENTER button to select the folder where you want Shuffle playback to begin. Press Play/Pause to begin playback. All songs/folders in the folder where playback begins will be played randomly. Shuffle Mode Off On 5. To de-select the Shuffle option, repeat steps 1 and 2 to select Shuffle Off.
Lyra Micro jukebox Repeat Three repeat options are available on the Lyra Micro Jukebox. • Repeat Off - No repeat option selected. • Repeat On - Plays songs in the current group/folder repeatedly. The repeat icon will show on the display. • Repeat One - Plays the current song repeatedly. The repeat one icon on the display. • Repeat All - Plays all songs in the current play mode repeatedly. The repeat all icon All will show on the display.
Lyra Micro jukebox Adjusting DSP Settings DSP Settings (Digital Signal Processor settings) adjust the various levels of the audio output for different types of songs. For example, the DSP setting for BASS makes the bass sounds more prominent. You can also personalize the levels via the EQ menu item. The default DSP setting for your Lyra Micro Jukebox is FLAT. SETTING MENU Shuffle Off Repeat Off DSP Flat Contrast 0 Backlight 10sec 1. Scroll the ENTER button to highlight DSP on the Settings screen. 2.
Lyra Micro jukebox Personalizing DSP Output (EQ menu item) Graphic EQ: enables you to personalize audio output settings. SETTING MENU Shuffle Off Repeat Off DSP Flat Contrast 0 Backlight 10sec DSP Settings Classical Raggae Hip-hop Funk Graphic EQ 1. Scroll the ENTER button to highlight DSP on the Settings screen. 2. Press the Enter button to view the DSP Menu. 3. From the DSP Menu, scroll the ENTER button to select Graphic EQ. 4. Press the Enter button to show the Graphic EQ display. 5.
Lyra Micro jukebox Audio Clips You can quickly navigate the audio contents of a file when activating Audio Clips function (only in STOP mode). Settings PowerSave SleepTimer AudioClips SmartEQ InstantOn OFF OFF OFF OFF OFF AUDIO CLIPS OFF ON OFFSET 0sec DURATION 5sec 1. Scroll the ENTER button to highlight Settings in the top menu. 2. Press ENTER to view options listed 3. Scroll the ENTER button to highlight AudioClips. 4.
Lyra Micro jukebox System Settings You can personalize the display settings. TOP MENU Playlists Audio Files All Files Setting Profiler 1. Scroll the ENTER button to highlight Settings in the top menu. 2. Press ENTER to view options listed 3. Scroll the ENTER button to highlight the setting (Contrast, Backlight, PowerSave or Sleep timer) you want to adjust. 4. Press the ENTER button to select among options in each setting. Contrast (between +5 to -5) Contrast Adj.
Lyra Micro jukebox Profiler The application will profile and sort supported audio files on your Lyra Micro Jukebox so you can sort and play them properly. Note: It is best to profile your contents on your PC after each transfer of music files. Profiling on the unit will take longer and may use up battery power. Note: Approximately 500 songs can be profiled on the Lyra Micro Jukebox. If the number of audio files exceed this limit, use your PC for profiling .
Lyra Micro jukebox Portable Hard Drive Capability Since Lyra Micro Jukebox has a 1.5-gigabyte hard drive, you can use it to transport files any files, not just music files. Some possible uses for this feature are as follows: • Create back-ups/archive files. • Connect to other computers - at work, for example. • Transport digital photo albums. • Transport files from one computer to another computer.
Additional Information Tips and Troubleshooting Problem: Player repeats same tracks or all tracks. • Repeat play is turned on. Press the MENU button to change the play mode. Problem: Audio distorted at high volume. • Select another DSP setting. • Turn down the volume. Problem: The audio tracks on my Lyra keep skipping or popping. • You’ll need to re-record the audio track – make sure you close all other applications on your PC when you record. Problem: Player turns itself off.
Additional Information FAQ (Frequently Asked Questions) Question: What is mp3? mp3 is an abbreviation for MPEG-1, Layer 3 Audio (MPEG = Motion Picture Experts Group). This is a digital sound encoding and compression process that was developed by the Fraunhofer Institut fur Integrierte Schaltungen and Thomson. mp3 is an international standard and is well suited for the transfer of high quality audio files over telephone or ISDN lines, and over the internet.
Additional Information Hard Disc • External Hard Disc Drive: When connected to a computer via USB, the Lyra Micro Jukebox is capable of storing any file type allowing the user a fast, convenient method of storing, retrieving, and transferring files. Including word processing files, presentations, spreadsheets and any other computer files. • Capacity: 1.5 GB • Rotational Speed: 4400 RPM • Connection: USB 2.
Additional Information PC Hardware Requirements – 233MHz or higher (Pentium II 300 MHz or higher recommended) – Windows® 98SE, Me, XP or 2000 – Internet Explorer 4.0 or better with Internet access – 32 MB RAM (64 MB recommended) – Free hard disk space (4 MB for the software plus 1 MB for every minute of CD quality audio that will be stored on the PC).
visit us at www.thomson-europe.com or www.thomson-lyra.com Please do not send any products to the address listed in this manual or on the carton. This will only add delays in service for your product. THOMSON 46, quai Alphonse Le Gallo 92648 Boulogne Cedex FRANCE (EN) www.thomson.