
- Thomson multimedia VCR User Manual

4
Installation
Auto Installation
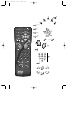
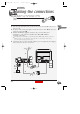
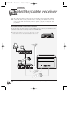
1 Switch on the television.
2 Set vcr/dvd/tv on the remote control to vcr a.
3 Switch on your video recorder with button
B (1).
ð When switching on the video recorder for the first time, a language selection menu
comes up. Should it not appear, press key menu (13).
4 With keys ▲ (7) and ▼ (9), select the language you prefer to display the menus on the
screen, then validate your choice with the key ok (11).
ð A welcoming message appears. Validate with ok (11) key.
5 The I
NSTALLATION menu appears. The Auto installation line has already been selected.
Validate with ok (11) key.
6 Press key ▲ (7) and ▼ (9), ) to select the country where you usually live, then validate
with the ok (11) key.
J
Your video recorder comes with the NexTView Link feature. This function simplifies the channel
installation procedure, dowloading them from a TV set fitted with the NexTView Link or similar
feature (Easy Link, Smart Link, Megalogic, etc.) and already installed. The channels downloaded in
this way preserve the same properties as your TV set (same number, same name, etc.).
ð If your TV set is fitted with the NexTView Link function or similar, the video
recorder automatically initiates channel download once you have selected the country.
You can view channel download on the video recorder display (Pr1, Pr2,...). On
completion of download, the video recorder switches over to standby. Channel
installation is finished.
ð When your television set is not fitted with the NexTView Link or any similar feature,
a message tells you that your video recorder is searching and storing the channels you
can receive in your region. Keep patient until a message informs you that your
channels are stored.
7 Press key ok (11) to confirm your channels.
8a If the proposed channel number matches the displayed picture, press ok (11) to pass on
to the next channel.
8bIf the proposed channel number does not correspond to the picture that you see, scroll
the channels with the
CC
(10) or
BB
(8) keys. Validate with ok (11) key.
9 When all the channels have been confirmed, press exit (12) to leave the menu.
New or encoded channel
J
To complete the installation of your video recorder when the automatic channel installation has not
stored all of the channels or when you wish to store a new channel.
1 With the menu (13) key, call up the SUMMARY menu.
2 Press the
▼
key to select the Installation line, then validate with ok (11) key.
3 The Manual set up line is already selected. Press ok (11).
ð The M
ANUAL SET UP menu comes up. The Standard line is selected.
4 Press C (10) or B (8) to choose the reception standard.
When the picture of a channel is of poor quality or encoded, try out the fine tuning feature.
Refer to New or encoded channel, step 7.
L
Initial Installation
J
As the video recorder has not been preset to receive channels from your region, you have to install
the channels yourself by carrying out the automatic channel installation procedure described
below.
r9-GB3-DAE 12/05/2000 18:38 Page 4