
- Thomson Multimedia Broadcast Solutions Operator's Manual Camcorder LDK 5430
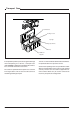
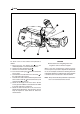

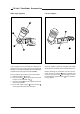
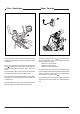
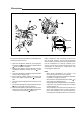
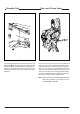
Table Of Contents
- Contents
- About this Manual
- Introduction
- Technology
- Smart Card
- Features
- Important Precautions
- Assembling the Units
- Transport Case
- Lens
- 1.5-inch Viewfinder
- 1.5-inch Viewfinder Accessories
- Other Viewfinders
- Zoom Controls
- Microphone
- Tripod Adapter Plate
- SuperXPander
- Shoulder Pad
- Rain and Off-use Cover
- Script board
- Top Light
- Configurations
- Basic Configurations
- Location of Controls and Functions
- Power Supply
- Security and Access
- Video Functions
- Monitoring Functions
- Viewfinder
- Viewfinder Indicators
- Audio
- Intercom
- Control Functions
- Auxilary Functions
- Shooting
- Using the Camera
- Standard settings
- Colour Bar
- Gain selection
- Optical filter selection
- Colour temperature selection
- Auto-White Balance
- Shooting Screens
- Exposure Time
- Using the Menu System
- Introduction
- Systems Menu
- Appendix
- System Menu Structure
- List of System Menu Functions
- List of Abbreviations
- Introduction
- Assembling the Units
- Configurations
- Location of Controls
- Shooting
- Using the Menu System
- Appendix

Assembling the Units Operator’s Manual LDK 200 Triax 2-5
1.5-inch Viewfinder Accessories
If you regularly use the viewfinder at a distance, for
example, when you use the camera in the hand-held
position, it is recommended that you fit the optionally
available wide angle eyepiece (LDK 5390/00).
To fit the wide angle eyepiece proceed as follows:
a. Hold the eyepiece
1
securely.
b. Press the button
2
below the eyepiece tube and
swing it free of the button clip
3
.
c. Press the button
4
above the eyepiece tube and
remove the eyepiece.
d. Fit the wide angle eyepiece
1
to the two clips
3
ensuring that they both click into place.
Wide angle eyepiece
A left eye adapter is optionally available (LDK 5390/
10) to allow the viewfinder to be used with the left eye.
Before mounting the viewfinder onto the camera,
attach the left eye adapter
1
to the viewfinder and
secure it using the screw
2
. Do not forget to mount
the microphone support bracket
3
at the end of the
left eye adapter.
Left eye adapter
1
1
2
2
3
3
4