Technicolor Delivery Technologies – www.technicolor.
1. B • • 2.
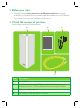
1. Before you start • Carefully read the Safety Instructions and Regulatory Notices document included in your package before continuing with the installation of your OWA3111. • Do not make any connections until instructed to do so! 2. Check the content of your box Your package contains the following items: A B C D Item Description A One OWA3111. B User Documentation (this Quick Setup Guide, Safety Instructions & Regulatory Notices…). Other additional documents may be included.
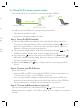
3. About the OWA3111 3.3. 3.1. Wi‑Fi Wi-Fi general The OWA3111 is equipped with: • Two 5 GHz Wi-Fi 6 (IEEE802.11ax) interfaces that provide superior transfer rates and are less sensitive to interference. • One 2.4 GHz Wi-Fi 6 (IEEE802.11ax) interface which allows you to connect Wi‑Fi devices that don’t support 5 GHz Wi‑Fi.
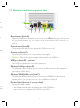
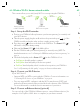
tes 3.3. Back panel and bottom product label A Wi‑Fi ce ints. 11 is king t B C D E F Reset button (item A) When the OWA3111 is powered on and you press the Reset you can restart or reset it. For more information, see “5.8. How to repair an unresponsive Wi-Fi extender” on page 13. Power button (item B) The power button allows you to power the OWA3111 on or off. Power port (item C) The power port allows you to connect the power supply.
4. Set up 4.1. The OWA3111 can be used: • As a wired Wi-Fi 6 home network enabler. You will use this scenario in case your Internet gateway and/or home network has no Wi-Fi, or Wi-Fi capabilities without Wi-Fi 6. For this scenario, see “4.1. Wired Wi‑Fi 6 home network enabler” on page 5. • As a wireless Wi-Fi 6 home network enabler. You will use this scenario in case your Internet gateway and/or home network has Wi-Fi, but no Wi-Fi 6 and/or EasyMesh. For this scenario, see “4.2.
4.1. Wired Wi‑Fi 6 home network enabler This scenario allows you to add Wi‑Fi 6 coverage using the OWA3111. Wi-Fi 6 has has Wi-Fi ent Fi esh your Ethernet cable Internet gateway OWA3111 Wi-Fi 6 access point Wi-Fi device You will connect the OWA3111 to your Internet gateway either: • Directly using an Ethernet cable. • Indirectly via a powerline adapter or similar. Step 1: Set up the Wi-Fi extender 1 Take the included Ethernet cable (this is the cable with the yellow connectors).
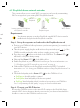
4.2. Wireless Wi‑Fi 6 home network enabler This scenario allows you to add (extra) Wi‑Fi 6 coverage using the OWA3111. Wi-Fi Internet gateway or Wi-Fi extender Wi-Fi 6 OWA3111 Wi-Fi 6 access point Wi-Fi device Step 1: Set up the Wi-Fi extender 1 Position your OWA3111 half-way between your Internet gateway (or extender) and your Wi‑Fi devices. ) of the 2 Take the power supply, plug the small end into the power inlet port ( OWA3111 and then plug the other end into a nearby power outlet.
4.3. EasyMesh home network extender This scenario allows you to extend Wi‑Fi coverage in your home by retransmitting Wi‑Fi messages from your existing Wi‑Fi EasyMesh network. Wi-Fi 6 EasyMesh ce ) and the ) ” on ee 111. for Internet gateway or OWA3111 as EasyMesh controller Wi-Fi 6 OWA3111 EasyMesh agent Wi-Fi device Requirements Your Internet gateway or another EasyMesh-capable Wi-Fi device must be enabled and configured as the EasyMesh controller.
Step 3: Connect your Ethernet devices (optional) You can use both of the OWA3111’s Ethernet ports to connect Ethernet devices (for example, a Set-Top Box, a NAS drive or computer) to your home network. 5. Tips and tricks 5.1. Making a wired connection between the OWA3111 and your Internet gateway 1 Take the included Ethernet cable (this is the cable with the yellow connectors). 2 Connect one end of the Ethernet cable to the blue Ethernet WAN ( ) port on the back of your OWA3111.
for r on our e n the or a ow or hen 5.3. Joining your OWA3111 with an existing EasyMesh network Requirements Make sure your OWA3111 isn’t joined already to an existing EasyMesh home network. Procedure 1 Briefly press the WPS ( ) button on the OWA3111. The Status LED ( ) on the OWA3111 starts blinking green. 2 Within two minutes, briefly press the WPS button on your Internet gateway or any Wi-Fi extender in the EasyMesh home network.
5.4. Pairing Wi‑Fi devices to your OWA3111 Connecting your Wi-Fi devices using WPS 1 Briefly press the WPS ( ) button on WPS the OWA3111. The Status LED ( ) on the OWA3111 starts blinking green. 2 Within two minutes, start WPS on your Wi‑Fi device. If your Wi‑Fi device is: Another Wi-Fi extender, briefly press its WPS button. Another type of device, consult the documentation of your device.
ous of Status LED If the OWA3111 has a Wi‑Fi connection to an Internet gateway, extender or repeater (with or without EasyMesh), the Status LED ( ) will provide information about the quality of the link between them. If the Status LED ( ) is: • Solid green: then the link quality is optimal. No further actions are needed. • Solid yellow: then the link quality is fair, but not optimal. Change the position of the OWA3111 until the LED turns green. • Solid red: then the link quality is bad.
3 The Wi-Fi extender web interface appears. By default, you are logged in as guest. This means that some items are hidden. To view all items, click Sign In and enter admin as user name and the ACCESS KEY printed on the label of your Wi-Fi extender as password. Note: If this is the first time that you sign in, the OWA3111 may offer you to change your password. 4 The Wi-Fi extender web interface appears with all settings available.
and h: (for your 5.8. How to repair an unresponsive Wi-Fi extender If at some point your Wi-Fi extender becomes unresponsive you can: • Force it to restart: After restarting the OWA3111 will return to normal operation with its last known working condition and configuration. • Reset it to factory defaults: The OWA3111 restarts with the factory default configuration. None of the Wi-Fi and EasyMesh settings, nor other configuration changes you made to the OWA3111 are preserved.
Federal Communication Commission Interference Statement This equipment has been tested and found to comply with the limits for a Class B digital device, pursuant to Part 15 of the FCC Rules. These limits are designed to provide reasonable protection against harmful interference in a residential installation. This equipment generates, uses and can radiate radio frequency energy and, if not installed and used in accordance with the instructions, may cause harmful interference to radio communications.