Multi Function Plain Paper FAX Model No. KX-F1150 OPERATING INSTRUCTIONS Please read these Operating Instructions before using the unit and save for future reference. FOR OPERATION ASSISTANCE, CALL 1-800-HELP-FAX ¡This product is designed for use in the United States of America, and may not operate in other countries. (See page 81 for more details.) ¡Este producto ha sido diseñado para su uso en los Estados Unidos de América, y puede no funcionar correctamente en otros países.
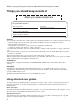
Thank you for purchasing the Panasonic Multi Function Plain Paper Facsimile. Things you should keep records of Attach your sales receipt here For your future reference Date of purchase Serial No.
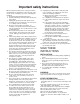
Important safety instructions When using this product, basic safety precautions should always be followed to reduce the risk of fire, electric shock, and injury to persons, including the following: 1. Read and understand all instructions. 2. Follow all warnings and instructions marked on this product. 3. Unplug this product from wall outlets before cleaning. Do not use liquid or aerosol cleaners. Use a damp cloth for cleaning. 4.
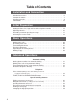
Table of Contents Installation and Connection Included accessories RRRRRRRRRRRRRRRRRRRRRRRR 6 Location of controls RRRRRRRRRRRRRRRRRRRRRRRRR 7 Installing your unit RRRRRRRRRRRRRRRRRRRRRRRRRR 9 Connections RRRRRRRRRRRRRRRRRRRRRRRRRRRR 13 Initial Preparation Setting the date, time, logo and facsimile telephone number RRRRRRR Adjusting volumes RRRRRRRRRRRRRRRRRRRRRRRRRR Recording a common greeting message RRRRRRRRRRRRRRRR Selecting the receive mode RRRRRRRRRRRRRRRRRRRRRR 14 16 17 18 Basic Operations Making
Installation and Connection Special receiving features 40 41 42 43 44 46 47 Initial Preparation Remote fax receiving (using an extension phone to receive a fax message) RRR Junk mail prohibitor (preventing the reception of unwanted fax documents) RRR Receiving with distinctive ring service RRRRRRRRRRRRRRRRR Signaling your pager that you have received a fax document RRRRRRR Receiving documents in memory RRRRRRRRRRRRRRRRRRR Receiving oversized documentsRRRRRRRRRRRRRRRRRRRR Film/paper save reception RRRRRRR
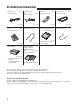
Included accessories Power cord RRR 1 pc. Part No. PQJA200Z Telephone line cord RRRRRR 1 pc. Handset RRRR 1 pc. Handset cord RR 1 pc. Part No. PQJXD0105Z Part No. PQJA212M Part No. PQJA59V (p. 13) (p. 13) (p. 13) (p. 13) Document feeder tray RRRRRR 1 pc. Document stacker 1 pc. Paper cassette R 1 pc. Paper stacker RR 1 pc. Part No. PQZSF1000M Part No. PFZE2F1050M (Cover) Part No. PFUS1031Z PFZEF1050M (Tray) Part No. PQKS10011Y2 (p. 12) (p. 12) Film cartridge RR 1 pc.
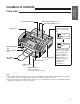
Installation and Connection Location of controls Front view Document entrance Document feeder tray (p. 12) Document guides (p. 21) Visual film indicator: shows the approximate amount of remaining film. Speaker (p. 16) FULL FILM INDICATOR FILM INDICATOR EMPT EM PTY Y Recording paper exit Paper cassette (p. 9) Document stacker (p. 12) Front lid open lever (p. 73, 74) Document exit Paper stacker (p. 10) Paper level slot: You can confirm the approximate amount of paper.
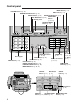
Control panel MENU button (p. 14) VOLUME buttons (p. 16) HELP button (p. 13) NEW MESSAGES button (p. 27) RESOLUTION button (p. 21) DIRECTORY MAIL BOX button (p. 52) button Display panel (p. 32, 33) ERASE button (p. 28) RECEIVE MODE button (p.
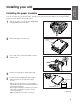
Installation and Connection Installing your unit Installing the paper cassette You can use letter size or legal size paper. The paper cassette can hold up to 250 sheets of 75 g/m2 (20 lb.) paper. Use 60 to 90 g/m2 (16 to 24 lb.) paper. 1 Remove the paper cassette by (A) slightly lifting and (B) pulling it out of the unit. B A 2 Remove the paper cassette cover. 3 Press down on the silver plate until it is locked under the tab.
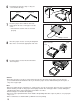
6 Push down the opposite edges so they are secured under the clips. Correct Incorrect Clip 7 Insert the paper stacker with the bent side facing up into the slots on the paper cassette cover. Slots —Check that the stacker ends are inserted properly. Paper stacker 8 Close the paper cassette cover by inserting both tabs on the cover into the appropriate side slots. Paper cassette cover Tab Slot 9 Insert the paper cassette into the unit until it clicks into place.
1 Installation and Connection Using legal size paper Press the button on the paper cassette to release the tray. Tray Button 2 3 Slide the tray so that “LGL¤” on the tray aligns with “⁄” on the cassette and lock into place. Tray Insert the paper by aligning the paper edges with the paper level slot side on the paper cassette. LGL LG A LT 4 R L A 4 LTR Paper level slot 4 Extend the paper stacker until it clicks into place.
Installing the document stacker Insert the document stacker with the bent side facing up into the slots on the main cabinet. Helpful hint: ¡To extend the document stacker, pull it out of the unit until it clicks into place. To save space, slide the document stacker into the unit until it clicks into place. Document stacker Installing the document feeder tray 1 2 Insert the three tray fins into the slots on the back of the unit (A).
Installation and Connection Connections Handset Power socket Handset cord Connect to LINE. Dialing mode switch: Set to TONE. —If you cannot dial, set to PULSE. DIALING MODE Power cord TONE PULSE Single telephone line (RJ11C) Telephone line cord surge ( Line protector ) Power outlet (120 V, 60 Hz) surge ) ( Power protector Note: ¡For additional equipment protection, we recommend the use of a surge protector. The following types are available; TELESPIKE BLOK MODEL TSB (TRIPPE MFG. CO.
Setting the date, time, logo and facsimile telephone number Before using your unit, program the correct date and time, your logo and your facsimile telephone number. This information will be printed on the top of each page transmitted from your unit. Setting the date and time 1 Press (MENU). 2 Press K, then @ A. 3 4 Press (START/SET). (MENU) SYSTEM SET UP SET DATE & TIME Enter the correct month/day/year/hour/minute by selecting each 2 digits. Then press j for AM or k for PM. Example: Aug.
How to enter characters and symbols The dial keypad and direct call stations can be used as character input keys and command keys. Pressing 0–9 and direct call station 1 will alternately select a character as shown below. Number of times Keys 2 6 7 12 13 2 3 4 5 6 7 8 9 10 11 12 1 [ ] { } + – / = , .
Setting your facsimile telephone number 1 2 3 4 5 6 Press (MENU). SYSTEM SET UP (MENU) Press K, then @ C. YOUR TEL NO. Press (START/SET). NO.= Enter your facsimile telephone number up to 20 digits. ¡The k button inserts a space and the j button a “+”. ¡If you make a mistake, return to step 1 and try again. Dial keypad (START/SET) Press (START/SET). Press (MENU). Adjusting volumes » Ringer volume: Press (VOLUME) (Z/Y) while the unit is idle. ¡3 levels (high/low/off) are available.
Recording a common greeting message Record a common greeting message before using the unit as an answering device and facsimile. The greeting message tells a caller that you are unable to answer, and allows them to leave a voice message or send a fax message. 1 2 Open the station key panel. 3 Press (REC). 4 After the long beep, speak clearly 20 cm (8 inches) away from microphone. (VOLUME) Station key panel Press (SELECT). ANS-GREETING ¡A long beep will sound.
Selecting the receive mode Receiving with the KX-F1150 The unit combines the functions of facsimile, answering system and telephone. To perform these functions, this unit has three types of receive modes; ANS/FAX, FAX and TEL. Select the desired mode by pressing (RECEIVE\MODE) repeatedly. ¡The arrow indicator in the display shows your selection. FILM/PAPER SAVE MAIL BOX CALLS ANS/ FAX TEL FAX (RECEIVE\MODE) Regardless of the mode that you select, you can always place calls and send faxes.
Receiving with your PC This feature allows you to operate any kind of reception on the PC. When the documents are received in the PC, you can confirm the received fax data on the screen. If necessary, you can print out the data. The pre-selected setting is ON. To change the setting, proceed as follows. Press (MENU). 2 Press K, then A D. 3 Press (START/SET). 4 5 6 Press (‹) or (›) to select the desired mode. SYSTEM SET UP (MENU) PC LINK MODE=ON [ÿŸ] Press (START/SET).
Making voice calls 1 2 Press (MONITOR) or lift the handset. 3 If using (MONITOR), when the other party answers your call, lift the handset and speak into it. 4 When finished, hang up the handset. Dial a phone number. ¡If you misdial, hang up and dial again. Dial keypad (MONITOR) Answering voice calls 1 2 When the unit rings, lift the handset. When finished, hang up the handset. Handset (HANDSET\MUTE) Voice muting Using this feature, the other party cannot hear you but you can hear them. 1.
Transmitting documents Documents you can send Maximum size Effective scanning area Scanned area 600 mm (235⁄8w) 128 mm (5w) Minimum size 128 mm (5w) Document weight Single sheet: 45 to 90 g/m2 (12 to 24 lb.) Multiple sheets: 60 to 75 g/m2 (16 to 20 lb.) 4 mm 208 mm (83⁄16w) 216 mm (81⁄2w) Paper width 216 mm (81⁄2w) Basic Operations Note: ¡Remove clips, staples or other similar fastening objects. ¡Check that ink, paste or correction fluid has dried. ¡Do not send the following types of documents.
Transmitting documents manually 1 2 3 Insert the documents FACE DOWN until a beep tone is heard. 4 5 When a fax tone is heard, press (START/SET). FACE DOWN Press (MONITOR) or lift the handset. Dial a phone number. ¡If you misdial, hang up and dial again. Hang up the handset if using it. Note: ¡If the other party answers your call, ask them to start to receive a fax, then press your (START/SET) button. ¡The unit will automatically end the transmission after the last sheet is transmitted.
Receiving documents Manual reception 1 2 When the unit rings, lift the handset to answer the call. 3 Replace the handset if using it. When: —document reception is required, —a slow beep is heard, or —no sound is heard, press (START/SET). ¡The unit will start reception. Basic Operations (START/SET) (STOP) Automatic reception Set the unit to the ANS/FAX or FAX mode by pressing (RECEIVE\MODE). ¡When a fax call comes in, the unit will automatically activate the fax function to receive documents.
Receiving fax documents only (FAX mode) When the receive mode is set to FAX, the unit will work only as a facsimile machine. The unit will automatically answer all calls and generate fax tones to the callers. Callers will hear fax tones and will only be able to transmit faxes. Setting the FAX mode ring count This feature determines the number of rings after which the unit answers a call in the FAX mode. You can choose from 1 to 4 rings.
Receiving fax documents and/or recording incoming voice messages automatically (ANS/FAX mode) When the receive mode is set to ANS/FAX, the unit will work as a facsimile machine and/or answering device. If a fax call is detected, the unit will automatically switch to the fax and receive fax documents. If a voice call is detected, the answering system will begin recording, then the caller can leave a voice message. Setting the voice message and document reception 1.
Changing the caller’s recording time You can choose from two lengths of recording times for incoming messages. VOX (unlimited): The unit records an incoming message for as long as the caller speaks (pre-selected setting). 1 MIN (1 minute): The unit will record each incoming message up to 1 minute. 1 Press (MENU). 2 Press K, then press ` 3 Press (START/SET). 4 5 6 Press (‹) or (›) to select the desired setting. (MENU) SYSTEM SET UP I. RECORDING TIME MODE=VOX [ÿŸ] Dial keypad Press (START/SET).
Operating the answering device Listening to messages in common memory When the unit receives voice messages, —the NEW MESSAGES indicator will flash, —the call counter will show the total number of recorded messages up to 99, and —a slow beep will sound if message alert (page 28) is set to ON. To listen to new messages (NEW\MESSAGES) CALLS (Call counter) Station key panel Press (NEW\MESSAGES). ¡At the end of the last message, 3 beeps will sound.
Erasing recorded messages To erase specific messages from memory (ERASE) Press (ERASE) while the message you want to erase is playing. To erase all messages in common memory 1 Press (ERASE) after listening to all of the messages. ICM ERASE OK? 2 Press (START/SET). ERASE COMPLETED ¡If this feature is not required, press (ERASE) or (STOP) instead of (START/SET).
Recording a memo message If the user is going out and wants to leave a private message for someone, they can record a voice memo in the unit. This can be played back later either directly or remotely. 1 2 3 4 Open the station key panel. (MAIL\BOX) Station key panel Press (MEMO/2WAY\REC). Immediately after the beep, speak clearly into the microphone. When finished, press (MEMO/2WAY\REC) again or (STOP).
Making a copy Any transmissible document can be copied (p. 21). 1 Insert the documents (up to 15 sheets) FACE DOWN until a beep tone is heard. FACE DOWN 2 Press (COPY). ¡The unit will start copying. Note: ¡When copying, the unit will automatically select FINE resolution if the resolution is set to STANDARD. ¡You can select the SUPER FINE or HALF TONE resolution (p. 21). ¡You can make or receive a voice call while making a copy. (STOP) (COPY) To stop copying Press (STOP).
Storing phone numbers for automatic dialing The unit’s memory allows you to use both one-touch dialing and speed dialing for rapid access to your most frequently dialed numbers. One-touch dialing: The unit is equipped with 13 direct call station keys, each of which is divided into an upper station and a lower station. Speed dialing: The unit is equipped with 100 additional dialing stations. These stations are assigned to 2-digit numbers (00–99).
Making voice calls using automatic dialing 1 2a Press (MONITOR) or lift the handset. (DIRECTORY) Using one-touch dialing: » For upper stations 1–13 Press the desired direct call station key. » For lower stations 14–26 Press (LOWER), then press the desired direct call station key. 2b 3 Using speed dialing: Press (DIRECTORY), then press K and the desired 2-digit number (00–99). If using (MONITOR), when the other party answers, lift the handset and speak into it.
Electronic telephone directory The station names stored in memory are automatically registered into the electronic telephone directory in alphabetical order. You can make a fax or voice call by selecting the desired station name on the display. If you wish to send a fax, insert the documents into the document feeder tray first. 1 Press (DIRECTORY). 2 Press the dial key in which the first initial of a station name is assigned (see the index table below).
Voice contact (talking to the caller during or after fax reception or transmission) You can have a voice conversation with the same call after the fax message is completed. This will save the extra expense and time of making another call. This feature works only when the other party's unit is equipped with a voice contact feature. Initiating voice contact 1 Press (MONITOR) while transmitting or receiving documents. VOICE STANDBY FACE DOWN ¡Your unit will call the other party with a distinctive ring.
TONE, FLASH and REDIAL/PAUSE buttons TONE button (FLASH) The TONE (*) button is used for a rotary pulse dial service and allows you to temporarily change from pulse to tone mode during a dialing operation. When you hang up, the unit will automatically return to pulse mode. FLASH button The FLASH button functions as the hookswitch on a regular phone. If you misdial or dial another phone number, press the FLASH button firmly.
Polling (retrieving fax documents) The polling feature allows you to retrieve a document from another compatible machine where you pay for the call as opposed to the document being sent to you, thereby saving the other party call charges. This unit can perform both receive and transmit polling. Receive polling To place a call and recover a document from another machine, follow the steps below.
Delayed transmission (sending a fax at a later time) Using a built-in clock, this unit can send documents automatically at a specific time. This allows you to take advantage of low-cost calling hours offered by some telephone companies. The delayed transmission can be reserved to take place up to 24 hours in advance. 11 12 Insert the documents FACE DOWN. 13 Press K, then press B 14 Press (START/SET). 15 Press (‹) or (›) to select “ON”. 16 Press (START/SET).
Sending documents overseas You may experience difficulty in transmitting documents overseas. This feature will make sending documents easier as the transmission speed is slowed down. Before starting the transmission procedure, follow the steps below. 1 Press (MENU). 2 Press K, then B 3 Press (START/SET). 4 Press (‹) or (›) to select “ON”. 5 6 Press (START/SET). (MENU) SYSTEM SET UP C. OVERSEAS MODE MODE=OFF MODE=ON [ÿŸ] [ÿŸ] Dial keypad (START/SET) (‹)/(›) Press (MENU).
Printing a cover page The unit can print a cover page to attach to documents you send. Sample of a cover page [FAX COVER PAGE] DATE : TO : NAME : FAX NO. : FROM : NAME : FAX NO. : Number of pages : (including cover page) Subject / Notes : To print a cover page, proceed as follows: (MENU) 1 Press (MENU) until the following is displayed. 2 Press K, then G. 3 Press (START/SET) to start printing. 4 Press (MENU).
Remote fax receiving (using an extension phone to receive a fax message) If you have an extension phone on the same line, it is possible to receive a manual fax message. Using the extension phone, dial the remote fax activation code. This saves you from going to the facsimile unit and pressing (START/SET). Important: ¡To activate this feature, use a touch tone telephone as the extension phone and press J J (pre-selected remote fax activation code) FIRMLY.
Junk mail prohibitor (preventing the reception of unwanted fax documents) This feature prevents reception from facsimile machines whose phone numbers are not stored in automatic dialing. Important: ¡This feature does not work when: —the receive mode of the unit is set to the TEL mode, —manual reception is performed, or —the other party does not program their facsimile/telephone number correctly.
Receiving with distinctive ring service This feature can only be used by those who subscribe to a distinctive ring pattern service from their telephone company. For more information on the availability of this service, please contact your telephone company before setting this feature on your unit. The distinctive ring service gives you up to 3 phone numbers on a single telephone line, each having a different ringing pattern.
Signaling your pager that you have received a fax document This feature allows your unit to call your pager automatically each time your unit receives a fax message. 1 Press (MENU). 2 Press K, then G@. 3 Press (START/SET). 4 Press (‹) or (›) to select “ON”. (MENU) SYSTEM SET UP FAX PAGER MODE=OFF MODE=ON [ÿŸ] [ÿŸ] ¡If this feature is not required, select “OFF”. 5 Press (START/SET). 6 Enter your pager phone number. If necessary, press (REDIAL/PAUSE) twice.
Receiving documents in memory The unit will temporarily store incoming fax documents in memory when: —the recording paper or film runs out, —a paper jam occurs, —the film cartridge is not installed properly, or —the top cover is open. Printing documents from memory When documents are received in memory, the unit will alert you with beep tones and alternately show “FAX IN MEMORY” and the applicable following message(s) on the display which explain(s) the reason for memory reception.
Setting memory reception alert When received documents are stored into memory, the unit will alert you with beep tones. If you hear slow beeps, clear the printing problem or supply paper to print the stored documents. The beep sound will stop. 1 Press (MENU). 2 Press K, then D 3 Press (START/SET). 4 5 6 Press (‹) or (›) to select the desired mode. (MENU) SYSTEM SET UP D. RECEIVE ALERT MODE=ON [ÿŸ] Dial keypad (START/SET) (‹)/(›) Press (START/SET). Press (MENU).
Receiving oversized documents When the size of the documents sent by the other party is as large as, or larger than the recording paper, the unit can reduce each page of the document and print it out on the recording paper at a suitable reduction rate. The reduction rate is determined by a combination of the size of the recording paper and received document.
Film/paper save reception Use this feature if you wish to save film and recording paper when receiving two or more faxed pages. When this feature is set, the unit will reduce the received document to half its length and print two pages of the document on one page. A boundary will be printed out between the document pages.
Making an enlarged copy Use this feature to enlarge a document to twice the length of the paper that is being used in the paper cassette. This feature is used to reverse the film/paper save function (p. 47). Sample of enlarged copy: When you want to enlarge the top half of the document; Original document Top edge Top half Enlarged copy ABC ABC Bottom half DEF Insert the document into the unit from the top edge side FACE DOWN. To make an enlarged copy: 1 2 Insert the documents FACE DOWN.
Making a reduced copy When you copy documents that are longer than the recording paper, the unit can reduce the original document and print it out on one page by programming a suitable reduction rate. The reduction rate is determined by a combination of the size of recording paper and original document.
Voice mailbox (how callers can leave you private messages) The unit has three mailbox memories. Your caller can leave a message in a specific mailbox. Only the person who knows the password can retrieve the message from the mailbox. If your caller does not specify a mailbox, their message will be recorded in common memory and anyone can retrieve the message from memory.
Recording a mailbox greeting message Record a personal greeting message for each mailbox. This will be played back to the caller who selected the specific mailbox. Helpful hints: ¡The maximum length of each greeting message is 16 seconds. We recommend you record a brief greeting message to leave more time for incoming messages. ¡If you do not record a mailbox greeting message, incoming messages will be recorded after the long beep. 1 2 Open the station key panel.
How incoming messages are recorded in a mailbox In order to leave a message in a mailbox, each owner of a mailbox must inform their callers of their mailbox number in advance and set the unit to the ANS/FAX mode. 1 A caller calls your unit (only from a touch tone telephone). 2 They press *, then the desired mailbox number (1–3). 3 They leave a message in the mailbox. ¡The common greeting message will play. ¡The personal greeting message will play, followed by a long beep.
Erasing recorded messages in a mailbox Erasing a specific message in a mailbox (ERASE) Press (ERASE) while the message you want to erase is playing. Erasing all messages in a mailbox 1 Press (MAIL\BOX) repeatedly until the desired mailbox number is displayed. Example: Mailbox 1 is selected. 2 Press (ERASE). 3 Press (START/SET).
Signaling your pager that a voice message has been recorded This feature allows your unit to call your pager automatically each time an incoming voice message is recorded. You can set the pager number for each memory (common, mailbox 1, 2 and 3). This feature is only effective with an automatic pager. 1 Press (MENU). 2 For common pager alert, press K, then F@. SYSTEM SET UP (MENU) COMMON PAGER For mailbox 1 pager alert, press K, then FA. MAIL BOX1 PAGER For mailbox 2 pager alert, press K, then FB.
Remote operation from a touch tone phone The following operations are available from a remote location with a touch tone telephone. Set the unit to the ANS/FAX mode before going out.
Programming the remote operation ID The remote operation ID is used to access your answering device and listen to your messages in common memory. Choose any 3-digit number except a number using digits 0 or 7. Make sure that the first 2-digits of the remote operation ID are different from the junk mail prohibitor ID (p. 41) and the mailbox password (p. 50). 1 Press (MENU). 2 Press K, then A@. 3 Press (START/SET). 4 5 6 Enter the desired number.
Listening to messages in common memory 1 2 Call your unit. Press the remote operation ID during common greeting playback. ¡A long beep and (a) short beep(s) will sound. The number of short beeps indicates the number of new recorded messages. Short beeps will sound up to 8 times even if 9 or more calls are recorded. 3 Press D to listen to new recorded messages. OR Press E or wait for 4 seconds to listen to all of the recorded messages.
During playback » Repeating a message Press A to start playing the previous message. » Skipping a message Press B to start playing the next message. Erasing messages from memory » Erasing a specific message from memory Press J D when the message you want to erase is being played. ¡The unit will erase the message being played back. ¡A long beep followed by three short beeps will sound. Then the unit will continue with the next message.
» Re-recording greeting messages You can change the contents of a greeting message from a remote location. 1. Call your unit. 2. For the common greeting message: Enter your remote operation ID. For the mailbox greeting message: Press J and the desired mailbox number (A, B or C). Then enter the mailbox password. 3. Press G to start recording. ¡A long beep will sound. 4. Speak immediately after the long beep (up to 16 seconds).
Changing the display contrast Use this feature to adjust the brightness of the display. The following choices are available. NORMAL: (Pre-selected setting) LIGHT: Used when the display contrast is too dark. DARKER: Used when the display contrast is too light. 1 Press (MENU). 2 Press K, then CI. 3 Press (START/SET). 4 5 6 Press (‹) or (›) to select the desired mode. (MENU) SYSTEM SET UP LCD CONTRAST MODE=NORMAL[ÿŸ] Dial keypad Press (START/SET). (START/SET) (‹)/(›) Press (MENU).
Summary of user programmable features Basic features Code Feature Selection Initial setting mm/dd/yy hh:mm Page #01 SET DATE & TIME 14 #02 YOUR LOGO 14 #03 YOUR TELEPHONE NUMBER 16 #04 PRINT TRANSMISSION REPORT #07 FAX RING COUNT #08 ANS/FAX RING COUNT #09 RECORDING TIME #10 REMOTE ANS ID #14 PC LINK ERROR, ON, OFF OFF 63 1, 2, 3, 4 rings 1 ring 24 1, 2, 3, 4, TOLL SAVER, RINGER OFF 1 ring 25 VOX/1 MIN VOX 26 111 56 ON, OFF ON 19 Selection Initial setting Page
Printing reports and lists You can print out the following reports and lists from your unit. Feature list—provides you with the current settings of the basic and advanced programming features (p. 61). Telephone number list—provides you with the phone numbers and station names which are stored in automatic dialing. Phone number codes are shown below. P: A pause has been entered. F: A flash has been entered. [ ]: A secret phone number has been entered. (The telephone number is not printed.
Setting the transmission report printing One of the following choices is available. ERROR: The transmission report will print out only when fax transmission fails. ON: The report will always print out, indicating whether fax transmission is successful or not. OFF: The report will not print (pre-selected setting). 1 Press (MENU). 2 Press K, then @D. 3 Press (START/SET). 4 5 6 Press (‹) or (›) to select the desired mode.
Sample of journal report JOURNAL NO. 01 02 03 04 05 OTHER FACSIMILE 1234567 9998765 2121444 555556677 +987 1234 START TIME Jan. 21 02:14PM Jan. 21 02:17PM Jan. 21 02:18PM Jan. 22 10:35AM Jan. 22 11:02AM USAGE TIME MODE 00'25 TX 00'38 TX 00'28 RX 00'58 TX 01'50 TX RX Jan. 25 1996 05:22PM PAGES RESULT 01 OK 02 OK 01 OK 03 COMMUNICATION ERROR 05 OK 03 OK Communication result (see below.) Sample of transmission report UCODE (43) Error code (for service personnel use only) XMT REPORT NO.
Error messages on the display If the unit detects a problem, the following messages will appear on the display. ERROR MESSAGE CALL SERVICE CHECK CASSETTE CHECK COVER CHECK DOCUMENT CHECK FILM CHECK MEMORY FAX IN MEMORY FAX MEMORY FULL FILM EMPTY LOADING FILM NO ANS GREETING NO RESPONSE PAPER JAMMED PC FAIL OR BUSY POLLING ERROR REDIAL TIME OUT REMOVE DOCUMENT TRANSMIT ERROR UNIT OVERHEATED ¡The recording paper is jammed near the paper cassette. Clear the jammed paper (p. 72). ¡The top cover is open.
Before requesting help General PROBLEM CAUSE & REMEDY I cannot make and receive calls. ¡The power cord or telephone line cord is not connected. Confirm the connection (p. 13). I cannot make calls. ¡The dialing mode setting is wrong. Check the selector (p. 13). The unit does not work. ¡Disconnect the unit from the telephone line and connect to a known working phone. If the known working phone operates properly, call your service personnel to have the unit repaired.
Fax Reception PROBLEM CAUSE & REMEDY I cannot receive documents automatically. ¡The receive mode is set to TEL. Set the receive mode to ANS/FAX or FAX. ¡The time to answer the call may be too long. Decrease the number of rings (p. 24, 25). ¡The greeting message may be too long. Shorten the message or ask the other party to press ** and then start transmission. ¡The junk mail prohibitor is set to ON (p. 41). Recording image is faint. ¡The sender transmitted a faint document.
Error codes on your PC when using Multi Function Center software If an error occurred when functioning the printer or scanner using Multi Function Center software on your PC, the error code is shown in the 8 digits on the Status Log window as follows. The meaning of each digit of the error code is different according to the function you are using. If an error occurred using the printer function, see below. When using the scanner function, see page 69. » Error code for “Printer not ready.
» Error code for “Scanner not ready.” status: 0 0 0 0 0 Document feed: When this digit is “1”, the document is not fed into the unit properly. Reinsert the document. Document jam: When this digit is “1”, the document is jammed. Remove the jammed document (p. 73). Cover open: When this digit is “1”, the top cover is open. Close it. For example: If “1” appears in the 8 digit code, see the corresponding instructions and solve the problem. e.g. When “Scanner not ready.
If a power failure occurs... When a power failure occurs, note the following: ¡This unit does not function during a power failure. ¡The memory contents will not be erased. ¡Transmission and reception will be interrupted. Check the transaction by printing a journal report. ¡If fax documents are stored in memory, they will be lost. When power is restored, a power-down report will be printed out stating the contents in memory that have been erased.
Clearing a recording paper jam If a recording paper jams, the display will show one of the two messages below. Remove the jammed recording paper following either message. PAPER JAMMED A recording paper jammed near the head unit. See below. CHECK CASSETTE A recording paper jammed near the paper cassette. See page 72. When paper has jammed near the head unit 1 2 Open the top cover. Top cover Head unit Press both green buttons marked “PUSH” and lift up the head unit.
7 8 Press the head unit down firmly until it clicks into place. BACK Close the top cover securely by pushing down on both sides. Press firmly to lock 9 Open the paper cassette cover, remove the paper, press down the silver plate until it is locked under the tab and insert the paper into the paper cassette (see steps 2–6 on pages 9 and 10 for details). 10 Insert the paper cassette into the unit until it clicks into place.
Clearing a document jam If the unit does not release an original document during feeding, remove it as shown below. 1 2 3 Slide the front lid open lever towards the front to open the front lid. Front lid Remove the jammed document carefully. Close the lid securely by pushing down on both sides. Front lid open lever Adjusting the feeder pressure If misfeeding of documents occurs frequently, adjust the feeder pressure as shown below.
Cleaning the inside of the unit Cleaning the document feeder unit If misfeeding occurs frequently or dirty patterns or black bands appear on a copied or transmitted document, clean the feeder rollers, sub roller, rubber flap, white plate and glass. 1 2 3 Disconnect the power cord and the telephone line cord. 4 Clean the rubber flap with a cotton swab moistened with isopropyl rubbing alcohol, and let it dry thoroughly. 5 6 7 Clean the white plate and the glass with a dry soft cloth.
Replacing the film or film cartridge When the unit detects the end of the film, the following message will be displayed. FILM EMPTY Replace the film or film cartridge with a new one. To order replacement parts, see page 80. 1 2 Open the top cover. Top cover Head unit Press both green buttons marked “PUSH” and lift up the head unit. PUSH Green button 3 4 5 Remove the film cartridge. ¡If you purchased a film cartridge (Model no. KX-FA132) for replacement, skip to step 11.
18 Insert the film into the cartridge so that the arrow on the open cartridge points in the same direction as the arrows on the film. ¡If you insert a film which is partially used, insert the unused spool of the film in the “FILM SUPPLY” mark side of the cartridge. Unused spool ¡Insert the film Incorrect cores correctly referring to the Correct illustration to the right. 19 FILM SUPPLY Roll the blue leader of the film by winding the core gears until the leader is no longer visible.
FCC information If required by the telephone company, inform them of the following. ¡FCC Registration No.: (found on the rear side of the unit) ¡Ringer Equivalence No.: (found on the rear side of the unit) ¡The particular telephone line to which the equipment is connected. This unit must not be connected to a coin operated line. If you are on a party line, check with your local telephone company.
Matsushita Consumer Electronics Company, Division of Matsushita Electric Corporation of America One Panasonic Way, Secaucus, New Jersey 07094 Panasonic Sales Company Division of Matsushita Electric of Puerto Rico, Inc. Ave. 65 de Infantería, Km. 9.
Service center directory OPERATION ASSISTANCE¡FAX ADVANTAGE PROGRAM DIAL TOLL FREE: 1-800-HELP-FAX (9:00am–8:00pm Monday–Friday, EST) PRODUCT INFORMATION¡LITERATURE REQUESTS¡DEALER LOCATIONS Customer Satisfaction Center 2F-3, One Panasonic Way, Secaucus, NJ 07094 (Headquarters) 201-348-9090 (9:00am–8:00pm Monday–Friday, EST) ACCESSORY PURCHASES 1-800-332-5368 (Consumer orders only) Matsushita Services Company Accessory Order Office, 20421-84th Avenue South Kent, WA 98032 (6:00am–6:00pm Monday–Friday, 6:00
Information for users For product service ¡Service centers are listed on page 79. ¡Call toll free 1-800-545-2672 for the location of an authorized service center. When you ship the product ¡Carefully pack your unit, preferably in the original carton. ¡Attach a letter, detailing the symptom or problem, to the outside of the carton. ¡Send the unit to an authorized service center, prepaid and adequately insured.
Specifications » General 1. Applicable Lines: 2. Document Size: 3. Effective Scanning Width: 4. Recording Paper Size: 5. Effective Printing Width: 6. Transmission Time: 7. Memory Capacity: 8. Scanning Density: 9. 10. 11. 12. 13. 14. 15. 16. 17. Halftone Level: Scanner Type: Printer Type: Data Compression System: Modem Speed: Operating Environment: ∑ W∑ ∑ D): Dimensions (H∑ Mass (Weight): Power Consumption: 18. Power Supply: 19. Total Recording Time: Public Switched Telephone Network Max.
» Interface pin The signals are assigned to the interface pins of the KX-F1150 as follows. 1 2 3 4 5 6 7 8 9 10 11 12 13 14 15 16 17 18 19 20 21 22 23 24 25 Signal Name Pin No. D-SUB 25 pin Signal Direction Transmitted data TD 2 DTE→DCE Used for transmitted data. Received data RD 3 DTE←DCE Used for received data. Request to send RTS 4 DTE→DCE Signal for data transmission request from your PC (DTE) to the modem (DCE). Also used for flow control.
Speed dialer list Station No. Name/Phone No. Station No. Name/Phone No. Station No. 00 34 68 01 35 69 02 36 70 03 37 71 04 38 72 05 39 73 06 40 74 07 41 75 08 42 76 09 43 77 10 44 78 11 45 79 12 46 80 13 47 81 14 48 82 15 49 83 16 50 84 17 51 85 18 52 86 19 53 87 20 54 88 21 55 89 22 56 90 23 57 91 24 58 92 25 59 93 26 60 94 27 61 95 28 62 96 29 63 97 30 64 98 31 65 99 32 66 33 67 Name/Phone No.
Speed dialer list Station No. Name/Phone No. Station No. Name/Phone No. Station No. 00 34 68 01 35 69 02 36 70 03 37 71 04 38 72 05 39 73 06 40 74 07 41 75 08 42 76 09 43 77 10 44 78 11 45 79 12 46 80 13 47 81 14 48 82 15 49 83 16 50 84 17 51 85 18 52 86 19 53 87 20 54 88 21 55 89 22 56 90 23 57 91 24 58 92 25 59 93 26 60 94 27 61 95 28 62 96 29 63 97 30 64 98 31 65 99 32 66 33 67 84 Name/Phone No.
Index A ALL MESSAGES button RRRRRRRR27 ANS/FAX mode RRRRRRRRRR18, 25 ANS/FAX ring count RRRRRRRRRR25 Answering device volume RRRRRRR16 Automatic dialing RRRRRRRRR31, 32 C CHECK button RRRRRRRRRR17, 51 Cleaning RRRRRRRRRRRRRRR74 COPY button RRRRRRRRRRR30, 48 Copy reduction mode RRRRRRRRR49 N NEW MESSAGES button RRRRRRR27 O One-touch dialing RRRRRRRRR31, 32 Overseas transmission mode RRRRRR38 Date and time RRRRRRRRRRRR14 Delayed transmission RRRRRRRRR37 DELETE key RRRRRRRRRRRRR15 Dialing mode RRRRRRRR
Panasonic KX-F1150 Proof of Purchase Panasonic FAX ADVANTAGE PROGRAM W e are proud to present the Panasonic Fax Advantage Program.