DVD Stereo System Operating Instructions Model No. SC-DV290 The illustration shows the model for the United Kingdom, Continental Europe and Russia. Region number supported by this player Region numbers are allocated to DVD players and software according to where they are sold. For the United Kingdom and Continental Europe pThe region number of this player is “2”. pThe player will play DVD-Video marked with labels containing “2” or “ALL”. Example: 2 ALL 2 3 5 For Australia and N.Z.
Dear customer Supplied accessories Thank you for purchasing this product. For optimum performance and safety, please read these instructions carefully. Before use Unless otherwise indicated, illustrations in these operating instructions are of the system for the United Kingdom, Continental Europe and Russia.
Table of contents Safety precautions c3 c3 c3 c4 c5 Simple setup . . . . . . . . . . . . . . . . . . . . . . . . . . . . . . . . . . 6 Control guide and preparatory steps Front panel controls . . . . . . . . . . . . . . . . . . . . . . . . . . . . . . . Turning DEMO off . . . . . . . . . . . . . . . . . . . . . . . . . . . . . . . . . The remote control . . . . . . . . . . . . . . . . . . . . . . . . . . . . . . . . Setting the time . . . . . . . . . . . . . . . . . . . . . . . . . . . . . . . . . . .
Caution for AC Mains Lead (For United Kingdom) (“EB” area code model only) Before use For your safety, please read the following text carefully. This appliance is supplied with a moulded three pin mains plug for your safety and convenience. A 5-ampere fuse is fitted in this plug. Should the fuse need to be replaced please ensure that the replacement fuse has a rating of 5-ampere and that it is approved by ASTA or BSI to BS1362. Check for the ASTA mark P or the BSI mark R on the body of the fuse.
Disc information [RAM] DVD-Audio [DVD-A] DVD-Video [DVD-V] DVD-R Video CD [VCD] CD [CD] Playing DVDs and Video CDs The producer of these discs can control how they are played so you may not always be able to control play as described in these operating instructions (for example if the play time is not displayed or if a Video CD has menus). Read the disc’s instructions carefully.
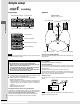
Simple setup STEP 1 Locating Components DVD/Video CD/CD changer Speakers Optimum location Distance: ANBNCNDNE Sound processor Front speaker (left) Front speaker (right) Simple setup Center speaker Stereo cassette deck Stereo tuner/amplifier A B C Sound processor Stereo tuner/amplifier E D DVD/Video CD/CD changer Stereo cassette deck Surround speaker (left) Note Do not put the DVD/Video CD/CD changer on the top of the tuner/amplifier. Heat can damage your discs.
Speaker leads Do not connect the AC mains lead until all other connections are complete. Center speaker Surround and center speakers Surround speaker (right) R CENTER Surround speaker (left) L SURROUND Right Front speaker Connect the leads to the terminals of the same colour. LF and HF stand for low frequency and high frequency. Connect the left (L) side in the same way. Note pNever short-circuit positive (T) and negative (U) speaker wires.
3 STEP Antennas FM indoor antenna For Australia and N.Z. Fix the other end of the antenna where reception is best. Twist the vinyl tip and pull off. Simple setup Adhesive tape AM indoor antenna Keep loose antenna cord away from other wires and cords. Twist the vinyl tip and pull off. 4 STEP Flat cables Connecting Keep the cables as flat as possible against the back of the unit. Connect the connectors to the terminals of the same colour. Incorrect connection can damage the unit.
5 STEP Video cords Video cord VIDEO OUT Simple setup To your television For the United Kingdom, Continental Europe and Russia For Australia and N.Z. Use the RCAJ adaptor (included) if your television has a 21-pin SCART terminal. You do not have to connect anything to the AUDIO terminals. VIDEO OUT Use this connection if you have connected a VCR or Laser Disc player (➡ page 44 [B]–[D]). This enables you to control the video and audio from this equipment with [INPUT SELECTOR].
A Front panel controls 12 3 45 6 7 8 @ A 9: DIGITAL S.WOOFER VOLUME ê ê /I FF UP PLAY/ REC CLOCK/ TIMER DEMO FM AUTO/ MONO INPUT SELECTOR TUNER/BAND MIC EFFECT LOUNGE CHORUS KEY CON ECHO DOWN TUNING TUNING MODE PHONES SET KARAOKE V.
d e c SUPER 3D AI EQ MULTI JOG DISPLAY MODE ëPRO LOGIC SUPER SURROUND SUPER SOUND EQ CENTER FOCUS VIRTUAL REAR MULTI REAR SURROUND SURROUND SEAT POSITION OFF/ON f g hij k A Sound processor x 7 8 9 : ; < = > ? B l 1 m nf o p q sr ut 9 vw x C ê SUBTITLE SETUP SLEEP POSITION MEMORY GROUP 1 2 3 DISC 4 5 6 S10/-/-- 7 8 9 0 ëPRO LOGIC CH SELECT SUPER SRND KARAOKE KARAOKE EFFECT TEST TOP MENU MENU SUPER SOUND EQ EQ DIRECT NAVIGATOR PLAY LIST ENTER S.
The remote control A 1 R6, AA, UM-3 - + + - 2 A Batteries x pInsert so the poles (K and L) match those in the remote control. pDo not use rechargeable type batteries. Do not; pmix old and new batteries. puse different types at the same time. pheat or expose to flame. ptake apart or short circuit. pattempt to recharge alkaline or manganese batteries. puse batteries if the covering has been peeled off. pkeep together with metallic objects such as necklaces.
QUICK SETUP ê 1 SUBTITLE SETUP 3,7 SLEEP POSITION MEMORY GROUP 1 2 3 DISC 4 5 6 S10/-/-- 7 8 9 0 Remote control only ëPRO LOGIC CH SELECT SUPER SRND TEST TOP MENU MENU SUPER SOUND EQ EQ DIRECT NAVIGATOR PLAY LIST ENTER S. 3D AI EQ AV EFFECT DISPLAY RETURN 4-7 RETURN VCR(EXT)/ VDP(AUX) TAPE/ DECK 1/ 2 DVD TUNER/ BAND CANCEL PLAY MODE 2/; º 1 DIGITAL AUDIO S.
Discs [RAM] [DVD-A] [DVD-V] [VCD] [CD] [WMA] [MP3] [JPEG] 4 Preparation pPress [¦/I] to turn on the unit. pTurn on the television and select the appropriate video input on the television to suit the connections for the unit. 3 2 1 Press [DVD] to select “DVD” as the source. If the disc contains both audio data (WMA and MP3) and JPEG, check “Mixed Disc—Audio & Stills” setting in the SETUP menu (➡ page 46). Select “Audio (MP3/WMA)” or “Stills (JPEG)” .
45 , Discs Skip function [RAM] [DVD-A] [DVD-V] [VCD] [CD] [WMA] [MP3] [JPEG] While playing or paused On the remote control Press [SKIP ( or )]. On the changer Press [ ] or [ ]. ; [JPEG] Remote control only Press [ ] or [ ] for group skip. Each press increases the number of skips.
Discs Remote control only ê POSITION MEMORY SUBTITLE SETUP SLEEP POSITION MEMORY GROUP GROUP 1 2 3 DISC 4 5 6 S10/-/-- 8 7 9 0 ëPRO LOGIC CH SELECT SUPER SRND [RAM] [DVD-A] [DVD-V] [VCD] [CD] [WMA] [MP3] [JPEG] Numbered buttons TEST TOP MENU MENU SUPER SOUND EQ EQ DIRECT NAVIGATOR PLAY LIST ENTER ENTER S. 3D AI EQ AV EFFECT DISPLAY RETURN VCR(EXT)/ VDP(AUX) TAPE/ DECK 1/ 2 DVD TUNER/ BAND CANCEL PLAY MODE 2/; º 1 DIGITAL AUDIO S.
Discs ê SUBTITLE SETUP SLEEP POSITION MEMORY GROUP SUBTITLE 1 2 3 DISC 4 5 6 S10/-/-- 7 8 9 0 [RAM] [DVD-A] [DVD-V] (Discs with multiple soundtracks) Remote control only ëPRO LOGIC CH SELECT SUPER SRND During play TEST TOP MENU MENU 2, 1, 3, 4 PLAY LIST ENTER S. 3D AI EQ AV EFFECT DISPLAY RETURN VCR(EXT)/ VDP(AUX) TAPE/ DECK 1/ 2 DVD TUNER/ BAND CANCEL PLAY MODE 2/; º 1 DIGITAL AUDIO S.WOOFER MIX 2CH AUDIO Press [AUDIO].
Discs ê SUBTITLE Remote control only SETUP SLEEP POSITION MEMORY GROUP 1 2 3 DISC 4 5 6 S10/-/-- 7 8 9 0 Marking places to play again [RAM] [DVD-A] [DVD-V] [VCD] [CD] [WMA] [MP3] [JPEG] You can mark a position so you can return to it easily at a later time. 1 ëPRO LOGIC CH SELECT SUPER SRND TEST TOP MENU SUPER SOUND EQ EQ DIRECT NAVIGATOR PLAY LIST ENTER S.
Discs A Repeat play x [RAM] [DVD-A] [DVD-V] [VCD] [CD] [WMA] [MP3] [JPEG] A-B REPEAT REPEAT During play Press [REPEAT]. A Program B 1 A✱ Each time you press the button: [RAM] Program All (Entire disc) Off pDuring play list play Scene Playlist Off [DVD-V] Chapter Title Off [DVD-A] [WMA] [MP3] (There is no on-screen display.) Track Groupa Off a During all group play, “All” is displayed. [DVD-A] [JPEG] Group Off [VCD] [CD] (There is no on-screen display.
Discs ê SUBTITLE SETUP SLEEP POSITION MEMORY GROUP 2 1 3 Program play DISC 4 5 6 S10/-/-- 7 8 9 0 ëPRO LOGIC CH SELECT SUPER SRND DISC [VCD] [CD] Numbered buttons You can select up to 24 tracks on any of the loaded Video CDs or CDs to play in the order you choose. TEST TOP MENU MENU SUPER SOUND EQ EQ DIRECT NAVIGATOR PLAY MODE CANCEL S. 3D AI EQ AV EFFECT DISPLAY RETURN VCR(EXT)/ VDP(AUX) TAPE/ DECK 1/ 2 CANCEL PLAY MODE 2/; DIGITAL AUDIO S.
Discs ê SUBTITLE Remote control only SETUP SLEEP POSITION MEMORY GROUP 1 2 3 DISC 4 5 6 S10/-/-- 8 7 9 0 ëPRO LOGIC CH SELECT SUPER SRND DISC Numbered buttons TEST TOP MENU MENU SUPER SOUND EQ EQ DIRECT NAVIGATOR PLAY LIST ENTER ENTER PLAY MODE S. 3D AI EQ AV EFFECT DISPLAY RETURN VCR(EXT)/ VDP(AUX) TAPE/ DECK 1/ 2 DVD TUNER/ BAND CANCEL PLAY MODE 2/; º 1 DIGITAL AUDIO S.
ê SUBTITLE Playing the programs or play lists on DVD-RAM SETUP SLEEP POSITION MEMORY GROUP 2 1 3 DISC 4 5 6 S10/-/-- 7 8 9 0 [RAM] Numbered buttons ëPRO LOGIC CH SELECT SUPER SRND TOP MENU DIRECT NAVIGATOR , , , ENTER Remote control only Selecting a program to play—DIRECT NAVIGATOR TEST TOP MENU 2134 MENU PLAY LIST SUPER SOUND EQ EQ DIRECT NAVIGATOR PLAY LIST ENTER Use the program list to find programs to play. S.
Navigation menus ê SUBTITLE SETUP SLEEP POSITION MEMORY GROUP Remote control only 1 2 3 DISC 4 5 6 S10/-/-- 7 8 9 0 ëPRO LOGIC CH SELECT SUPER SRND Numbered buttons TEST TOP MENU 2, 1, 3, 4 SUPER SOUND EQ DIRECT NAVIGATOR ENTER 1 PLAY LIST ENTER S. 3D AI EQ AV EFFECT DISPLAY RETURN [WMA] [MP3] [CD] (CD text only) Example: finding a track including the word “LOVE” MENU EQ Track title search Press [3, 4] to select “Find” and press [ENTER].
Using GUI screens ê SUBTITLE [RAM] [DVD-A] [DVD-V] [VCD] [CD] [WMA] [MP3] [JPEG] SETUP SLEEP POSITION MEMORY GROUP 1 2 3 DISC 4 5 6 S10/-/-- 7 8 9 0 ëPRO LOGIC CH SELECT SUPER SRND TEST TOP MENU MENU SUPER SOUND EQ EQ DIRECT NAVIGATOR PLAY LIST ENTER Remote control only GUI screens are menus that contain information about the disc or unit. These menus allow you to perform operations by changing this information.
Unless otherwise indicated, select items with [2, 1] and change with [3, 4]. Disc information Return T: Track number in group [DVD-A] [WMA] [MP3] C: Chapter number [DVD-V] P: Picture number [JPEG] Time [RAM] [DVD-A] [DVD-V] Select a position to start play by specifying a time.
Using GUI screens Unit information Play menu Picture menu 1 A-B repeat (➡ page 19) [RAM] [DVD-A] [DVD-V] [VCD] [CD] [WMA] [MP3] 2 Repeat mode (➡ page 19) [RAM] [DVD-A] [DVD-V] [JPEG] 3 Play mode (➡ page 19) [DVD-A] ---: Normal play ALL: All group play Display only 4 Marker [RAM] [DVD-A] [DVD-V] [VCD] [CD] [WMA] [MP3] [JPEG] ➡ page 18 [ENTER] 1 [RAM] [DVD-A] [DVD-V] [VCD] [JPEG] Picture mode (➡ page 17, Cinema) ≥N: Normal mode ≥S: Soft mode (Soft picture with fewer video artifacts) ≥F: Fine m
The radio: manual tuning Radio stations can be tuned manually by selecting the station’s frequency or they can be preset into channels to make it easy to tune (➡ page 28). Preparation: Press [Í/I] to turn the unit on. ê/I 2 3 1 1 4 Press [TUNER/BAND] to display FM or AM on the tuner/amplifier. Each time you press the button: FMbAM 2 Press [TUNING MODE] to display “MANUAL” on the tuner/amplifier.
The radio: preset tuning There are two methods of presetting stations. Automatic presetting: The stations the tuner can receive are preset. Manual presetting: You can select the stations to preset and the order they are preset in. There are 39 channels available for presetting. 2, 4 3 A Automatic presetting ª Do the following once each for FM and AM. Preparation: Tune to the frequency presetting is to begin at (➡ page 27). Hold down [SET].
Cassette tapes See page 3 for tape selection. ê Preparation: Press [Í/I] to turn the unit on. 1 /I 5 DECK 1/2 forward side 65 , 2 3 1 4 DECK 1 1 < º Press [< OPEN] on deck 1 or deck 2 and insert the cassette with a tape facing down. 2 3 1 4 5 DECK 2 Close the holder by hand. Press [DOLBY NR] to select Dolby NR on (“Î NR” appears on the tuner/amplifier) or off. Press [REV MODE] to select the reverse mode.
A Boosting the super woofer ª Boosting the super woofer adds power to the bass. Press [DIGITAL S.WOOFER]. DOUBLE RE-MASTER DIRECT OPEN DISC 1 DISC 2 DISC 3 DISC 4 DISC 5 1 2 < 45 º 3 4 The indicator turns green. The display on the tuner/amplifier changes each time you press the button: MID (medium)>MAX (high)>cancel (off) ^--------------------------------------------------------} There is only one level when listening through headphones. ; 5 To cancel Press [DIGITAL S.
Changing sound field and quality 1, 3, , 2 A Using the acoustic image equalizer (AI EQ) ª Achieve subtle sound quality settings with the soft, sharp, heavy, and light coordinates. 1 Turn [MULTI JOG] to display “AI-EQ” on the sound processor. 2 Press [SUPER 3D AI EQ] to select the surround level.
Enjoying surround sound The following chart gives a summary of this unit’s surround features. It also shows additional effects that can be used to enhance your enjoyment. Note ≥All the features are only effective if speakers are used. ≥You may experience a reduction in sound quality when these surround systems and effects are used with some sources. If this occurs, turn the surround system or effect off.
SUPER SURROUND Press [SUPER SURROUND] and select “MOVIE” or “MUSIC”. SUPER 1 SURROUND The indicator turns green. The display on the tuner/amplifier changes each time you press the button: MUSIC>MOVIE>STEREO SOUND§ (off) ^------------------------------------------------} § Original display when playing DVDs To cancel Press [SUPER SURROUND] to select “STEREO SOUND”. The indicator goes out.
Surround effects These effects can be used with the surround systems described on page 32. These effects are available when the corresponding indicators are alight. VIRTUAL REAR SURROUND 1 2 A CENTER FOCUS ª (Discs where the dialogue is recorded in the center channel) Press [CENTER FOCUS]. The indicator turns green. Dialogue enhancer is canceled when you turn this on (➡ page 26). CENTER FOCUS MULTI REAR SURROUND To cancel Press [CENTER FOCUS] so the indicator turns orange.
Before recording (Deck 2 only) A B See page 3 for tape selection. Volume, sound quality and surround effects have no effect on recording. Sound quality and surround effects are automatically set to flat when recording. 1 COUNTER RESET DISPLAY ª A To display the tape counter while recording Press [COUNTER, DISPLAY]. DECK 1/2 The counter is displayed for about 5 seconds. ≥Press [COUNTER, RESET] to reset the counter. ≥To display or reset the tape counter for deck 1, first press [DECK 1/2].
Recording discs INPUT SELECTOR 1 Preparation: pDo the preparatory steps (➡ page 35). pInsert the disc(s) you want to record (➡ page 14). pPress [DISC, 1–5] to select the disc where you want to start recording, then press [w] to stop the disc. 2 A Normal recording x [RAM] [DVD-A] [DVD-V] [VCD] [CD] [WMA] [MP3] 1 Press [ ] (reverse side) or [ ] (forward side) then [w] to set the tape direction. 2 Press [q REC PAUSE].
A Recording the radio x A Preparation: Do the preparatory steps (➡ page 35). 1 Tune to the required station. (➡ page 27, 28) 2 3 2 Press [q REC PAUSE]. The deck goes into the recording standby mode and the play indicator “ ” or “ ” starts flashing. 3 Press [ ] recording. (reverse side) or [ ] (forward side) to start To stop recording Press [w]. To temporarily stop recording Press [q REC PAUSE]. The deck goes into recording standby mode.
Using the timers The play timer 3 1 This timer starts play of the selected source at the selected time. The displays in the illustrations show settings for preset radio channel 1 to play between 6:30 and 7:40 at L48 dB. 2 Preparation: Turn the unit on, set the time (➡ page 12), preset radio stations if you want the timer to start playing the radio (➡ page 28). 1 Press [CLOCK/TIMER] to display “&PLAY” on the tuner/amplifier.
Using the timers The record timer 4 1 This timer records the radio at the set time. The displays in the illustrations show settings for recording preset channel 1 from 18:30 to 19:30. 2 Preparation: Turn the unit on, set the time (➡ page 12), preset radio stations (➡ page 28). 1 Press [CLOCK/TIMER] to display “&REC” on the tuner/amplifier. Each time you press the button: CLOCK &PLAY &REC Original display $ Press [SET] within 3 seconds.
Using the timers A A The play and record timers x Turning the timers on and off The timers come on at the set times if &PLAY/&REC indicator is on. They can be turned on and off by pressing [&PLAY/&REC]. FPLAY/FREC Checking the timers Press [CLOCK/TIMER] to select “&PLAY” (or “&REC”). The timer conditions are shown in the following order: Play timer: Start time Finish time Source Volume Record timer: Start time Finish time Selected radio station The timers can be checked even if the unit is off.
A Changing the sound range display x A The sound processor shows the level of each sound range with the three types of display described below. Press [DISPLAY MODE]. The spectrum display will change as follows. [a] Normal display DISPLAY MODE This display indicates the strength of the sound in each tonal range. [b] Peak-hold display The peak sound value of each sound range is held on the display for about one second after it occurs.
Enjoying karaoke (For Australia and N.Z.) KARAOKE 3 Preparation: pPress [¦/I] to turn the unit on. pTurn on the television and switch the video input mode of the television to suit the type of connection you have made (e.g., VIDEO 1). pLower volume with [MIC VOL], then connect the microphone(s) to the microphone jack(s). (Plug type 6.3 mm monaural) 1 2 Start the source. Select the Karaoke mode. See below ([A], [B] or [C]) for operation details. 3 Adjust the main volume and microphone volume.
Enjoying karaoke (For Australia and N.Z.) x A Using the echo effect 2 1 LOUNGE ECHO Press [ECHO]. The display on the tuner/amplifier changes each time you press the button: ECHO 1 ECHO 2 ECHO 3 ECHO OFF $ x B Changing the key (up to 6 steps) 1 Press [KEY CON]. “KEY 0” is displayed on the tuner/amplifier. 2 CHORUS Press [TUNING ( or )] to change the key.
External unit connections A pTurn off all units before making connections. pRefer to the manuals of the other units for details. (Cords and equipment not included.) S-video cord (not included) S-VIDEO OUT B Video cord (1 included for the United Kingdom, Continental Europe and Russia 2 included for Australia and N.Z.
Optional antenna connections A If radio reception is poor, connect outdoor antennas to the antenna terminals on the tuner/amplifier ([A]). FM outdoor antenna [B] For Continental Europe and Russia Connect the 75 j coaxial cable ( ) from the outdoor antenna to the FM antenna terminal. For UK only B Attach the included antenna plug adaptor ( ) to the end of the cable before connection. [C] For Australia and N.Z.
Changing settings This chart shows the settings for this unit. Change the settings to suit your preferences and to suit the unit to the environment in which it is being used. These settings are retained in memory until they are changed, even if the unit is turned off. See page 47 for details on menu operation. Menus Disc Timer operations and convenient functions Video Audio Display RQT6894 Others 46 Items Options (Underlined items are the factory preset.
Entering a password (Ratings) ê SUBTITLE SETUP SLEEP POSITION MEMORY GROUP SETUP 1 2 3 DISC 4 5 6 S10/-/-- 7 8 9 0 Numbered buttons ëPRO LOGIC CH SELECT SUPER SRND TEST TOP MENU MENU SUPER SOUND EQ EQ 2, 1, 3, 4 DIRECT NAVIGATOR ENTER [DVD-V] The password screen is shown when you select levels 0 to 7. 1 Input a 4-digit password with the numbered buttons and press [ENTER]. pIf you enter a wrong number, press [SHIFT]K[CANCEL] to erase it before you press [ENTER].
Glossary Decoder WMA/MP3/JPEG information A decoder restores the coded audio signals on DVDs to normal. This is called decoding. pDiscs must conform to ISO9660 level 1 or 2 (except for extended formats). pThis unit is compatible with multi-session but if there are a lot of sessions it takes more time for play to start. Keep the number of sessions to a minimum to avoid this. [WMA] pNoise may occur when playing WMA files. pYou cannot play WMA files that are copy protected.
Technical specifications SOUND PROCESSOR ∫ AM tuner section ∫ EQ/SFP section Frequency range MANUAL GEQ 5-Band EQ Center frequency 70/300/1 k/3.15 k/10 k Hz Level control n2.0, 4.0, 6.0 dB EQ/Space mode 4 modes HEAVY, CLEAR, SOFT, HALL SUPER 3D AI EQ 3 modes AI EQ, SUPER 3D AI 1, SUPER 3D AI 2 ∫ Pre-amplifier section Input sensitivity/impedance VCR (EXT) VDP (AUX) Output level VCR REC OUT (For Australia and N.Z.) VIDEO OUTPUT MONITOR OUT VCR REC OUT 250 mV/15 k≠ 250 mV/15 k≠ 150 mV/1.
Troubleshooting guide Before requesting service, make the below checks. If you are in doubt about some of the check points, or if the remedies indicated in the chart do not solve the problem, consult your dealer for instructions. Reference pages are shown as black circled numbers 7. Common Problems No sound. Turn the volume up. Switch off the unit, determine and correct the cause, then switch the unit on.
Enjoying discs “TAKE OUT/DISC” appears on display. There is a problem with the disc mechanism. (A power failure may have occurred.) The tray will open automatically. Remove the disc from the tray, and close it after ensuring there is no disc in the tray. The unit will make disc changing noises for a few moments and then it should operate normally. No picture. ≥Check the connection. 9 ≥Make sure the television is on. ≥Ensure the television’s video input setting (e.g., VIDEO 1) is correct.
SUOMI CAUTION! THIS PRODUCT UTILIZES A LASER. USE OF CONTROLS OR ADJUSTMENTS OR PERFORMANCE OF PROCEDURES OTHER THAN THOSE SPECIFIED HEREIN MAY RESULT IN HAZARDOUS RADIATION EXPOSURE. DO NOT OPEN COVERS AND DO NOT REPAIR YOURSELF. REFER SERVICING TO QUALIFIED PERSONNEL. VAROITUS! LAITTEEN KÄYTTÄMINEN MUULLA KUIN TÄSSÄ KÄYTTÖOHJEESSA MAINITULLA TAVALLA SAATTAA ALTISTAA KÄYTTÄJÄN TURVALLISUUSLUOKAN 1 YLITTÄVÄLLE NÄKYMÄTTÖMÄLLE LASERSÄTEILYLLE.