System Component Techno C S SC-EH600 SC-EH500 Operating Instructions Note: The “EB” indication shown on the outside packing case indicates United Kingdom. Before connecting, operating or adjusting this product, please read these instructions completely. E%BAC’T Please save this manual.
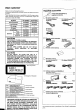
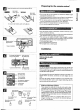
Table of contents Preparing for the remote control Ingratiation Connections Speaker caution Front panel controls Setting the time Memory presetting Automatic memory presetting . . Manual memory presenting Listening to radii broadcasts Enjoying RDS broadcasts (For areas except UK, Australasian) .. division i poinciana, Types of RDS and functions display the name of a broadcasting station . To display the type of a program .
MRS Vol Upstream Caution for AC mains lead (For United Kingdom) (“EB” area code model only) For your safety, please read the following text carefully. This appliance is supplied with a molded three pin mains plug for your safety and convenience. A B-ampere fuse is fitted in this plug. Should the fuse need 1o be replaced please ensure that the replacement fuse has a rating of 5-ampere and that it is approved by PASTA or BSI to BS1362. Check for the PASTA mark @ of the BSI mark ¥ on the body of the fuse.
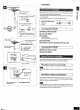
m chert the batteries in the correct polarities 5). RO3/LRG3 AAA, UM~ Remote control signal sensor Tuner/amplifier CD changer (SL-EH600) o Sound processor CD player (SL-EH500) i o0 Cassette duck (RS-EM600) Tuner/amplifier Sound processor Vulnerabilities i i CD changer (SL-EH800) or CD player (SL-EHS00) Cassette deck {RS-EH500) Center speaker TV (not included) P Eed Front speaker (Left) This system Frank splicer (Right | SB-EH (SB-EH600} .
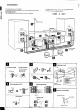
Connections The illustrations show SC-EFH600. To prepare the AM loop antenna wire and speaker cords, i Connect the AC mains lead after you have connected all other cables. twist the vinyl cover tip and pull off. g For Australia and NZ_ s The configuration of the FM antenna terminal is different. Adhesive tape (Lat (Right To household i AC outlet {Left) Right) n H H Attaching to wall To connect cables To unplug cables Hold the connector from both ends Connector and pull it out.
1 Connect the flat cables. 1. Connect the shorter flat cable from the tuner/amplifier to terminal A on the sound processor. 2. Connect the longer flat cable from the cassette deck to terminals BY and B2. Do nat try connecting or disconnecting the flat cables while the power is switched to ON. After connection: Keep cables as flat against the back of the unit as possible, E Connect the FM indoor antenna.
AUDIO | TV DIVED | i Sound gluon | Only for i processor % QL be--commercialism ; ’ | andN. Z. vnpé i Stereo ¢ connection Video cable connection cable Video cassette i recorder ! (not included) i . Only for Sound -l " Australia | processor andN. Z { Stereo connection, Video connection 3 cable cable Laser disc player e (ot included) = Ste reg connection cable Turntable (oot included) Tuner/ amplifier Cassette deck {coincided) RS {Only for Australia and N.2.
(For Australia and N.Z.) M outdoor antenna / {mot included} D Remove a piece of the outer vinyl insulator. j— ] 30mm @ Twist the shield braid to expanse the core wire. 18mm " Core T~ TR wie Shield braid @ Connect the shield braid and. the core wire as shown at the {For others) FM outdoor antenna i (ot included) : : {United Kingdom only) 7502 coaxial cable, Use the antenna tot included) fug adapter # (included. 3 Tunier/amplitier Do not remove the AM loop antenna.
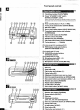
Before use Front panel controls @ Clock timer button (CLOCK/TIMER) (2) Power “STANDBY switch (POWER, STANDBY (h/ON) Press to switch the unit from on to standby mode or vice versa. In standby mode, the unit is still consuming a small amount of power @ Timer on/off buttons (© PLAY, © REC) (@ Tuning mode select bunion (TUNING MODE) (® Set button (SET) ® Source input select button (INPUT SELECTOR) @ Tuner/band select button and indicator {TUNER/BAND) Super woofer button (S.
Front panel controls @ Deck 1 cassette hider pane button (4 OPEN) © Deck 1 indicator (DECK 1) @ Deck 1 cassette holder @ Playback buttons and indicators ® Deck 2 cassette holder @ Record pause indicator (REC PAUSE) (D Deck 2 indicator (DECK 2) Deck 2 cassette holder open button {4 OPEN) @ Counter reset, display buttons (COUNTER, RESET, DISPLAY) @ Deck 1/deck 2 select button (DECK 1/2) @) Reverse mode defect button (REV MODE) @ Straightforwardness buttons (4, »p) @ Stop button (m) @ Dolby noise reduction but
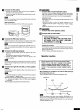
P Over a‘uubav§ ® c Lock 2 H. S TURING Effing the time The tuner/amplifier displays the time, frequency and other information on CDs and tapes. This is a 24-hour display clock, The figure shows how to set the time for 16:25. [I Switch on the power. P] @ Press CLOCK/TIMER to show “CLOCK, Every time you press the button, the indication changes in the order of CLOCK—® PLAY—® REC—Original display. Within § secants: @ Press SET. @ Press TUNING set the present time on the display.
s = E PRESET 875 G TUNING HOED =3 natural Cal m S TUNING A b3 4 MANUAL WAL = AUDIO hinge [BmE Preset channel 3 i PRESET /PRESET TUNE;) fimd Memory presenting #Once stations have been preset, you can easily select them from the tuner/amplifier or the remote control #You can preset total of 39 stations between the FM and AM bands. #Stations can be set automatically or manual.
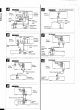
AUTOMATON S TUNER A Preset channel SET This example in the figure shows how to store FM 88.10 MHz into preset channel 1. Press TUNER/BAND to select the desired band. Each time you press this button, “FM” and “AM" will appear alternately. Press TUNING MODE to select “MANUAL”, Each time you press this button, “MANUAL” and “PRESET” will appease alternately. E D Press TUNING (v or A)to tune in the desired broadcast. “STEREO" lights when an FM stereo broadcast is being received.
(When you select “PRESET") \‘ PRESET [PRESET TONED) Fi1 8750un:2m REQ i I s (When you select : “MANUAL™ ¢ (When you select “PRESET") o preset MANUAL") FH AUTOMATON E&EHSG@ ]loos LW m S TUNING o~ Listening fo radii broadcasts This example in the figure shows how to tune in FM stations. [ switch an the power. E Press TUNER/BAND to select the desired band. Each time you press this button, “FM” and “AM” will appear alternately. E] Press TUNING MODE fo select “PRESET” or “MANUAL".
Radio operations . RDS P5 ~ DIPS MODE « PTY RDS PS DIPS MODE A0S P8 BRYNNER 1 RDS ISP MODE PTY BDS PTY ENS Gall Enjoying RDS broadcasts {For areas except UK, Australia and N.
There are a total of 15 PTY displays on this unit. The table gives an explanation of each display. Display Explanation NEWS Short accounts of facts, events and publicly expressed views, reportage and actuality. AFFAIRS Topical program expanding or enlarging won the news, generally in different presentation style or concept, including documentary debate, ar analysis.
Compact disc operations “ Label must face upward, Duse number T time USO Number of tracks 12em CD Listening to compact discs [l e Always stop the changer before loading or changing CDs. You cannot change CDs while a disc is playing, n Press DISC 1-5, whichever you want to open. P Press 4 OPEN/CLOSE. [E] settee CD in the tray. E’ Press 4 OPEN/CLOSE. The tray will dose. E To load other CDs, repeat steps through B, About disc indicators: Green: Indicates that the tray is ready to play its CD or to'be opened.
n Switch on the power. Insert CDs in the trays. (For details, see page 18.) When the “CD” input source is selected, disc number, total number of tracks, and total playing time will appear on the display. When there are 16§ or more tracks on the CD, “ g will appear. The total playing Hme displayed when a disc is loaded includes intervals between tracks, This is why sometimes the displayed time is longer than that listed on the CD. K] Press. ‘The charger will automatically play all tracks on all discs.
Listening to compact discs Exempt To listen to a favorite CD B e Press DISC 15, whichever disc you want. The selected CD will be played from the first track o the last track of = the final disc (Age 19). Cent) Playback will stop automatically when the East track of the final disc = is finished. To listen to o favorite track fl Press CD. E Press DISC, (within 10 seconds or so0) Press DISC 1-5, whichever disc you want.
This function allows you to program up to 24 tracks. |} Press co. z Press PROGRAM. [] Press Disc. {within 10 seconds or so) Press DISC 1-5, whichever disc you want. Press the numeric button(s) to select the track you want to play in the desired sequence. To select & two-digit track: Press 210 and then the two numbers you want. E Repeat steps [ through H until you have programmed ail the tracks vou want. Press ». Play will starting the programmed sequence.
Listening to compact discs For SC-EH500 |3 Switch on the power. Press & CLOSENESS to open the tray. Stinger the CD with label facing upward. Press & ENCLOSED to close the tray. ‘When the “CD" input source is selected, foal number of tracks and total playing time will appear on the display. When there are 16 or more tracks on the CD, ¥ 5" will appear.
B s= T Direct access allows you to start sequential play from a specific track o the last rack on the CD, “ Press CO/TAPE to select “CD". Press the numeric button(s) to select the desired track number. Play will start with the track you select To elect a two-digit track: Press 210 and then the two numbers you want within 10 seconds or s0. This function repeats the play of all tracks. Press REPEAT before or during play. ¢ will light. To cancel repeat play: Press REPEAT once again. " will gout.
Compact disc operations ‘This function allows you to program up to 24 tracks. n Press CO/TAPE to select “CD”. E Press PROGRAM., Press the numeric button(s) to select the track you want to play in the desired sequence. To select a two-slight track: Press 210 and then the two numbers you want. Repeat step B until you have programmed all the tracks you want. Crass b, Play will start in the programmed sequence. Play will stop automatically when all the programmed tracks have been played.
Deckle Age En Forward side COLBY 1R [h—m: Deck 1 000 =i REV MODE R DELHI 1 000 () HO o rangy S Listening to tapes Types ot tapes which can be played: ‘The unit automatically identifies the type of tape. Normal position/TYPE | High position/TYPE I Metal position/TYPE [V #Both deck T and 2 can be used to playback tapes. #This page shows an example using deck 1 n Switch on the power. Press & OPEN on deck 1 and insert the tape. Load a tape with the exposed side facing downward. Close the cassette haler.
Listening to tapes Press DECK 1/2 1o select the deck to be used. ] Press COUNTER RESET. When the tuner or CD mode display shows, the tape counter display will appear for about 1 second. To reset the tape counter while listening recording from CDs or the radio (D Press COUNTER DISPLAY. @ Press COUNTER RESET while the tape counter is being displayed (displayed for approximately compete 5 seconds). For your reference; Or Splay ©When the tape is traveling in the reverse direction, the vale dis.
n OPEN ASPEN g i REV MODE omR = Press or d while the tape is playing. If the forward side (5} is placing: Pb-: The tape will play from the beginning of the next tune. € The tape will rewind to the beginning of the present tune. Then the tune will play again 1f the reverse side (<3} of the tape is playing: The reverse operation will take place. the function that searches for the silent passages in a tape program.
ROOFER SPACE pretty HELLCAT Changing the tone “S, WOOFER” will light. *When listening to the sound through the speakers: Each time you press the button, the level will change as fallows. MID {medium)— MAX (high)— Light off (OFF) T T When 5. WOOFER is on and either MID or MAX are not displayed then when 8. WOOFER is pressed, the current level will be displayed. Pressing the button a second time will change the level.
@ Lower register Upper register Middle register Changing the phone This function allows easy creation of sounds closer to what you imagine. The figure shows an example where the sound quality has been adjusted to HEAVY level 2 and SHARP level 3. n Press ACOUSTIC IMAGE EQ. ] Press the buttons to move the cursor 1o the desired music image. HEAVY When a heavier sound is desired LIGHT When a lighter sound is desired SOFT () Whens softer sound s desired SHARP () When a sharper sound is desired.
Concerning the display The sound processor shows the level of each sound range with the three types of display described below. B} Press DIPS momentarily. The spectrum display will change as follows. [¥ Normal display This display indicates the strength of the sound in each tonal range. 2] Peak-hold display The peak sound value of each sound range s held on the display for about one second after scours. [3] Aurora display The peak sound value of each sound range is displayed in inverted form.
Front Front speaker (L) Center speaker speaker (R} D Surround Surround speaker (L) speaker Foot Front speaker (L) Center speaker speaker v TRILBY: E Offing, Enjoying sound with DOLBY PRO Logic By combining front, center and surround speakers, you can enjoy the SURROUND mode which conveys a feeling of presence or the STEREO mode which conveys @ feeling of orientation, By reproducing the feeling of depth and movement of sound, video software or compact discs recorded with DOLBY SURROUND provide the listener w
noncooperation functions +3dF i Enjoying sound with DOLBY PRO LOGIC T =) In order to reproduce the movement of the sound and ifs clear orientation, it is important to adjust the output level of each speaker. Adjust output to the correct levels while listening to the test signal. n Press DOLBY PRO LOGIC OFF/ON to select ] Press MODE to select “SURROUND” or “3 STEREO™. Each time you press the bunion, the display will change as follows: SURROUND-»3 STEREO [ E Press TEST to output a test signal.
SURMOUNT Enjoying sound with DOLBY PRO LOGIC For Scene] Before trying anything, have you set the center mode and adjusted speaker output lever? When viewing a video, turn on the power supply for the TV and set the TV to video mode. K} Press INPUT SELECTOR to select the desired external source. Each tie you press this button, sound sources will be switched as follows. TUNER—CD——TAPE 1 i These indications correspond to terminals on the rear panel of the sound processor or tuner/amplifier.
» Recording opera Recording pa Leader tape (o recording ran be made) Before recording LTI The unit automatically identifies the type of tape. Manorial position /TYPE | High position,/ TYPE 1l Metal position /TYPE IV Wind the leader tape forward so that recording can start as soon a5 you press the button, This is not necessary if one-touch editing from CDs. The Dolby noise-reduction system is designed to effectively reduce the annoying high-frequency “hissing” noise typical of cassette tapes.
LOPE Dolly PRESET Tu Med TERN B STEREO dE FH B85 Exegeses TUNED iR BEO Fri g1 .)DMM! Recording from radio broadcasts PSR Preparation: Advance the tpe to a point from where recording can start immediately. n Switch on the power. E Press 4 OPEN on deck 2 and insert the tape with the exposed part of the tape facing downward. Close the halyard. fl To record in Dolby B NR: Press DOLBY NR and check “O0 NR” Is displayed. I3 Press REV MODE to select the reverse mode.
ons Recording : @ Hes recording from ably one CD e | Ist track * (Side ) 1= Comet Remainder of track 3 Trod is cut in the middle. i g}/} ‘When recording from 2 to 5 discs st track distaste dissent 3rd disc 2nd dies Her recording from only one CD Racist i) | sine) | N ‘When recording from 2 to 5 discs.
TIRED PAUSE Recording from compact discs ] Switch on the power. Press & OPEN on deck 2, and then insert the tape with the exposed part of the tape facing downward. Loss the holder. To record in Dolby B NR. Press DOLBY NR and check “O0 NR” is displayed. [} Press REV MODE 1o select the reverse mode. = Onside will record, and then the tape will stop automatically at the end of the tape. <23 Both sides will record (forward side— reverse side), and then the tape will stop automatically at the end of the tape.
g S rat Recording ope AT EDIT g Soil E One-touch editing is designed to record from disc 1 all the way through to disc 5. If you want ta record just one CD, set it in tray 3, n Press & OPEN on deck 2, and then Insert a tape. Colas the holder. Restorer in Dolby BN Press DOLBY NR and check “00 NR" is displayed. Press REV MODE to select the reverse mode. = Onside will record, and then the tape will stop automatically at the end of the tape.
PROGRAM Recording from compact discs RS You can link up another CD when “LINK” dashes after editing a CD. fl Press A OPEN/CLOSE to replace the CD with another one. The tray of the last disc (disc 5) will open. Load the news CD in there. [f you were recording programmed tracks, the tray with the disc you were recording from will open.
racist (Side A) (Side B) : I Remainder of track 5 siege ) | Recording operations st track distaste 3rd disc 2nd disc Track is cut in the middle. ijb e | EI) Recording from compact discs [For SC-EH500] DECK 2 rally ‘There are 2 ways to record from compact discs, normal recording and one-touch editing. Normal recording B In normal recording, no blank space is left at the end of side A. But, this means track will be cut off it the middle when the end of the side is reached.
pow Er STANDEE Boleyn TR OO : [aye i Do Recording from compact discs For SC-EH500] jiJ switch on the power. Press A OPEN on deck 2, and then insert the tape with the exposed part of the tape facing downward. Close the holder. B 7o record in Dolby BNR. Press DOLBY NR and check “O0 NR” is displayed. fl Press REV MODE ta select the reverse mode.
ions [ Recording ope oven Close | o A1 EDIT Press 4 OPEN on deck 2, and then Insert a tay Close the haired. To record in Dolby BNR. Press DOLBY NR and check “00 NR” is displayed. [E] Press REV MODE to select the reverse mods. i Onside will record, and then the tape will stop automate apically at the end of the tape. T Both sides will record (forward side—reverse side), and then the tape will stop automatically at the end of the tape.
TS0 E5E5D OO DD Recording from compact discs {For SC-EH500] You can link up another CD when “LINK” flashes after editing CD. Press & OPEN/CLOSE 1o replace the CD with another one. Press A OPEN/CLOSE again to close the tray. Press O, Linking will start. To continue linking tracks: Repeat steps gland B As long as there is space on the tape to record, when the recording finishes, the cassette deck will put linking on standby. To cancel the LINK function: Press B on the CD player.
Recording operations “ Tape-to-tape recording Preparation The Reader tapes in both decks must be wound up beforehand. (See page 4.) n Press INPUT SELECTOR {o select “TAPE”, Press 4 OPEN on the both decks and insert the tapes, DECK I: For playback DECK 2 For recording Close the holders. [EJ Press REV MODE to select the reverse mode.
e thick <@ KARAOKE i KARAOKE SONG: R MORE R %m BE HO § Singing along with KARAOKE (For Australia and N.Z. ably) This unit lets you enjoy the KARAOKE fin with audio €Ds and audio tapes. |} First, tower volume with MIC volume control, then, connect the microphone to the MIC jack. Plug type: 63 mun monaural Press KARAOKE to select the voice mode. Each time the button is pressed, the display will change in the following ores: ¥+ MUTE—MONO L—MONO R ——OFF Voice mode selection: O: Appropriate @: For practice, etc.
Using the dimer Make sure that you have completed “Setting the time” on page 12. Select this timer when you want to use the timer as an alarm clock, You can wake up while listening to music (CD, truer, tape) at a desired volume level and time. The figure shows how to set the play timer for; playing from £:00 to 7:30. n Switch on the power. fl Press CLOCK/TIMER twice to show “@ PLAY" on the display, and then press SET within 3 seconds, EJ (“ON” time setting) (D Press TUNING show the time to start playing.
Using the timer Make sure that you have completed “Setting the time” on page 12. Use this timer to record radio programs when you are out. The system will record the program you set at the time you set. The figure shows how 1o set the record timer for; recording preset channel no. 1 from 18:00 to 18:30. [l Switch on the power. Press CLOCK/TIMER three times to show “© REC” on the display, and then press SET within 3 seconds, (“ON” time setting) (@ Press TUNING show the time to start recording. @ Press SET.
T The stent will go into power standby mode at the set time (max. hours, half hour intervals), so you can go to sleep listening to music. The following example in the figure shows how to set the system to standby mode after 30 minutes [SC-EH500, 7 White enjoying the desired source: Press SLEEP. “SLEEP” lights up. Each time you press the button, the display will change as follows: SLEEP 60—SLEEP SLEEP OFF e SLEEP 120 To cancel the sleep timer: Press SLEEP to select “SLEEP OFF”. presences S EED" gods out.
Using the timer To go to sleep listening to an FM broadcast and wake up the next morning listening fo
) g [2Y/ S swum% ORE PAUSE E A Using an external unit #Before connecting, reduce the volume Revel. #Avoid listening for prolonged periods of time ta prevent hearing damage. #Plug type: 35 pum stereo Press INPUT SELECTOR to select the external source. Each time you press this button, sound sources will be switched as follows, HE TUNER— CD— TAPE—EXT > PHONON S — | SCHEMER TUNER— CD—TAPE~ VCR (EXT)— VDP (AUX) e T ] Operate the textual unit which you have connected to the system.
Remote control buttons and functions Reference pages are given as black circled numbers. Burton o s ape o POWER Turns the system ON/OFF @ 8| HEEP For seeing sleep timer @ — STUDEBAKER Band (e} switching select made For station CD selection (1-5) 0‘0 o 6 selection #Track selection (In preset 2.9 SOLO mode) @ 6 —_ Playback Pause Stop ien aquavit a5 PROGRAM — Engages program i C)_D D__'a Q input OVOID i g cancel . Cancels program .
Remote control buttons and functions Reference ages are given as black circled numbers. 3 3 Tuns the system ON/OFF @ e Selecting CD or Tape @, @ TUNER/ Band . switching @ DECKHAND Switch between d) — — deck 1 and deck 2 @ #Fast-forward/ Rewind (While e stopped) #kip to track beginning (During out playback) *Starts recording, from recording ! Cb é standby mode.
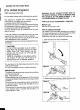
Suggestions for safety Avoid placing the uniting areas of: #dissect sunlight #high temperature #high humidity #excessive vibration uneven surfaces (Place the unit on a flat level surface.) Such conditions might damage the cabinet landlord other component parts and thereby shorten the unit’s service life. To protect the unit against sound distortion and acoustical effects, please place the unit astatine 15 cm away from wall surfaces etc.
Reference downward from above. How to hold CDs X ¢ Tab for side “B" Tore-record Normal tape % Do not touch the recorded surface. Side A = 92 Desiderata “A” e Hi-position tape >3 Discrimination hole ace label upwards and press Concerning compact discs FEEDBACK With this changer or player, you can only play compact discs having this mark. BUDGETARY However, do not use irregular shape CDs. CDs of this sort can damage the unit.
Reference Troubleshooting guide Before requesting service, make the below checks. If you can't fix the system as described below, or if something not here listed occurs, contact the place of purchase. To install antennas, make adjustments and the sort, contact the place of purchase. (direct wave) and the signal reflected from the building or mountain (reflected wave}.
Problem Probable cause(s) Suggested remedy Page While listening to tapes j Sound is low, intermittent, | Heads are dirty. Clean the leads. 59 oF par quality, nosy, Dolby noise reduction s set in the wrong Set it to match the Dolby NF recording mode, serrate, or unsteady. position. 25 The desk doss not enter the | The erase-prevention tabs are removed from | Attach tape to cover the space Left by removal 6 recording meed. the cassette. of the erase-prevention tabs.