System Component Operating Instructions Model No. SC-HD510 SC-HD310 The illustrations show SC-HD510 for areas except Australia and N.Z. Note: The “EB” indication shown on the outside packing case indicates United Kingdom. Before connecting, operating or adjusting this product, please read these instructions completely. Please keep this manual for future reference.
Dear Customer Thank you for purchasing this product. For optimum performance and safety, please read these instructions carefully. Before use These operating instructions are applicable to the following systems. These operating instructions, however, fundamentally explain the operation of system SC-HD510.
Table of contents Safety precautions Before use Placement Radio operations The Radio: manual tuning .....................................................12 The Radio: preset tuning .......................................................13 Cassette deck operations Cassette tapes ..........................................................................14 Compact disc operations Set the unit up on an even surface away from direct sunlight, high temperatures, high humidity, and excessive vibration.
Caution for AC Mains Lead (“EB” area code model only) WARNING: DO NOT CONNECT EITHER WIRE TO THE EARTH TERMINAL WHICH IS MARKED WITH THE LETTER E, BY THE EARTH SYMBOL OR COLOURED GREEN OR GREEN/YELLOW. For your safety, please read the following text carefully. THIS PLUG IS NOT WATERPROOF–KEEP DRY. Before use (For United Kingdom) This appliance is supplied with a moulded three pin mains plug for your safety and convenience. A 5-ampere fuse is fitted in this plug.
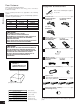
The remote control A A + − + R6/LR6 (AA, UM-3) 2 − Insert so the poles (+ and –) match those in the remote control. Do not use rechargeable type batteries. Do not; ● mix old and new batteries. ● use different types at the same time. ● heat or expose to flame. ● take apart. ● short circuit. ● attempt to recharge alkaline or manganese batteries. Mishandling of batteries can cause electrolyte leakage which can damage items the fluid contacts and may cause a fire.
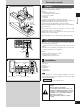
Connections Unless otherwise marked, the illustrations show SC-HD510 sold outside Australia and New Zealand. 2 3 Before use Adhesive tape 1 1 c (Left) 4 4 (Right) 5 To household mains socket 3 A c a b 1 4 To connect cables Speaker SC-HD510 Blue (–) Amplifier SC-HD510 HIGH Gray (+) White line LOW LOW Blue (–) Red (+) To unplug cables Hold the connector from both ends and pull it out. 2 (For Australia and N.Z.
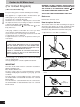
Basic connections for supplied accessories A Before connection Do not connect the AC mains lead until all other connections are complete. ● To prepare the AM loop antenna, FM antenna (for Australia and N.Z.) and speaker cables, twist the vinyl tip and pull off (a). ● Disconnect the flat cable on the cassette deck (b). 1 Before use ● Flat cables. Keep the cables as flat as possible against the back of the unit. 2 FM antenna. Fix the other end of the antenna where reception is best.
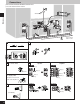
Connections A A (R) Tuner (L) ● ● EXT/ OUT IN MD a Before use (R) DIGITAL OPTICAL OUT (R) (L) (L) CD player IN OUT (L) Connect DVD players to the EXT/MD IN terminal on the tuner. DIGITAL OPTICAL IN FM outdoor antenna Turn off the power to all units before making connections. Refer to the manual of the other unit for details. (Cables and equipment not included.
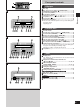
Front panel controls C B A A 1 2 q w e r t y u i o OPEN/CLOSE CD TEXT SCROLL Disc tray Disc tray open/close button ( OPEN/CLOSE)..................16 CD TEXT button (CD TEXT) ...................................................16 Scroll button (SCROLL) .........................................................16 AI edit button (AI EDIT) ..........................................................21 Skip/search buttons ( / , / ) ........................16 Stop button (■) ................................
Front panel controls C A A A 29 30 31 32 33 Before use /I 34 35 BLFS VOLUME MODE 36 INPUT SELECTOR – DVD DIRECT FINE TWEETER CONTROL PHONES DOWN UP MIN MAX 37 SLEEP PLAY 1 2 3 4 5 6 7 8 9 REC @9 Standby indicator When the unit is connected to the AC mains supply, this indicator lights up in standby mode and goes out when the unit is turned on. #0 Standby/on switch ( /I) ........................................................
A A This is a 24-hour clock. The example shows how to set the clock for Wednesday 16:25 (4:25 pm). 1 2 Press [ /I] to turn the unit on. q Press [CLOCK/TIMER, –DEMO] to display “CLOCK.” Each time you press the button: CLOCK 2 1 2 3, 4 REC Original display w Within 7 seconds Press [SET]. /I 1 CLOCK/TIMER 3 q Press [TUNE/TIME ADJUST (∨ or ∧)] to set the day. w Press [SET]. 4 q Press [TUNE/TIME ADJUST (∨ or ∧)] to set the time. w Press [SET].
The Radio: manual tuning /I 4 SC-HD310 SC-HD510 for Australia and N.Z. 1 Radio stations can be tuned manually by selecting the station’s frequency or they can be preset into channels to make it easy to tune with the remote control (a page 13). Preparation: Turn the unit on. 1 SC-HD310 SC-HD510 for Australia and N.Z. Press [FM] or [AM] to select the band. SC-HD510 for others Press [FM/AM] to select the band.
The Radio: preset tuning Choose either automatic presetting, which presets all the stations the tuner can receive, or manual presetting, which allows you to select the stations to preset and the order they are to be preset in. There are 39 channels available for presetting. A TUNE/TIME ADJUST ∨, ∧ A Automatic presetting Do the following once each for FM and AM. Preparation: Tune to the frequency presetting is to begin at. (a page 12). SET TUNE MODE SET Release the button when “AUTO MEMORY” appears.
Cassette tapes /I 5 Preparation: Turn the unit on. 1 1 RESET 2 4 Make sure the cassette is fully inserted and press [ OPEN/CLOSE] to close the deck. 2 Press [DOLBY NR] to select Dolby NR on (“ NR” appears) or off. 3 Press [REV MODE] to select the reverse mode. Every time the button is pressed: : One side is played. : Both sides are played. : Both sides are played eight times each. ■ 4 OPEN/CLOSE v] or [u u]. Press [v Play begins and the indicator changes to green.
Cassette tapes Fast-forwarding and rewinding A Press [ TPS] or [TPS is stopped. A Tape direction u v ] while the tape rewind fast-forward High-speed fast-forward/rewind This cassette deck is designed to roughly double fastforward/rewind speed automatically. When you fast-forward from the beginning of the tape or rewind from the end of it, the tape runs at high speed. When approaching the end of the tape, the deck automatically drops to normal speed.
CDs /I Normal play 1 3 Preparation: Turn the unit on. 1 Press [ tray. OPEN/CLOSE] to open the Set a CD label up on the tray. Press [ OPEN/CLOSE] to close the tray. The number of tracks and playing time is displayed if “CD” is selected as the source. ■ 1 Total number of tracks OPEN/CLOSE 2 3 2 Total playing time u] to start play. Press [u Adjust the volume. To stop the disc Press [■]. To pause play Press [ ] during play. Press [ Label must face upward. ] or [u] to resume play.
CDs A SLEEP 1 1-9, 0, > 10 PLAY 2 Remote control only When a CD is loaded and the unit is off, press [CD]. The unit comes on and starts play with the volume fading in. 3 > 10 4 5 6 7 8 9 One touch play REC 0 PROGRAM CANCEL RANDOM REPEAT RANDOM Other modes of play REPEAT Remote control only AUTO/ MONO MD CD CD TAPE EXT/MD TUNE MUTING Preparation: TUNER s Press [CD] to put the unit in CD mode.
CDs Other modes of play SLEEP PLAY Program play: REC Select up to 24 tracks to play in the order you choose 1 2 3 2 > 10 1 4 5 6 7 8 9 Remote control only 0 CANCEL PROGRAM CANCEL RANDOM REPEAT Preparation: Press [CD] to put the unit in CD mode. 1 2 AUTO/ MONO MD CD TAPE EXT/MD TUNER 3 TUNE MUTING TUNE Press [PROGRAM]. Enter the track number with the numbered buttons. For tracks numbered 10 and over, press [≥10] then the two digits.
Before recording Selection of tapes for recording The unit automatically identifies the type of tape. A Normal position/TYPE 1 High position/ TYPE 2 Metal position/ TYPE 4 A ✔ ✔ ✔ To display the tape counter while recording Press [COUNTER]. The counter is displayed for about five seconds. B COUNTER B Erasure prevention The illustration shows how to remove the tabs to prevent recording. To record on the tape again, cover as shown, being careful not to cover the high position discrimination hole.
A Recording the radio Preparation: Do the preparatory steps (a page 19). 2 ■ 3 1 Tune to the required station. (a page 12 or 13) 2 Press [● REC PAUSE]. The deck goes into the recording standby mode, [● REC PAUSE] indicator lights and a play indicator starts flashing. 3 v] or [u u] to start recording. Press [v u: to record on the forward side v: to record on the reverse side To stop recording Press [■]. To temporarily stop recording Press [● REC PAUSE]. The deck goes into recording standby mode.
Recording CDs ■ A 1 2 AI EDIT One touch CD editing (AI EDIT) The unit calculates the length of the tape and decides which tracks go on which side of the cassette so tracks are not cut off midway. Preparation: Do the preparatory steps (a page 19). Insert a CD. Press [AI EDIT]. The unit makes the calculations and “AI EDIT TAPE” scrolls across the display. It takes a moment for recording to start. ■ A After the deck completes recording the CD It goes into recording standby mode.
Using the timers 3 PLAY/ The play timer This timer starts play of the selected source at the selected time. The example shows settings for preset radio channel 3 to play between 6:30 and 7:40, Monday to Friday at –40 dB. Preparation: Turn the unit on, set the time (a page 11), preset radio stations if you want the timer to start playing the radio (a page 13). REC 1 q Press [CLOCK/TIMER, –DEMO] to select “ PLAY.” CLOCK 1 1 REC Original display w Press [SET] within 15 seconds.
Using the timers 3 PLAY/ The record timer This timer records the radio at the set time. The example shows settings for recording preset channel 3 on Saturday from 18:30 to 19:30. Preparation: Turn the unit on, set the time (a page 11), preset radio stations (a page 13). REC 1 q Press [CLOCK/TIMER, –DEMO] to select “ REC”. CLOCK PLAY REC Original display w Press [SET] within 15 seconds. 1 1 1 2 2 CLOCK/TIMER Repeat steps q and w to complete items q to r. q Select the day.
Using the timers A The play and record timers Checking the timers A [ PLAY/ REC] indicator Press [CLOCK/TIMER, –DEMO] to select “ PLAY” (or “ REC”) The timer conditions are shown in the following order: Day → start time → finish time → source → (“ PLAY” only) volume The timers can be checked even if the unit is off. Playing the unit after the timers are set The unit can be used after the timers are set. Make sure the unit is off before the set start time.
Using other equipment ●REC PAUSE A 1 v, u ■ SC-HD310 DOLBY NR, REV MODE Listening to an external source Press [INPUT SELECTOR] to select EXT/MD mode. 1 Each time you press [INPUT SELECTOR]: TUNER CD TAPE EXT/MD On the remote control Press [EXT/MD]. 2 Operate the unit. See the unit’s manual for details on operation and connection (a page 8).
Convenient functions Adjusting the treble range A SC-HD510 only BLFS SC-HD510 FINE TWEETER CONTROL Fine adjustments to the treble range can be made due to separation of the tweeter and woofer. Turn [FINE TWEETER CONTROL]. Turn towards MAX to emphasize the treble or towards MIN to lessen the effect. Note The effect is not noticeable through headphones. Adjusting the bass-BLFS B SC-HD510 only A Use this feature to emphasize the bass (HIGH or LOW), or weaken it (LIGHT).
Troubleshooting guide Before requesting service, make the below checks. If you can’t fix the system as described below, or if something not listed here occurs, refer to the enclosed directory to locate an Authorized Service Center convenient to you or contact your dealer. Reference pages are shown as black circled numbers y. Common Problems No sound. Turn the volume up. The speaker cords may be shorted. Turn the unit off, check and correct the connections and turn the unit on.
Technical specifications (DIN 45 500) TUNER ■ Pre-amplifier section Input sensitivity/impedance EXT/MD IN 300 mV/15 kΩ Output level/impedance EXT/MD OUT 250 mV/1.5 kΩ ■ Tuner section FM frequency range 87.50–108.00 MHz (0.