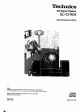
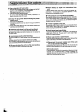
Technicians CD Stereo System SC-CH404 Operating Instructions Notes: The “EB" area code, for example, indicates United Kingdom specifications. #The “EB" indication shown an the outside packing case indicates United Kingdom. COMPACT Be lore connecting, operating or adjusting this product, pleads rad these instructions completely.
Thank you for purchasing this product. For optimum performance and safety, please read these operating instructions carefully. These operating instructions are applicable to the following systems. CLASS LASER (Back of product) DANGER-Invisible sari radiation when [ AVOID DIRECT EXPOSURE TO BEAM. {icing of product) 1 PRODUCT THIS PRODUCT UTILIZES A LASER. USE OF CONTROLS OB ADJUSTMENTS OR PERFORMANCE OF PROCEDURES OTHER THAN THOSE SPECIFIED HEREIN MAY RESULT IN HAZARDOUS RADIATION EXPOSURE.
Before use Caution tor AC mains lead . Suggestions for safety . Supplied accessories . Location of controls Amplifier action Tuner/sound processor section . Compact disc player action Cassette deck section ®o O @ Preparations —— Installation 9 Stacking the components .8 Connections 10 Optical antenna connections L2 External unit connection S8 Concerning the multi-control section . 14 Demonstration function . . 5 Concerning the remote control . 16 Battery Installation . .
(For United Kingdom) {“EB" area code model only) For your safely, please read the following text carefully. This appliance is supplied with & molded three pin mains plug for your safety and convenience. A 5-amperes fuse is fitted in this plug. Should the fuse need to be replaced please ensure that the replacement fuse has a rating of 5-ampere and that It Is approved by PASTA or BSI to BS1382. Check lor the PASTA mark 4 or the BS! mark §§ on the bad of the fuse.
M Use a standard AC wall outlet 1. Uss from an AC power source of high voltage, auk as that used for an alr conditioner, is very dangerous. A fora might be caused by such s connection. 2. ADC prows source cannot be used. Be sure to sack the prows sours carefully, especially on a ship or other place where DG is used, W Grasp the plug when disconnecting the power supply cord 1. Wet hands are dangerous. A dangerous electric shock may result (t the plug is touched by wet hands. 2.
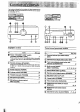
The functions Indicated by the numbs ts with black background {for example @) can also be activated from the remote control transmitter. {Sas pages 50-51.) @12) Amplifier section Tuner/sound processor section No. Name Ref. page No. Name Ref. page € Power “STANDBY (B/ON" switch @ External source Input select button (POWER, STANDBY 17 (EXT) % Press to switch the unit from an to standby mods or vice versa. In standby mode, the unit is still consuming a small amount of power.
Compact disc player section Cassette deck section No. Name Ref. page No. Name Ref. page (1) Random play button (RANDOM) 22 Deck 1 cassette holder 25 (@ Repeat button (REPEAT) 21 @ Deck 1 cassette holder open button A OPEN] © Stop button OPEN) z Dolby noise reduction button and €© Pause button (I0) 20 Indicators (DOLBY NR) 25 © Play button and indicator 20 @ Reverse mode button and indicators CD edit buttons (REVERSE MODE) 25 (J.
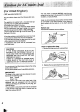
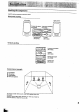
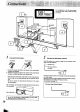
Stacking the components Install the various components as shown below.
Disconnecting S 1. Connect the shatter flat cable to the terminal of the turnaround processor and amplifier, 2. Connect the Longer fiat cable to the terminal of the tuner/sound processor, compact disc player, and cassette deck. Route the cable horizontally {underneath the heat cutlet grille) s that the side with the white-colored lead is positioned at the front. . Be sure to connect the blue-cultured connector 1o BY (tuner/ sound processor).
3 Connect the LW/MW loop antenna, 1. Attach the antenna hider to the rear pans of the tuner/sound processor, 2. Clamp the antenna to the antenna holder and connect the antenna terminal to the rear panel of the tuner/sound processor. 3. Position the loop for the best reception. Antenna holder You may attach the LW/MW antenna holder with screw (included) to @ rack or other structure. In this case, attach as showed in the figure below.
Optional antenna connections FM outdoor antenna (not included) I the M indoor antenna does not provide satisfactory reception of FM broadcasts, uss an outdoor antenna. You may dean an outdoor antenna # you use this system in & mountainous region or insides a reinforced-concrete building, sic, An outdoor antenna should be linseed by a computerate technician only.
External unit connection DCC (digital compact cassette deck) or DAT Rear surround speakers (digital audio tape deck) e ) Amplifier DCC {not included) or DAT (not Included) SURROUND| NAPPY out Put Stereo connection calve T 1 ¥ {not included) (R} (L) -HOHHOT REC PLAY Tuner/sound processor Left speaker Right speaker {not included) {not included) Analog player e et Ba sure to connect both speaker systems, if only one side 1s connected, no sound will bs heard, Analog player (not included) Install each speaker de
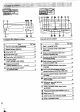
Using the multi-control buttons, you can make following operation. Climacteric settings #Tuning or presetting the radio station When aerating, the display shows which buttons are available for the operation, The chart below shows the display and the available buttons for #Selecting of adjusting the EQ or SPACE mode @Ech aeration. Operation Display Available buttons B Clockwise operation #Time setting {Sce page 17.) ®Record timer settling (See pages 4445, *Play timer setting (Ses pages 42—43.
Demonstration function By keeping pressed V.BASS, the demonstration example shows on the display ultimately. 0 Press and hold V.BASS, V.BASS = The display will change alternately sawing the display example when the mul control buttons are used.
Battery installation Insert two RO3/LO3 (UM-4 or equivalent, not Included) batteries as shown bestow, insert the batteries in the came ct polarities Use of batteries #00 not mix old and new batteries, or baptisteries of different types {carbon and alkaline, etc.). *Ways remove old, weak of worn-out batteries promptly and dispose of them properly.
These instructions explain how to set the timer for 16:25 {425 p.m.} on Wednesday, 1 POWER Switch on the power on the Qa amplifier. T N 2 ook @ Press CLOCK/TIMER to select “CLOCK™, [Lacy o within 7 seconds: @ Press SET. % % D Press select 3 L “WED”, + R SRy @Reggae select T L & Jed lime @ Press SET, (D Press select ugh, + =T S €, 107 Press SET to finish setting the time.
This feature allows you to set broadcast frequencies inch the memory. You can then easily retrieve any of those broadcast frequencies by pressing the tuner sound processor.
Manual memory presetting This features allows you to manually preset stations into any desired changeling. ] b | This example saws how to memorize FM 88, 10 Whiz into preset channel 1. 1 Press TUNER/BAND to select Each time you press TUNER/BAND, “FMT, “MW®, “LW™ will appear in order., Press SET momentarily. (fulminates, Flashes. Cx % Press select the deL eider preset channel, Flashes. Press SET momentarily, MEMO Indicator will go out.
Sequential play Sequential play refers o play beginning with the first track and continuing in order to the last rack. Switch on the power on the amplifier, Press & OPEN/CLOSE to open the disc tray. 5 insert the dido with label f Acing upward. Do not put your finger through the hole In the middies of the disc holder, 1t could get caught when the holder closes. Label must face upward.
Repeat function This function repeats the play of ail racks. REPEAT Press REPEAT before or dur% ing play. <> Ghouls. REPEAT To cancel repeat play: Press REPEAT incs again. & indicator on the display will go out, For your reference: In program play made, the compass disc player will repeat only the programmed tracks, You can enjoy the same track over and over by programming only one track. -ELASTICSEARCH o Skip function SKIP-SEARCH e e, Press ether until you reach the desired track.
Direct access play ’ Random play {Ava liable only from the remote conifer) The microcomputer wiki automatically sellout & sequence of tracks fo Direct access allows you to start ‘sequential play from a specific frack be played In random order, 1o the last track on the disc. RANDOM Press RANDOM. NGO f Lights. Press the numeric bitten select the desired track nonrandom play will stats. ber. Play will start with the track you select. To select a two-digit track: o To cancel random play: % Crass 210.
K. Program play (Ava liable only from the remote control) This function allows you o program up to 24 tracks on a disc in any order you choose, o Gino 0i00 giro, QOO || L o This example shows how to program tracks 3, 5 and 7, in sequence. O Press the numeric button to select the track you want to 8 play in the desired sequence. Programmed order Programmed | Total playing dime track number | of the programmed tracks PANDORA ‘The compact disc player resumes sequential pay mods.
PR e Switch on the power on the amplifier. Press TUNER/BAND to select Each lime you press TUNER/BAND, FM, MW, “LW” will be displayed In order. Press tune into the desired broadcast. The display will show the frequency which you selected.
Playback You can use dither sack 1 or sack 2 for tape playback. You ean use normal, chrome and metal tapes fo playback. 3 Switch on the power on the amplifier, Press A OPEN, and then Insert tha cassette you wish to play. Insert the cassette with the exposed taps facing down, @-mfl side Press CLOSE on deck 1 to close the cassette holder, @Pwns Press DOLBY NR if the cascaded using the Dolby noise reduction mode. The Dolby MR I indicator wilt fight up.
wear To find the beginning of a program (TPS: tape program sensor) Press <« (TPS) or (TPS) P while the tape is playing. It the forward side (b~ s playing: : The tape will pay from the beginning of ihe next tune. : The tape wilt rewind to ihe beginning of the present tune, Then the tune will play again. If the reverse side of the gape is playing: “Tha reverse operation should take place. TPS (Tape Program Sensor) is the function that searches for the sit ant passage in & pale program.
— Sequential playback among 2 tapes You can listen to twa tapes consecutively with the procedure below. Load cassettes in decks 1 and « 2 “ Load with the side that you wish to listen 1o first racing you in deck 1. Press CLOSE to close each deck’s cassette holder. Rosette you want to play was recorded with Dolby noise reduction mode. The DOLBY NR IN indicator will light up, 1f the tape was not recorded using Colby NR mode, press DOLBY NR and the DOLBY NR OUT indicator wil light up.
Easy play From the power standby condition, you can start play directly, Listening to compact discs = Press », The play wil start trim the first track. Listening to radio broadcasts g Press TUNER/BAND, You can receive the station last tuned in when the power was switched io standby condition. Listening to tapes 2 > Press The playback wil automatically start cor@ responding to the direction (< or »)you select. When 2 tape has been loaded in both decks, the deck 1 will play.
You can use normal, chrome and meta tapes far recording. The deck automatically identifies the kind of tape loaded, and sets the bias {for recording) and equalization accordingly. You cannot record an the leader tape (the first few revolutions) so take up the leader tape in advance. (Ses page 30.) Press & OPEN on deck 2 to load a cassette. Press CLOSE on deck 2 to close the cassette holder, When making a recording using Dolby NR recording, press DOLBY NR so that the Dolby MR IN indicator lights.
CERT recording function: . CERT (Computer Carolinian Re card Tuning) is the function which identities tha quality of the tape {conceding albs, feel, equalizer) automatically and sets the most desirable recording condition, While the CERT settling is activated, the CERT indicator flashes. After the chatting has completed, CERT indicator stops flashing. The CERT chatting wil remain in the system’s memory even after the power is switched 1o the standby mode.
Hers ara 2 ways 1o record from compact discs, on-fouch editing and synchrony-racording. Saa below for the information. Use this procedural Tape allotment The system calculate the length of the tape used, and safeguards against a break in the continuity of sound when the recording changes from one side of the ape to the other.
> 3%loo You tan use normal, chrome, and metal tapes for retarding. Press & OPEN to load a cassette In deck 2. When the edit-record will start, the castle taps will automatically rewind the ape back to the beginning where the retarding can be made. So you font have to rewind the tape in advance. Press CLOSE on deck 2 to close the cassette holder. Press DOLBY NR so that the DOLBY NR IN indicator lights. Press REVERSE MODE to select “ o™ for automatic two sided recording.
Closing up the tape-end unrecorded sections (LAST FADE) LAST FADE Press LAST FADE. % Lights. 9__. The recording will start after the system completes spats 2-3 of "One-touch operation” below. Usa this editing mode when you record more than 24 tracks. —— One-touch editing operation: 1. The cassette deck will fast-toward and rewind to measure its length. At the same time, CERT function will be activated. (See page 30 2.
Linking up several discs (LINK) You can link up another disc when LINK indicator flashes after editing & compact disc. oo oo Press 4 OPEN/CLOSE to re. place the disc with another N disc, and then press It again. The time remaining on taps ! 2 Press I> 1o start recording. The retarding will start whh the same editing mode of the first disc.
Synchrony recording You can usa notional, chrome, and metal tapes for recording. Check that the tape's erasure prevention tabs (sse page 53) are Intact, and then insert the cassette into deck 2. The leader tape must be wound on beforehand. (Sae page 30.) Press & OPEN to load a cassette In deck 2. Press CLOSE on deck 2 to close the cassette holder. Press DOLBY NR so that the DOLBY NR IN Indicator lights.
You can use normal, chrome and matey) tapes for receding, The recording level and the noise reduction effect of the original {playback} taps will ba recorded on the new tape just s they wees in the original retarding. 1 3 Hack that the tape's erasure prevention tabs (see page 53) are intact, and then insert the cassette into deck 2, The leader tape must be wound on beforehand, (See page 30.) 16 (g e, For recording: into deck 2 Insert both cassettes with the starting side facing in front.
About equalization curves (EQ) Pl o dded el i Uss this sound made when you want to change the tone according to the types of music. There are 5 equalization curves reprogrammed to this. system., ({Ses page 38) About simulated listening environments (SPACE) — Use this sound meed when you want fo crests the "five” performance sours. There are 3 simulated listening environments reprogrammed to this system, (See page 39.
o 38 To retrieve the reprogrammed equalization curves (EQ made) &types of equalization curves reprogrammed to this system. # =8} Cashier Press MODE to select E mode. Each time you press MODE, EQ and SPACE mode wil be materially switched. Q e T Lod JERKY " i Lights, The display shows one of the EQ mode (HEAVY, GLARE, SOFT, CAR, HP 87 which i previously retrieved. Press and hold MODE to select PRESET mode, Each tme you press and hold MODE, PRESET and USER mode will be alter nattily switched.
To retrieve the reprogrammed simulated listening environments (SPACE mode) bypass of simulated listening environments reprogrammed to this system, mode, Each time you press MODE, EQ and SPACE mode wil be ultimately switched. LISLE Lights. The display shows one of the SPACE mode (DISCO, LIVE, HALL) which is previously retrieved. Press and hold MODE to select PRESET mode.
To adjust EQ and SPACE (“USER”’ mode) You can adjust equalization curves and simulated fastening environments as you like, and store thee as the USER mode In Its memory, v = Select the equalization curve v Bass | 1 or simulated listening environments V.BASS to ONION_ men of which you want Just the tone. LA (See pages 33-30) CLEAR yum == e V.BASS indicator its. med 2 % Press adjust the equalization curve or simulate late listening environment. VASSALS To cancel the V.
Make sure that you have completed “Ratting the time" on page 17, About the types of timer operation There are 3 types of timer aeration. You can use below timer modes in conjunction, See page 47 for details. Play timer (See pages 42-43): Select this mire when you want to use the timer as an alarm clock. Yau can wake up with listening to music {CD, tuner, ape) at a desired volume level and time, ‘Wei, at 8:30, play a CD with tattie volumetric.
@AY The fallowing example shows how to set the play timer for; playing everyday from Mandy through Friday 5:30 0 7:40. Adjust the volume level for the timer play on the amplifier. @ Press CLOCK/TIMER three times 1o select [X] PLAY. o | Br Lay ene @& O Within 10 seconds: @ Press SET. Press select the R} day. + e % OO0 v @ Cross SET, [ % (“ON" time setting) 4 N D Press select the 3 hour. LT R &R 500 Pem e @ Press SET. S @Press select the fe minutes, 3 S Ty file S e Press SET.
6 C{Q % (D Press select the desired source, T s @ Press SET. When you select tuner, dissect a desired prates channel using <« or W, and then press SET. 7 Prepare for the play. When you play a CD: Load a disc. When you play a tape: Load a taps, Pres: 8 POWER [@a to switch the power to standby Anaxagoras mode, Please confirm [T PLAY appears on the display.
SEC 1 g @Press CLOCK/TIMER twice 1o select [T REC. = S + Sr Rec ke &R Withing seconds: @ Press SET. 2 ‘:‘R (D Press select the &0 day. . kY e OO0 ™ @ Press SET. ("ON" time setting) 3 ) é (D Press select the + hour. N JIBES M e @ Press SET. G\Q % @Press select the v minutes. @Press SET. wed 2~5 4 %} (“OFF" time setting) X @Press select the 3 hour. Nan o ' @ Cross SET. GR % @Press select the & minutes. LRy Cur Rhine? @Press SET.
(@ Press select the desired preset channel, 10w 3 e @ Press SET. 6 Prepare for recording. 1. Insert a telecasts into deck 2, 2. Select the Dolby NA. 3, Select the revers mode, 4. Elect the taps travail! direction, Press POWER on the amplifier to switch the power to standby made, Please confirm {3 REC appears on the display, hare To cancel the timer; Press (T REC to go out [ REC on the display.
To use the sleep timer You can use this timer function to switch the pawpaw 10 the standby mode at & specified time (within & tangs of 1 minus t 120 minutes from the present time). ‘Tha following example shows how to sst the stern {0 standby mode after 30 minutes. enjoying the desired source: (D Press CLOCK/TIMER four times to select SLEEP. Ware s SLEEPER Tl Within 7 secants: @ Press SET. % @®Press select the desired length of time. -press SET. Please confirm SLEEP appears on the display.
To use each timer mode in conjunction To go to sleep listening to o tape, and wake up the next morning listening to a compact disc, and record from a radio broadcast while going out 1. Make a record timer setting. (See pages 44-45) 2. Make a play timer setting for @ compact disc. {See pages 42-43.) Be sure to set the timer play to ba off boors the timer recording will start, Play back the tape In deck 1, and adjust the volume fecal. {Select “C520" of the reverse modes.) .
This function mutes the vocal track but leaves the accompaniment allowing you to enjoy “KARADKE™ {singing with an accompaniment), Connect the microphone to MIC after reducing the volume level, Plug type: M6 monaural type Press KARAOKE to ON. Each time you press KARAOKE, “VOICE MUTE”, “LONELY, "R ONLY" will bo.
Listening to an external source You can connect DCC (or DAT) or analog turntable t this system. The following example shows when you select DCC. Press EXT to select the external source, R T FEES ELBERT Each time you pass EXT, “DCC” and “PHONIC" will be alternately displayed, 2 Operate the unit which Is connected to the system. See the Instruction manual of the unit noncombat for operating instructions, @;L Start playing the source 1o b recorded.
Common operation CD section Switching the system on pouch .
Tape section Tone control section Switching between equalization curve and simulated listening environment Oi Switching equalization curve or simulated fastening environment on croft o Switching between PRESET and USER mode Press and hood O Switching between sack 1 oss and sack 2 = Starting playback O O Finding the beginning ofa | Backslapping ck Q5 Fast forwarding or I stop mods« rewinding the tape D O .
Only compact discs having this mark can be used with this unit. DIGITAL AUDIO To remove a disc from its case Crass the center holder and it the dist holding by the edges. To hold the disc Hold the disc by the edges so the surface Is not soled with fingerprints.
Maintenance of external surfaces Ta clean this unit, use a soft, dry cloth. If the surfaces are extremely dirty, use a soft cloth dipped In a sap-and-water solution or a weak detergent solution. Wring the cloth wile before. wiping the unit, Wis once again with a soft, dry cloth. Never use alcohol, paint thinner, benzene, or chemically treated cloths to clean this unit, Such chemicals may damage the finish of your system.
Before requesting services for this unit, check the chart below.for a possible cause of the problem you ere experiencing. Some simple checks or & tad nor adjustment on your pan may eliminate the problem and restore proper operation. i you sre in doubt about some of the check points, ar if the remedies indicated in the chart do not solve the problem, refer to the directory of Authorized Service Centers (enclosed with this unit) to locate a convenient services nectar, or consult ‘your dealer for Instructions.
Problem Probable cause(s) Suggested remedy When there is a television set nearby The picture on the TV disappears or stripes appear on the screen, The lactation and orientation of the antenna are Incorrect, i you are using an indoor antenna, change to an outdoor antenna. The wiring at the back of the system is unsuitable. Separate the antenna. wire of the TV set from the system. While listening to ta| pes Sound Is fow, Intermittent, or poor quality, nosy, scratchy, or unsteady.