OPERATING INSTRUCTIONS LCD46-920 COLOUR TELEVISION WITH REMOTE CONTROL For assistance, please call our Tesco Electrical Helpline on 0845 4566767
Contents Features ................................................................. 2 Accessories ............................................................ 2 Introduction ............................................................. 2 Preparation ............................................................. 2 Safety Precautions ................................................. 3 Power Source ..................................................... 3 Power Cord ...............................................
Accessories Features • Remote controlled colour LCD TV. • Fully integrated digital TV (DVB-T). • HDMI connectors for digital video and audio. This connection is also designed to accept high definition signals. EPG SCREEN LANG • 200 programmes from VHF, UHF(analogue). SLEEP GHI DEF ABC • USB input. SUBTITLE 1 2 3 JKL MNO PQR 4 5 STU VWX 7 8 FAV 0 6 YZ 9 TV DTV V • 300 programmes for digital mode (IDTV). Batteries: 2 X AAA P • OSD menu system.
Safety Precautions Please read the following recommended safety precautions carefully for your safety. Power Source The TV set should be operated only from a 220-240 V AC, 50 Hz outlet. Ensure that you select the correct voltage setting for your convenience. Power Cord Do not place the set, a piece of furniture, etc. on the power cord (mains lead) or pinch the cord. Handle the power cord by the plug.
Installation To prevent injury, this device must be securely attached to the wall in accordance with the installation instructions when mounted to the wall (if the option is available). LCD Screen The LCD panel is a very high technology product with about a million thin film transistors, giving you fine picture details. Occasionally, a few non-active pixels may appear on the screen as a fixed blue, green or red point. Please note that this does not affect the performance of your product.
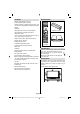
Overview of the Remote Control 1. Standby 2. Yellow / Feature menu / Current language (*) (in DTV mode) 3. Blue / Install menu / Favourite mode (*) (in DTV mode) 4. PIP / PAP mode EPG 5. Guide (in DTV mode) SCREEN SUBTITLE LANG SLEEP 6. Sleep timer 7. Subtitle on-off / TXT subtitle 8. Numeric buttons 9. TV – Digital TV mode DEF 1 2 3 JKL MNO PQR 6 4 5 STU VWX YZ 7 8 9 10. Volume up 11. Programme up / Page down (in DTV mode) GHI ABC FAV 0 TV DTV V 12. AV / Source selection 13.
LCD TV and Operating Buttons 1. Standby button 2. TV/AV button 3. Programme Up/Down buttons 4. Volume Up/Down buttons ” / “ ” Note: Press “ buttons at the same time to view main menu. Viewing the Connections- Back Connectors 12 13 1. S/PDIF Digital Out outputs digital audio signals of the currently watched source. Use a digital optic cable to transfer audio signals to a device that has S/PDIF input. 2.
5. SCART 1 inputs or outputs for external devices. Connect the SCART cable between SCART sockets on TV and SCART socket on your external device (such as a decoder, a VCR or a DVD player). Note: If an external device is connected via the SCART sockets, the TV will automatically switch to AV mode. If both sockets are employed at the same time, SCART 1 will override SCART 2 unless manually selected. Note: You should connect the decoder to EXT-1, if you are planning to watch a scrambled channel.
Viewing the Connections - Side Connectors 1. CI Slot is used for inserting a CI card. A CI card allows you to view all the channels that you subscribe to. For more information, see “Conditional Access” section. 2. Side USB input. Note: Codec update cannot be performed. 3. Side HDMI Input is for connecting a device that has an HDMI socket. 4. Headphone jack is used for connecting an external headphone to the system. Connect to the HEADPHONE jack to listen to the TV from headphones (optional). 5.
USB Memory Connection Power Connection IMPORTANT: The TV set is designed to operate on 220-240V AC, 50 Hz. • After unpacking, allow the TV set to reach the ambient room temperature before you connect the set to the mains. • Plug the power cable to the mains socket outlet. Side HDMI Connection You can use side HDMI input to connect a device that has an HDMI connector to your TV. Use an appropriate HDMI cable to make such a connection.
When the connection is made, switch to YPbPr source. See, “Input selection” section. • You may also connect through the SCART 1 or SCART 2. Use a SCART cable as shown below. • For connecting a to a device that has SPDIF support, use an appropriate SPDIF cable to enable sound connection. External Speakers Note: These three methods of connection perform the same function but in different levels of quality. It is not necessary to connect by all three methods.
Inserting Batteries in the Remote Control Handset Input Selection • Remove the battery cover located on the back of the handset by gently pulling backwards from the indicated part. • Insert two AAA/R3 or equivalent type batteries inside. Place the batteries in the right directions and replace the battery cover. Once you have connected external systems to your TV, you can switch to different input sources. • Press “SOURCE” button on your remote control for directly changing sources.
Operation with the Remote Control • The remote control of your TV is designed to control all the functions of the model you selected. The functions will be described in accordance with the menu system of your TV. • Functions of the menu system are described in the following sections. Volume Setting If an active antenna is connected to your TV, you can select this option as On. Antenna power should be “Off” when standard antenna is used instead of the active antenna.
Select your Country, Language and Text language by using “ ” or “ ” and “ ” or “ ” buttons. Press OK or RED button to continue. To cancel, press the BLUE button. For more information on this process, see “Install Menu” section. Note: For proper functioning of digital teletext in DTV mode, you should set country as UK in analogue AUTO PROGRAM (for UK only). • Press EPG button to view the EPG menu. • Electronic Programme Guide appears on the screen.
following warning message display on the screen (* for UK only): Press the “M” button. The menu below appears on the screen: Digital Teletext (** for UK only) • Press the TELETEXT ( ) button. • The digital teletext information appears. • Operate it with the coloured buttons, cursor buttons and OK button. The operation method may differ depending on the contents of the digital teletext. Follow the instructions displayed on digital teletext screen.
Note: If you enter the same programme number of the channel that you want to move, “.... channel services will be replaced. Do you want to continue?” OSD will be displayed. Press OK to confirm or select “No” to cancel. Deleting the Channels in the Channel List • Press “ ” or “ ” button to select the channel that will be deleted. • Press “ ” or “ ” button to select the “Delete’’ item on Channel List menu. Now pressing “ ” or “ ” button moves to the previous/ next character.
Date: Starting date is entered via the Left/Right or the numeric buttons. Start: Starting time is entered via the Left/Right or the numeric buttons. End: Ending time is entered via the Left/Right or the numeric buttons. Duration: Duration between Start and End time. Repeat: You can set a timer to be repeated as Once, Daily or Weekly. Change/Delete: permits or prohibits any modifications for other users.
• To see the viewing contract information: enter IDTV; press the “M” button, then highlight Conditional Access and press the OK button. • When no module is inserted, “No Conditional Access module detected” message appears on the screen. • Refer to the module instruction manual for details of the settings. NOTE: Insert or remove the CI module only when the TV is in STAND-BY mode or SWITCHED OFF. TV Setup AC3 Audio (* for EU countries only) You can use this item to display the TV functions.
channels as well. If it is set as OFF manually, encrypted channels will not be located while in automatic search or manual search. Use “ ” or “ ” button to select Scan Encrypted and then press “ ” or “ ” button to set this setting as On or Off. Receiver Upgrade Parental Control Use “ ” or “ ” buttons to go to Parental Lock option. Press OK button to enter the menu. A dialog box asking for the lock key will be displayed. The key is set to “0000” initially. Enter PIN.
screen. Current Time,Time Zone Setting and Time Zone will be available. Use “ ” or “ ” buttons to highlight the Time Zone Setting. Time Zone Setting is set using “ ” or “ ” buttons. It can be set to AUTO or MANUAL. When AUTO is selected, Current Time and Time Zone options will not be available to be set. If MANUAL option is selected as the Time Zone Setting, Time Zone can be altered: • By pressing “ ” or “ ” buttons select Time Zone. Use “ ” or “ ” buttons to change the Time Zone between GMT-12 or GMT+12.
Notes: • System Language determines the on-screen menu language. • Audio Language is used for selecting the soundtrack of a channels. • Primary settings are the first priority when multiple choices are available on a broadcast. Secondary settings are the alternatives when the first options are not available. Installation The Installation menu is mainly intended to help you for creating a Channel Table in the most efficient way. Select Installation from the Configuration menu by pressing “ ” or “ ” buttons.
First Time Installation The user can use this item to load default settings, which were loaded to the receiver at the factory. To install factory settings, highlight “First Time Installation” menu item and press OK button, then you will be asked whether or not to delete the settings. Selecting “Yes” by pressing OK button while the “Yes” is highlighted will delete the existing channel table. Select YES by pressing “ ” or “ ” button and press OK button. Media browser will be displayed.
Viewing JPG Files • You can set subtitles by using OK button before starting the playback or by using M button during the playback. Press RETURN (Exit) button to switch back to previous menu. Note: PIP/PAP mode is not available while in Media Browser mode. Analogue TV Menu System Picture Menu Jump (Numeric buttons) : jump to selected file using the numeric buttons. OK : views the selected picture in full screen. Play / Slideshow (Green button) : starts the slideshow with all pictures in the folder.
Press “ ” or “ ” button to select Noise Reduction. Press “ ” or “ ” to choose from one of these options: Low, Medium, High or Off. Sound Menu Film Mode Films are recorded at a different number of frames per second to normal television programmes. Press “ ” or “ ” button to select Film Mode. Press “ ” or “ ” button to set this feature On or Off. Turn this feature on when you are watching. films to see the fast motion scenes clearly. Game Mode Select Game Mode by pressing “ ” or “ ” button.
Headphone Feature Menu Press “ ” or “ ” button to select Headphone. Press “ ” button to view the headphone menu. Headphone sub-menu options are described below: Volume Press “ ” or “ ” button to select Volume. Press “ ” button to increase headphone volume level. Press “ ” button to decrease headphone volume level. Headphone volume level can be adjusted between 0 and 63. Headphone Sound (optional) Press “ ” or “ ” button to select Headphone Sound.
Note: This setting will be inactive if the TV is set to Pap mode. Blue Background This setting is used for moving the sub picture. If the signal is weak or absent, the TV will automatically change to a blue screen. To enable this, set Blue Background to On. Select PIP Position item by using “ ” or “ ” button. Use “ ” or “ ” button to adjust PIP position. By pressing “ ” or “ ” button, select Blue Background. Press “ ” or “ ” button to set Blue Background as On or Off.
Install Menu Install Menu in AV Modes The following screen appears in the install menu when the TV is in AV modes. Note that limited options will be available. Switch to TV mode for viewing complete version of the Install menu. Program Press “ ” or “ ” button to select Program. Use “ ” or “ ” button to select the program number. You can also enter a number using the numeric buttons on the remote control. There are 200 programme storage between 0 and 199. Band Band can be selected either C or S.
Name Source Menu To change the name of a programme, select the programme and press the RED button. Press “ ” or “ ” button and select the sixth icon. Then press “ ” or OK button. Source menu appears on the screen: The first letter of the selected name will be highlighted. Press “ ” or “ ” button to change that letter and “ ” or “ ” button to select the other letters. By pressing the RED button, you can store the name. Move Select the programme which you want to insert by navigation buttons.
into correct place automatically. This setting therefore automatically optimizes the display. Select Autoposition item by using “ ” or “ ” buttons. Press OK or “ ”, “ ” button. Warning: Please ensure auto adjustment is performed with a full screen image to ensure best results. H (Horizontal) Position This item shifts the image horizontally to right hand side or left hand side of the screen. Mute Function Press “ ” button to disable sound. Mute indicator will be displayed in the upper side of the screen.
Press “SCREEN” button to directly change the zoom mode. Available zoom modes are listed below. Note: In YPbPr and HDMI modes, while in 720p-1080i resolutions, only 16:9 mode is available. In PC mode, only 16:9 mode is available. Cinema This zooms up the wide picture (16:9 aspect ratio) to the full screen.
“ Poor Picture ” Reveal Shows hidden information (e.g. solutions of games). “OK” Hold Holds a text page when convenient. Press again to resume. “ ” Subcode Pages Selects subcode pages if available when the teletext is activated. P+ / P- and numbers (0-9) Press to select a page. Note: Most TV stations use code 100 for their index pages. Coloured Buttons Have you selected the correct TV system? Is your TV set or house aerial located too close to a non-earthed audio equipment or neon lights, etc.
Appendix A: PC Input Typical Display Modes Appendix B: AV and HDMI Signal Compatibility (Input Signal Types) The display has a maximum resolution of 1920 x 1200. The following table is an illustration of some of the typical video display modes. Your TV may not support different resolutions. Supported resolution modes are listed below. If you switch your PC to an unsupported mode, a warning OSD will appear on the screen. Note: Resolution modes indicated with (*) are not available for PIP/PAP modes.
Appendix C: Supported DVI Resolutions When connecting devices to your TV’s connectors by using DVI converter cables (not supplied), you can refer to the following resolution information.
Appendix E: Supported File Formats for USB Mode Media File Extension Audio (Maximum resolution/Bit rate etc.) MPEG Layer 1/2/3 MPEG2 PCM/MP3 60 Hz (frame refresh rate). 60 Hz (frame refresh rate). Up to 640 x 480. PCM/MP3 Support SP and ASP -- MPEG1 MPEG2 MPEG4 MS ISO MPEG4 MJPEG -- PCM PCM MPEG 1/2 30fps@VGA Sample Rate: 8K ~ 48KHz .mp3 -- Layer 1/ 2/ .mpg/ .dat/ .vob Movie .avi Music Remarks Format Video Sample Rate: 8K ~ 48KHz, Bit Rate: 32K~320Kbps 3 (MP3) .
Specifications TV BROADCASTING PAL/SECAM B/G D/K K’ I/I’ L/L’ RECEIVING CHANNELS VHF (BAND I/III) UHF (BAND U) HYPERBAND MHEG-5 ENGINE compliant with ISO/IEC 13522-5 UK engine Profile 1 Object carousel support compliant with ISO/IEC 135818-6 and UK DTT profile for UK Frequency range: 474-850 MHz for UK models Digital Reception 170-862 MHz for EU models Transmission standard: DVB-T. MPEG-2 Demodulation: COFDM with 2K/8K FFT mode FEC: all DVB modes Video: MP@ML, PAL, 4:3/16:9 Audio: MPEG Layer I&II 32/44.
Important Instruction For your own safety read following instruction carefully before attempting to connect this unit to the mains supply.
50157258