LCD TV RECEIVER USER'S MANUAL Please read this manual carefully before using your television and keep this manual for future reference.
CONTENT Safety Notice .........................................................................................1 Front Panel Control................................................................................ 2 Connection ........................................................................................... 3 Remote Control ..................................................................................... 4 Remote Control ..........................................................................
Safety Notice To prevent fire or electric shocks please read the instruction before installing, using and cleaning the television.
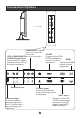
Front Panel Control SOURCE MENU 2 3 VOL- 4 VOL+ CH- CH+ 5 STANDBY 1 6 7 Control Panel Function 1. Standby switch 2. SOURCE Select the input signals: PC/COMPONENT/HDMI/DTV/ TV/SCART/S-VIDEO 3. MENU Press to select the main menu 4. VOL- Volume down / Left orientation to adjust the item in the OSD VOL+ Volume up / Right orientation to adjust the item/Press to enter 5. CH- TV channel down / to select the item in the menu CH+ TV channel up / to select the item in the menu 6.
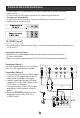
Connection Options ANT IN AUDIO IN Pr Pb Y S-VIDEO TV SCART VGA IN HDMI COMPONENT Input Connect a component video/audio VGA /COMPONENT/device to these jacks SVIDEO Audio Input Connect the PC output connector from a PC to the audio input port ANT IN AUDIO IN Pr Earphone port Antenna Input Connect cable or antenna signals to the TV, either directly or through your cable box.
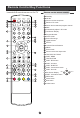
Remote Control Key Functions When using the remote control, aim it towards the remote sensor on the TV Buttons on the remote control Stand By SLEEP STANDBY Q.VIEW NICAM DISPLAY MUTE NICAM Press to set the sleep timer PC AUTO AD Switch to PC mode Return the last watched program channel 1 2 3 4 5 6 7 8 SOURCE 9 0 Automatically adjust in PC mode Call Screen Display Program Number Picture mode -/-- P.
Remote Control Key Functions Installing Batteries 1.Open the cover of the battery compartment at the back of the remote control. 2.Insert two AA alkaline batteries in the compartment. (plus and minus poles to respective mark) 3.Replace the cover of the battery compartment. 1 2 3 Precautions Make sure that there is no obstacle between the remote controller and television set. Keep the remote controller away from heat source or humid area to ensure effective performance of the remote controller.
Connection Instructions Grounding Ensure that you connect the grounding / earth wire to prevent possible electric shock. If grounding methods are not possible, have a qualified electrician install a separate circuit breaker. Do not try to ground the unit by connecting it to telephone wires, lightening rods, or gas pipes. External Equipment Connections Antenna Connection - Antenna or Cable Service with a Cable Box Connections - For optimum picture quality, adjust antenna direction if needed.
Connection Instructions VGA Input You can use your LCD-TV as a monitor for your personal computer using a VGA cable (not supplied). Connection and use steps: 1.Read the user guide supplied with your computer and ensure that it has a VGA connector; 2.Make sure that the power of the LCD -TV and the PC are off; 3.Connect a D type 15-pin VGA interface VGA IN cable ( not supplied ) to the VGA video interface connector on the PC.
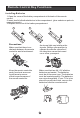
Connection Instructions COMPONENT (If connected to S-VIDEO,select the S-VIDEO external input source.) 3. Refer to the DVD player's manual for operating instructions. Component Input ports To get better picture quality, connect a DVD player to the component input ports as shown below. S-VIDEO Input - To avoid picture noise (interference), leave an adequate distance between the VCR and TV Connection and use steps: 1.
Connection Instructions SCART Input 1.Connect the scart lead from the external device(DVD players, settop boxes or game consoles, to the TV SCART socket. 2.Press SOURCE to select SCART mode. 3. Press Play button on external equipment and it should appear on the screen. SCART External equipment HDMI Input HDMI TV HDMI Devices Connect the cable from the HDMI devices to the TV HDMI, as shown in the figure. How to use 1. Select the HDMI source by using the SOURCE button on the remote control. 2.
Basic Operating Instructions Turn on the LCD-TV When the STANDBY button on the remote control is pressed and the LCD-TV is turned on, the indicator light on the front of the LCD-TV changes from red to green. When the LCD-TV is turned off using the STANDBY button, the LCD-TVwill go into standby mode and the indicator light turns red. You can also turn on the TV from standby mode by pressing the digits(1-9) or P+/- .
Basic Operating Instructions Select the TV Channel You can use the number keys on the remote control to directly select TV channels. The LCD-TV can store up to 100 channels , and you can press the keys on the remote control or on the panel to make a selection. 1. if you want to choose any channel from 0 to 9, please press the -/-- button until - is indicated on the screen and then press the relevant key on the remote control. for example: if you want to choose channel 8, just press the Key number 8. 2.
Menu Operations 1. Press MENU button to display the main menu, and V+/V-to select the main menu . 2. Press P+/P- to scroll through the options 3. Press V+/V- buttons to make changes to the parameters 4. Press the EXIT button to exit the menu Picture Menu Options Picture quality can be adjusted for any input separately . The picture quality on the screen can be adjusted as follows: 1. Press MENU button and V+/V- until the following menu appears on the screen. 2.
Menu Operations Picture Menu Options Continued 3.Press V+/V- button to increase and decrease the level to match your preference . 4. Repeat step 2 and step 3 until desired picture quality has been achieved . Functions: BRIGHTNESS :Adjust the brightness of the picture . By increasing the level, it will add more light to dark parts of the picture and by decreasing the level ,it will add more dark to light parts of the picture. CONTRAST : The image becomes higher as the number increase.
Menu Operations Audio Menu Options Continued 2. Press P+/P- button to enter the audio menu and to go up and down to select the desired option . 3.Press V+/V- button to increase and decrease the level to match your preference . 4. Repeat step 2 and step 3 until desired sound quality has been achieved . Functions : VOLUME : Adjust the volume of your TV BALANCE : Adjust the balance of the audio output from left to right .
Menu Operations Function Menu Options The menus can be shown on the screen in the selected language. First select your language. 1. Press MENU and V+/V- button until the following menu appears on the screen 2. Press P+/P- button to select LANGUAGE. 3. Press V+/V- button to select your desired language. From this point on, the on-screen menus will be shown in the language of your choice.
Menu Operations Function Menu Options Continued 4.DISPLAY MODE: To select the display mode between 4:3, 16:9 and FULL SCREEN 5.BLUE SCREEN:To set On, the screen will be in blue screen after 3 seconds if there is no signal. 6. RESET : Press V+ to reset the settings to the factory default . 7. CHILD LOCK: Press V+ to enter it and the following appears on the screen: PASSWORD: ---- If password is correctly entered, the CHILD LOCK menu will be entered.
Menu Operations Adjust Menu Options 1. Press MENU and V+/V- button until the following menu appears on the screen ADJUST AUTO SYNC PHASE CLOCK H. POSITION V. POSITION 50 50 50 50 Note: This menu only appears in PC mode . 2. Press P+/P- button to enter the adjust menu and to go up and down to select the desired option 3.Press V+/V- button to increase and decrease the level to adjust the selected option to your preference . 4. Repeat step 2 and step 3 until desired quality has been achieved.
Menu Operations Tuning Menu Options 1. Press MENU and V+/V- button until the following menu appears on the screen TUNING TUNING PROGRAM COUNTRY UNITED KINGDOM AUTO SEARCH Note: This menu only appears in TV mode . 2. Press P+/P- button to enter the tuning menu and to go up and down to select the desired option . 3.Press V+/V- button to increase and decrease the level to adjust the selected option to your preference . 4. Repeat step 2 and step 3 until desired quality has been achieved . Functions: 1.
Menu Operations Tuning Menu Options Continued SKIP : If you want to skip a channel , press V+/V- to select ON , and this channel will be skip next time when you press P+/P- . But you can press digits button to select the channel . If you want to restore the channel , select OFF. AFC : Auto frequence control . Select ON to improve the image quality . FINE TUNE :Press P+/P- to select FINE TUNE item in menu . Then , press V+/Vbutton to adjust and improve the image quality .
DVB-T Main Menu Operations Press TEXT button to display the additional information. Press the DTV/TV button on the remote control to enter the DVB status. 1. Press D.MENU button to display the main menu 2. Press / to scroll through the options 3. Press OK button to confirm enter the submenu 4. Press the D.MENU or EXIT button to exit the menu Channel List 1. Press D.MENU button , the main menu will appear. Main Menu Channel List Favourites Guides Timers Settings 2. Press / submenu.
DVB-T Main Menu Operations Favourite List 1. Press D.MENU button , the main menu will appear. Main Menu Channel List Favourites Guides Timers Settings 2. Press / sub-menu. 3. Then press 4. Press / button to select Favourites and OK button to confirm enter the / to select among List 1, List 2, List 3, List 4 and List 5. button to select the channel and OK button to set to add or remove. . After the operation, you can press FAV button to display the favourites channel.
DVB-T Main Menu Operations (INFO)More: Press i button to display more information about operation when you need help and press again to exit the help. List Schedule EPG: Press / button to select List Schedule EPG and OK button to enter the sub-menu / :press these buttons to navigate the program list. (Red and green): press red or green button to change schedule time shown on the screen. (Yellow and blue): press yellow or blue button to advance the schedule back or forward a day.
DVB-T Main Menu Operations Press / button to select the other items, and then press the digits button to set the Start time, End time and Date. Press / button to select Password and then press digits to set the password. / 4. After you have set the timer, you could press the timer. to enter the Enter Lock Key screen / to activate or deactivate Note: Press INFO button to display more information about operation when you need help and press again to exit the help. Settings Configuration 1. Press D.
DVB-T Main Menu Operations Settings (continued) Language 1. Press D.MENU button , the main menu will appear. Main Menu Channel List Favourites Guides Timers Settings 2. Press / sub-menu. . button to select Settings and OK button to confirm enter the Settings Configuration Language Installation 3. Press / button to select Language and OK button to confirm enter the sub-menu. Press / button to select Preferred or Current. Press OK button to confirm.
TELETEXT Teletext is an information system, broadcast by certain channels, which can be read like a newspaper . It also provides subtitles for people with hearing difficulties or those who are unfamiliar with the language in which a particular program is being broadcast (cable networks, satellite channels, etc.). Note: The teletext buttons could be working even if there is no teletext signal, but there is no teletext display.
TELETEXT Teletext Language change Pressing the button will change the Teletext characters between Eastern and Western. Hold Pressing the button will stop the teletext page automatically updating. This feature is very useful where there are several teletext pages or data on the same page number. Size Pressing the button changes between full screen top half bottom half full screen. This feature is very useful as it magnifies the image making the characters easier to read.
Troubleshooting Guide To assist in location possible faults use help guide below. Troubleshooting No picture, no sound Verify if the television is properly plugged in. Verify if the television has a proper supplied power source. Verify if electricity is available. Blank screen Verify if correct signals are input. Press SOURCE button to change signal input to TV input. Restart the television if power supply is interrupted. No sound Press MUTE button and verify if Mute mode is set.
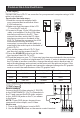
Specifications Specifications of the television that you have just purchased may vary from the information in this table due to technical innovations. Picture, sound system Audio output External input port PAL/SECAM-B/G,I,D/K,L,L 1.5W+1.
V0.