HD Ready LCD TV with Freeview & DVD User Guide Model No LCD26-310
INTRODUCTION Thank you for purchasing this Technika Advanced which has been designed and manufactured to give you many years of trouble-free service. You may already be familiar with using a similar product but please take time to read these instructions which have been written to ensure you get the very best from your purchase. Throughout the remainder of this user guide the Technika Advanced will be referred to as the ‘TV’.
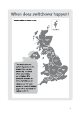
Important information regarding the digital TV switchover Television in the UK is going digital, bringing us all more choice and new services. Starting late 2007 and ending in 2012, television services in the UK will go completely digital, TV region by TV region. How the switchover affects your TV equipment.
SAFETY INFORMATION IMPORTANT SAFETY INSTRUCTIONS – READ CAREFULLY BEFORE USE Take note of the following safety information which appears on the back of this TV. CAUTION! TO PREVENT ELECTRICAL SHOCK, DO NOT REMOVE ANY COVER OR SCREWS. NO USER SERVICEABLE PARTS INSIDE. REFER SERVICING TO QUALIFIED SERVICE PERSONNEL. This symbol indicates that there are important operating and maintenance instructions in the literature accompanying this unit.
CAUTION! CHANGES OR MODIFICATIONS NOT EXPRESSLY APPROVED BY THE MANUFACTURER COULD VOID THE USER’S AUTHORITY TO OPERATE THIS DEVICE. CAUTION! USAGE OF CONTROLS OR ADJUSTMENTS OR PERFORMANCE OF PROCEDURES OTHER THAN THOSE SPECIFIED HEREIN MAY RESULT IN HAZARDOUS EXPOSURE. Important This TV generates, uses and can radiate radio frequency energy and, if not installed and used in accordance with these instructions, may cause harmful interference to radio communication.
CONTENTS SETTING UP YOUR TV - What is included in the box - REMOTE CONTROL - CONNECTING THE TV - Tuning in TV - Digital Switchover Re-Tune - Remote control buttons and their functions - TV buttons and their functions - Inputs and Connections - Choosing Mode/Source TV MENU OPERATION PICTURE SETTINGS MENU - Selecting Picture Mode Preset - Adjusting Contrast - Adjusting Brightness - Adjusting Colour - Adjusting Tint - Adjusting Sharpness - Adjusting Colour Temperature - Dynamic Noise Reduction SOUND SETTINGS M
WHAT IS INCLUDED IN THE BOX Accessories Included with this TV are the following accessories: 1x - User Guide Book 1x - Remote control VOL CH 1x - RF lead 2x - AAA batteries 1x - Quick Start Guide 1x - TV 1x - Leaflet 1x Mains Cable 1x Blanking Plate Please save your packaging as you will need this in the event of warranty/service repair or support. We are unable to carry out warranty/service if you are unable to package it correctly.
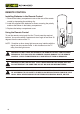
REMOTE CONTROL Installing Batteries in the Remote Control 1. Remove the battery compartment cover at the rear of the remote control by depressing the retaining clip. 2. Install the supplied AAA batteries as shown, ensuring the polarity matches that shown in the battery compartment. 3. Replace the battery compartment cover. Using the Remote Control To use the remote control point it at the TV and press the required buttons.
CONNECTING THE TV WARNING! ENSURE THE TV AND ALL ANCILLARY EQUIPMENT IS UNPLUGGED FROM THE MAINS BEFORE MAKING ANY CONNECTIONS! Connecting the TV Antenna Connect the TV antenna to the aerial socket with a 75 ohm co-axial plug. For best results use a high gain TV aerial, preferably roof or loft mounted. • To improve picture quality in a poor signal area, purchase DQG LQVWDOO D VLJQDO DPSOL¿Hr. • If the antenna needs to be split for two TVs, use a 2-Way Signal Splitter (not supplied).
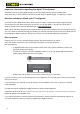
GETTING STARTED - INITIAL SET UP IMPORTANT - AFTER TUNING DO NOT PRESS ANY BUTTONS FOR 20 SECONDS SO THE CHANNEL INFORMATION CAN BE STORED. TUNING IN IMPORTANT — Please ensure the TV has reached room temperature before connecting the power for the first time 1) Connect the mains lead to your electrical outlet If no channels are found the following screen will appear, please refer to additional information below.
REMOTE CONTROL BUTTONS DISPLAY Digital mode: Exit the Digital menu. DVD mode: Stop the DVD playing. Digital mode: press to select NICAM. DVD mode: press to select DVD audio channels. Press -/-- for 10 to 99, and again for 100 to 99. GUIDE Teletext mode: press to enter the teletext mode. DVD mode: press to play a DVD Programme in fast rewind mode. PICTURE FORMAT Digital mode: press to display FAV menu. Teletext mode: press hold on or off for current page display.
TV BUTTONS & THEIR FUNCTIONS TOP PANEL BUTTONS Please insert a 12cm disc according to the instructions 1 Select the input source 2 Displays Menu/OSD 3 Programme/Channel up and menu up 4 Programme/Channel down and menu down 5 Volume up and menu up 6 Volume down and menu down 7 DVD - Play/Pause 8 DVD - Eject 9 Power On/Off SOURCE 1 2 3 4 5 6 7 8 9 This model is fitted with a main on/off switch which is located on the back right hand side of the set as you look at it.
INPUTS & CONNECTIONS REAR CONNECTIONS CI Port MAIN POWER SWITCH 1. AC POWER INPUT: 100-240V AC 50/60Hz. (Warning: This appliance must be earthed). 2. HDMI 1 / 2: Connect to the HDMI sockets of DVD player or other equipment. 3. VGA: PC Display. Connect to the D-Sub 15 pin connector of PC. 4. PC AUDIO : Connect to Audio output of PC sound card. 5. S-VIDEO: Connect to S-Video socket of DVD player or similar equipment (video only). 6.
TV MENU OPERATION PICTURE SETTINGS MENU Lets you adjust picture mode, contrast, brightness, colour, tint and sharpness to enhance the viewing experience.
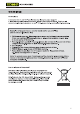
TV MENU OPERATION PICTURE SETTINGS MENU Adjusting Tint Lets you increase or decrease the level of tint within the picture 1) Press [LCD-MENU] to enter menu 2) Press [\/] to highlight Tint 3) Press [>] to increase the tint or [<] to decrease the tint Adjusting Colour Temperature There are 3 presets for colour temperature Normal Warm Standard setting Increased red within the picture Cold Increased blue within the picture 1) Press [LCD-MENU] to enter menu 2) Press [\/] to highlight Colour Temperature 3) P
TV MENU OPERATION SOUND SETTINGS MENU Adjusting Bass To adjust the amount of bass within the sound Adjusting Volume Lets you adjust the volume of the television 1) 2) 3) 4) 1) Press [LCD-MENU] to enter menu 2) Press [>] to move to Sound Settings Menu 3) Press [\/] to highlight Volume 4) Press [>] to increase the volume or [<] to decrease the volume Press [LCD-MENU] to enter menu Press [>] to move to Sound Settings Menu Press [\/] to highlight Bass Press [>] to increase the bass or [<] to decrease the b
TV MENU OPERATION TUNING SETTINGS MENU (Only Freeview & Analogue TV modes) Adjusting Country If you are moving country you may wish to change the Country Settings 1) Press [LCD-MENU] to enter menu 2) Press [>] to move to Tuning Settings Menu 3) Press [\/] to highlight Country 4) Press [>] to alter the chosen country 6) Press [>] to start 7) Press [EXIT] to exit Program Edit / Changing Channel Position (Only Freeview & Analague TV modes) You can change the analogue channel position to suit your requirement
TV MENU OPERATION Common Interface Slot (Only in Freeview Mode) Pay per view services require a “smartcard” to be inserted into the TV. If you subscribe to a pay per view service the provider will issue you with a ‘CAM’ card “smartcard”. The CAM can then be inserted into the COMMON INTERFACE PORT. To access the card follow the steps below.
TV MENU OPERATION 4) To switch on child lock or key lock press [>] GENERAL SETTINGS MENU Lets you adjust the language, picture size, blue screen, add child lock, complete first time installation and reset the television. On Screen Menu Language Lets you change the on screen menu language. 1) Press [LCD-MENU] to enter menu 2) Press [>] to move to General Settings Menu 3) Press [\/] to highlight Language 4) Press [>] to change the language 5) To change Pin Code enter menu.
ELECTRONIC Programme GUIDE & DIGITAL TELETEXT Electronic Programme Guide (EPG) The Electronic Programme Guide (EPG) is available in Digital TV mode. It is a 7 day TV guide and provides information about forthcoming programmes (where supported by the broadcasted channel). Digital TV Teletext With Digital TV (Freeview) there is also digital teletext available on some channels. Simply follow the on screen commands. Here is an example of the BBC digital teletext service.
TELETEXT OPERATION (ANALOGUE TV ONLY) Teletext is a service offered by some broadcasters. Teletext Operation 1) Press [TEXT], after a few seconds teletext page 100 should appear. Here is an example of BBC1 2) You can now navigate to the page you require in a number of ways: a) Press the page you require using the number buttons i.e.
CONNECTING TO A PC - WINDOWS XP IMPORTANT— Before connecting to a PC you must ensure that the settings of the PCs output are correct for the new LCD Monitor. 4) Left click your mouse on Settings, this screen will appear. Check the screen resolution is set to what is show in the technical specifications section. You can adjust the resolution by moving the slider on screen.
PC MENU OPERATION (VGA) VGA MENU Auto Configuration of Screen Lets you automatically configure the television to be used as a computer monitor 1) 2) 3) 4) Press [LCD-MENU] to enter menu Press [>] to select PC settings Press [\/] to select Auto Sync Then press [>] for the TV to automatically configure itself Horizontal Position Changes the horizontal position of the picture 1) 2) 3) 4) Press [LCD-MENU] to enter menu Press [>] to select PC settings Press [\/] to select H-Position Then press [>] or [<] to m
DVD MENU OPERATION SYSTEM SET UP Adjusting TV System Lets you adjust between NTSC, PAL, AUTO (PAL is default for the UK) 1) Press [DVD-SETUP] to enter menu 2) Press [>] to select TV System 3) Press [>] to enter menu 4) Press [\/] or [/\] to highlight NTSC, PAL or AUTO 5) Press [OK] to confirm Returning to Default This lets you switch the DVD menus show above back to Default settings 1) Press [DVD-SETUP] to enter menu 2) Press [>] to select TV System 3) Press [\/] to select Default 4) Press [>] to enter men
DVD MENU OPERATION AUDIO SET UP Adjusting Tone Lets you increase or decrease the Tone of the sound 1) Press [DVD-SETUP] to enter menu 2) Press [\/] to select Audio Set Up 3) Press [>] to enter menu 4) Press [\/] to select Tone 5) Press [>] to enter menu 6) Press [\/] or [/\] to increase or decrease the tone 7) Press [OK] to confirm 8) Press [DVD-SETUP] to exit DIGITAL SET UP Adjusting Dynamic Range This is the difference between the quietest and loudest sounds.
WALL MOUNTING To remove the stand, follow the instructions below. Remove the six screws highlighted below Once the stand is removed please use the blanking plate provided in your accssory bag to fill the hole from where the stand was removed. Blanking Plate VESA 400 x 200 28 Important – If wallmounting this TV, only use the screws already provided in the wallmounting holes. Using other screws which are longer could cause irrepable damage to internal parts.
USING WITH SKY DIGITAL You may wish to use your TV with Sky Digital. There are a number of connection options, the best being connecting via SCART cable. Connecting via SCART 1) Connect the SCART cable from the Sky Digital Box to SCART of the TV 2) Press [SOURCE] 3) Press [\/] or [/\] to select SCART 4) Press [OK] The channel your Sky Digital box is displaying will now be shown on the TV. You may wish to share your Sky Digital signal around the home by using an RF connection.
FREQUENTLY ASKED QUESTIONS Question: Solution: I have tuned in Digital TV but I am not receiving any or all of the channels and/or the channels I receive are breaking up 1) Check you are in an area that can receive Freeview. Visit www.freeview.co.uk or call 08701 111 270. 2) Check you have a suitable aerial.
TECHNICAL SPECIFICATION 26” 1366x768 800:1 450 2 2 2x6W AC Mode 665W x 256D x 514H 664W x 106D x 468H 9.5 11.
INDEX Analogue TV teletext Auto Configuration of Screen Auto Tuning Balance Bass Blue Screen Brightness Changing DVD Regions Child Lock Clock Colour Colour Temperature Common Inferface Slot Connecting to a PC Contrast Country Digital Switchover Re-Tune Digital TV teletext Dynamic Noise Reduction Dynamic Range Electronic Programme Guide First Time Installation Frequently Asked Questions Horizontal Position Index Inputs and Connections Manual Tuning Mode/Source On Screen Display Timer 23 25 19 18 18 21 16 27