Bedienungsanleitung DIGITRADIO 3 VOICE CD/DAB+/UKW-Stereo-Radio mit Offline-Sprachbedienung
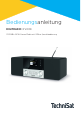
1 Abbildungen 1.1 Ansicht von vorne 1 4 5 6 7 8 9 2 3 10 11 12 1.
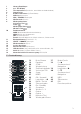
1 2 3 4 5 6 7 8 9 Infrarot-Empfänger 2,8“ TFT-Display Teleskopantenne (Rückseite, ausziehbar und abnehmbar) Lautsprecher Kopfhöreranschluss (3,5mm Klinke) Mikrofon links/rechts VOL / STANDBY Drehregler CD-Einschub (Slot-In) Wiedergabetasten: Vorheriger Titel Stopp Wiedergabe/Pause Nächster Titel Funktionstasten: MODE Quellenwahl/Modusumschaltung MENU aufruf des Hauptmenüs FAV Favoritenspeicher Zurück Auswahl abbrechen, Menü verlassen, Schritt zurück Direktwahltasten (Favoriten 1...
2 Inhaltsverzeichnis 1 1.1 1.2 1.3 Abbildungen................................................................................................................ 2 Ansicht von vorne........................................................................................................................ 2 Ansicht von hinten...................................................................................................................... 2 Fernbedienung..........................................................
8.2 8.3 8.4 8.5 8.6 8.7 8.8 8.9 FM (UKW)-Empfang mit RDS-Informationen................................................................22 Automatische Sendersuche..................................................................................................22 Manuelle Sendersuche............................................................................................................22 Suchlauf-Einstellung..................................................................................................
15 Fehler beseitigen..................................................................................................... 37 16 Technische Daten / Herstellerhinweise.............................................................39 17 Notizen........................................................................................................................
3 Vorwort Sehr geehrte Kunden, vielen Dank, dass Sie sich für ein Digitalradio von TechniSat entschieden haben. Die vorliegende Bedienungsanleitung soll Ihnen helfen, die umfangreichen Funktionen Ihres neuen Gerätes kennen zu lernen und optimal zu nutzen. Sie hilft Ihnen beim bestimmungsgemäßen und sicheren Gebrauch. Sie richtet sich an jede Person, die das Gerät installiert, bedient, reinigt oder entsorgt. Bewahren Sie die Bedienungsanleitung für einen späteren Gebrauch sorgfältig auf.
Schutzklasse II - Elektrogeräte der Schutzklasse II sind Elektrogeräte die durchgehende doppelte und/oder verstärkte Isolierung besitzen und keine Anschlussmöglichkeiten für einen Schutzleiter haben. Das Gehäuse eines isolierstoffumschlossenen Elektrogerätes der Schutzklasse II kann teilweise oder vollständig die zusätzliche oder verstärkte Isolierung bilden. Ihr Gerät trägt das CE-Zeichen und erfüllt alle erforderlichen EU-Normen.
- Das Gerät darf nur in den dafür angegebenen Umgebungsbedingungen betrieben werden. - Setzen Sie das Gerät nicht Tropf- oder Spritzwasser aus. Ist Wasser in das Gerät gelangt, schalten Sie es aus und verständigen Sie den Service. - Setzen Sie das Gerät nicht Heizquellen aus, die das Gerät zusätzlich zum normalen Gebrauch erwärmen. - Bei auffälligem Gerätedefekt, Geruchs- oder Rauchentwicklung, erheblichen Fehlfunktionen, Beschädigungen an Gehäuse unverzüglich den Service verständigen.
4.3.1 Rechtliche Hinweise Hiermit erklärt TechniSat, dass der Funkanlagentyp DIGITRADIO 3 VOICE der Richtlinie 2014/53/EU entspricht. Der vollständige Text der EUKonformitätserklärung ist unter der folgenden Internetadresse verfügbar: http://konf.tsat.de/?ID=23114 TechniSat ist nicht für Produktschäden auf Grund von äußeren Einflüssen, Verschleiß oder unsachgemäßer Handhabung, unbefugter Instandsetzung, Modifikationen oder Unfällen haftbar. Änderungen und Druckfehler vorbehalten. Stand 10/20.
4.3.2 Servicehinweise Dieses Produkt ist qualitätsgeprüft und mit der gesetzlichen Gewährleistungszeit von 24 Monaten ab Kaufdatum versehen. Bitte bewahren Sie den Rechnungsbeleg als Kaufnachweis auf. Bei Gewährleistungsansprüchen wenden Sie sich bitte an den Händler des Produktes. Hinweis! Für Fragen und Informationen oder wenn es mit diesem Gerät zu einem Problem kommt, ist unsere Technische Hotline: Mo. - Fr. 8:00 - 18:00 unter Tel.: 03925/9220 1800 erreichbar.
5 Beschreibung des DIGITRADIO 3 VOICE 5.1 Der Lieferumfang Bitte überprüfen sie vor Inbetriebnahme, ob der Lieferumfang vollständig ist: 1x DIGITRADIO 3 VOICE 1x Teleskopantenne mit Montagewerkzeug 1x Fernbedienung 2x Batterien für Fernbedienung 1x Netzteil 1x Bedienungsanleitung 5.2 Die besonderen Eigenschaften des DIGITRADIO 3 VOICE Das DIGITRADIO 3 VOICE besteht aus einem DAB+/UKW-Empfänger, mit folgend aufgeführten Funktionen: Sie können bis zu 20 DAB+ und 20 UKW-Sender speichern.
Wechseln Sie schwächer werdende Batterien rechtzeitig aus. Auslaufende Batterien können Beschädigungen an der Fernbedienung verursachen. Wenn das Gerät längere Zeit nicht benutzt wird, nehmen Sie die Batterie aus der Fernbedienung. Wichtiger Hinweis zur Entsorgung: Batterien können Giftstoffe enthalten, die die Umwelt schädigen. Entsorgen Sie die Batterien deshalb unbedingt entsprechend der geltenden gesetzlichen Bestimmungen. Werfen Sie die Batterie niemals in den normalen Hausmüll.
Wichtig ist oft die exakte Ausrichtung der Teleskopantenne, insbesondere in den Randgebieten des DAB+ -Empfangs. Im Internet kann man z. B. unter „www.dabplus.de“ die Lage des nächstgelegenen Sendemastes schnell ausfindig machen. Starten Sie den ersten Suchlauf an einem Fenster in Richtung des Sendemastes. Bei schlechtem Wetter kann der DAB+ -Empfang nur eingeschränkt möglich sein. Fassen Sie die Teleskopantenne während der Wiedergabe eines Senders nicht an.
oder deaktivieren (siehe auch Punkt 13.6). Anschließend führt das Gerät automatisch einen vollständigen Suchlauf im DAB-Modus durch. Während des Suchlaufs zeigt die Displayinformation den Fortschritt, sowie die Anzahl der gefundenen Digitalradio-Stationen an. Nach Beendigung des Sendersuchlaufs wird das erste DAB+ Programm wiedergegeben. 5.4.2 Gerät ausschalten > Durch kurzes Drücken der Taste Ein/Standby können Sie das Gerät in den Standby-Modus schalten. Im Display erscheint kurz der Hinweis [Standby].
5.4.5 Display Je nach gewählter Funktion oder Option, werden im Display folgende Informationen angezeigt: Quelle Uhrzeit Sendername Titelname/ Zusatinfos Albumcover/ Slideshow Empfangsstärke Aktive Wecker Favoritenliste Aktiver Sleeptimer Stereo-Ton 5.4.6 Displayanzeigen aufrufen > Drücken Sie die Taste MENU und wählen Sie mit den Tasten oder das Untermenü [Displayeinst.] > [Display]. Drücken Sie anschließend die Taste OK. Wählen Sie mit den Tasten / und OK eine Anzeigeoption.
6 Menübedienung Über das Menü gelangen Sie zu allen Funktionen und Einstellungen des DIGITRADIO 3 VOICE. Die Menü-Navigation erfolgt mit den Tasten MENU, BACK, / und OK der Fernbedienung. Das Menü ist aufgeteilt in Untermenüs und enthält je nach gewählter Quelle unterschiedliche Menüpunkte bzw. aktivierbare Funktionen. Zum Öffnen des Menüs, einfach die Taste MENU kurz drücken.
Folgende Sprachbefehle sind möglich: Hey TechniSat, [Sprachbefehl] Sprachbefehl Beschreibung Einschalten Schaltet das DIGITRADIO ein Ausschalten Schaltet das DIGITRADIO aus Ton lauter Lautstärke um einen Schritt erhöhen oder Stummschaltung (falls aktiv) deaktivieren Ton leiser Lautstärke um zwei Schritte verringern Ton stumm Ton stummschalten Weiter CD/Musik Wiedergabe: Nächster Titel, DAB+: Nächster Sender in der Senderliste, FM: Sendersuchlauf Zurück CD/Musik Wiedergabe: Vorheriger Titel, D
7 Die DAB+ (Digital Radio)-Funktion DAB+ ist ein digitales Format, durch welches Sie kristallklaren Sound ohne Rauschen hören können. Anders als bei herkömmlichen Analogradiosendern werden bei DAB+ mehrere Sender auf derselben Frequenz ausgestrahlt. Weitere Infos zu DAB+ bzw. zur DAB+ Verfügbarkeit an Ihrem Standort erhalten z. B. unter www.dabplus.de oder www.dabplus.ch. 7.1 DAB+ Empfang einschalten > Drücken Sie die Taste MODE bis [DAB+] im Display angezeigt wird.
> Wählen Sie zunächst den gewünschten Sender aus (siehe Punkt 7.3). > Um diesen Sender auf einem Speicherplatz abzulegen, halten Sie während der Wiedergabe die Taste FAV gedrückt, bis [Progr. speichern] im Display erscheint. Wählen Sie anschließend mit den Tasten / einen Favoritenspeicher (1...20). Drücken Sie die Taste OK zum Speichern. > Zum Speichern weiterer Sender wiederholen Sie diesen Vorgang.
7.8 Manuell einstellen Dieser Menüpunkt dient der Überprüfung der Empfangskanäle und kann zur Ausrichtung der Antenne dienen. Werden auf einer Frequenz neue Sender gefunden, werden diese nun ebenfalls in die Senderliste übernommen. > Drücken Sie kurz die Taste MENU und wählen Sie mit den Tasten / den Eintrag [Suchlaufeinst.] > [Man. einstellen] und drücken Sie die Taste OK. > Wählen Sie mit den Tasten / und OK einen Kanal (5A bis 13F). Im Display wird nun dessen Signalstärke angezeigt.
8 FM (UKW)-Betrieb 8.1 UKW-Radiobetrieb einschalten > Wechseln Sie durch Drücken der Taste MODE in den FM-Modus. > Im Display wird [FM] angezeigt. Beim erstmaligen Einschalten ist die Frequenz 87,5 MHz eingestellt. Haben Sie bereits einen Sender eingestellt oder gespeichert, spielt das Radio den zuletzt eingestellten Sender. Bei RDS-Sendern erscheint der Sendername. Um den Empfang zu verbessern, richten Sie die Teleskopantenne aus (Punkt 5.3.3). 8.
Bei der Einstellung Alle Sender stoppt der automatische Suchlauf bei jedem verfügbaren Sender. Das kann dazu führen, dass schwache Sender mit einem Rauschen wiedergegeben werden. 8.6 Audio-Einstellung > Drücken Sie die Taste MENU und wählen Sie mit den Tasten / den Eintrag [Toneinst.] > [Audioausgabe] und drücken Sie die Taste OK. > Wählen Sie mit / den Eintrag [Stereo möglich] oder [Nur Mono], um die Wiedergabe in Stereo oder nur in Mono-Ton bei schwachem FM-Empfang wiederzugeben.
9 CD-Player 9.1 Allgemeine Informationen zu CD’s/MP3 CD’s Das Gerät ist für Musik-CDs geeignet, die mit Audio-Daten (CD-DA oder MP3 für CD-R und CD-RW) bespielt sind. MP3-Formate müssen mit ISO 9660 Level 1 oder Level 2 erstellt werden. Multisession-CDs können nicht gelesen werden. Im MP3-Betrieb sind die Begriffe „Folder“ = Album und „Titel“ ausschlaggebend. „Album“ entspricht dem Ordner am PC, „Titel“ der Datei am PC oder einem CD-DATitel. Das Gerät sortiert die Alben bzw.
9.3 CD abspielen > Wechseln Sie durch Drücken der Taste MODE in den CD-Player -Modus. > Im Display wird [CD] angezeigt. > Legen Sie eine CD mit der bedruckten Seite nach oben vorsichtig ein. Vergewissern Sie sich, dass die CD nicht schief sitzt. Die CD wird automatisch vom Gerät eingezogen. > Die Daten auf der CD werden geprüft. Im Display erscheint [Einlesen]. Anschließend beginnt die Wiedergabe mit dem ersten Titel (Audio-CD) bzw. ersten Titel im ersten Ordner (MP3 CD).
9.5 Schneller Suchlauf Sie können im laufenden Titel einen schnellen Suchlauf vorwärts oder rückwärts durchführen, um eine bestimmte Stelle zu suchen. > Halten Sie die Tasten Vorheriger Titel oder Nächster Titel gedrückt, um einen schnellen Vor- bzw. Rücklauf innerhalb des Titels für die Dauer des Gedrückthaltens durchzuführen. 9.6 Wiederholen Funktion Sie können auswählen, ob Sie einen Titel, den ganzen Ordner/Album (nur bei MP3 CDs) oder alle Stücke der CD wiederholen möchten.
> Drücken Sie die Taste Wiedergabe/Pause abzuspielen. , um die Programmierten Titel Um Titel der aktuellen Programmierung hinzuzufügen, drücken Sie einmal die Taste Stopp . Sie können nun weitere Titel auf den nächsten freien Programmplatz legen. Um die Programmierung zu löschen, während Sie sich im Programmier-Modus befinden, drücken Sie die Taste Stopp und beginnen Sie von neuem.
Ihrem USB-Medium. Achten Sie daher auf die Angaben im Display. Die MP3/Audio-Dateien werden eingelesen und im Display in Form von Gesamtanzahl der Titel [T] und Alben [F] angezeigt. Warten Sie mit der Bedienung, bis der Inhalt komplett eingelesen wurde, um sicherzustellen, dass alle benötigten Informationen vom Speichermedium gelesen wurden. Wenn kein Speichermedium angeschlossen ist oder nicht gelesen werden kann, erscheint die Anzeige [Kein Gerät] im Display.
10.4 Wiederholen Funktion Sie können auswählen, ob Sie einen Titel, den ganzen Ordner/Album oder alle Stücke wiederholen möchten. > Drücken Sie hierzu mehrmals die Taste Wiederholung . Der angewählte Modus wird im Display anhand eines Icons angezeigt (Wiederholen 1x, Wiederholen Album, Wiederholen Alles). > Wird kein Wiederholen-Icon angezeigt, ist die Funktion ausgeschaltet. 10.5 Zufällige Wiedergabe Mit dem Zufallsgenerator können Sie die Titel in einer beliebig gemischten Reihenfolge abspielen.
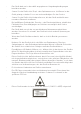
11 Audioeingang Sie können den Ton eines externen Gerätes über die Lautsprecher des DIGITRADIO 3 VOICE wiedergeben. > Verbinden Sie das externe Gerät mit dem AUDIO IN-Anschluss (16, 3,5mm Klinke) an der Rückseite > Wählen Sie mit der Taste MODE den Audioeingang. Im Display wird [AUXEingang] angezeigt. Die Steuerung erfolgt am externen Gerät. Stellen Sie die Lautstärke nicht zu leise ein, um Störgeräusche zu vermeiden.
12.2 Wecker Der Wecker schaltet das DIGITRADIO 3 VOICE zur eingestellten Weckzeit ein. Es können 2 Weckzeiten programmiert werden. Als Beispiel erfolgt die Beschreibung der Programmierung des Wecker 1 12.2.1 Wecker einrichten > Drücken Sie die Taste Wecker 1/2 (32) auf der Fernbedienung. Es erscheint die Übersicht der eingestellten Weckzeiten im Display. > Wählen Sie mit den Tasten / einen der Weckerspeicher, den Sie einstellen möchten und drücken Sie die Taste OK.
Damit der Wecker ordnungsgemäß funktioniert, muss die Uhrzeit eingelesen werden. Näheres hierzu unter Punkt 13.1. Bei aktivem Wecker erscheint ein Glockensymbol im Display. 12.2.2 Wecker nach Alarm ausschalten > Drücken Sie die Taste Ein/Standby auf der Fernbedienung oder VOL/ STANDBY am Gerät, um den Wecker auszuschalten. Drücken Sie den SELECT/ SNOOZE Drehregler, um die Schlummer-Funktion zu aktivieren. 12.3 Equalizer Mit dem Equalizer können Sie den Ton Ihren Wünschen entsprechend anpassen.
> Die ersten Ziffern (Tag) des Datum blinken und können mit den Tasten / abgeändert werden. Die Taste erhöht den Wert, die Taste verringert den Wert. > Drücken Sie zum Übernehmen der Einstellung die Taste OK. > Anschließend blinken die nächsten Ziffern (Monat) des Datums und können ebenfalls wie zuvor beschrieben abgeändert werden. > Drücken Sie nach jeder weiteren Einstellung die Taste OK, um zur nächsten Einstellung zu springen. > Verfahren Sie bei der Uhrzeit wie zuvor beschrieben.
> Wählen Sie mit / eine der folgenden Optionen: [TT-MM-JJJJ] (Tag, Monat, Jahr) [MM-TT-JJJJ] (Monat, Tag, Jahr) > Drücken Sie zum Speichern die Taste OK. 13.2 Displayhelligkeit Sie können die Displayhelligkeit sowohl für den Betrieb als auch für Standby einstellen. Außerdem stehen verschiedene Farbschemas zur Verfügung. > Drücken Sie die Taste MENU, wählen Sie den Eintrag [Displayeinst.] und drücken Sie OK.
13.3 Werkseinstellung Wenn Sie den Standort des Gerätes verändern, z. B. bei einem Umzug, sind möglicherweise die gespeicherten Sender nicht mehr zu empfangen. Mit dem Zurücksetzen auf Werkseinstellungen können Sie in diesem Fall alle gespeicherten Sender löschen, um anschließend einen neuen Sendersuchlauf zu starten. > Drücken Sie die Taste MENU und wählen Sie mit den Tasten / den Eintrag [Systemeinst.] > [Werkseinstellung] und drücken Sie OK.
13.6 USB Einstellungen Bei der erstmaligen Einrichtung können Sie festlegen, ob die USB-Ladefunktion des DIGITRADIO 3 VOICE aktiviert oder deaktiviert sein soll. Bei einer aktivierten USB-Ladefunktion, haben Sie die Möglichkeit ein angeschlossenes Gerät (z. B. ein Smartphone), unabhängig vom Betriebszustand des DIGITRADIO 3 VOICE zu Laden bzw. mit Strom zu versorgen (auch im Standby). > Drücken Sie die Taste MENU und wählen Sie mit den Tasten / den Eintrag [USB Ladefunktion] und drücken Sie OK.
15 Fehler beseitigen Wenn das Gerät nicht wie vorgesehen funktioniert, überprüfen Sie es anhand der folgenden Tabelle. Symptom Mögliche Ursache/Abhilfe Gerät lässt sich nicht einschalten. Das Gerät wird nicht mit Strom versorgt. Schließen Sie das Netzteil richtig an die Steckdose und am Gerät an. Es ist kein Ton zu hören. Erhöhen Sie die Lautstärke. Das Display schaltet sich nicht ein. Gerät vom Stromnetz trennen und Gerät wieder mit Strom versorgen. Empfang über DAB+/FM ist schlecht.
Symptom Mögliche Ursache/Abhilfe Die CD wird nicht wiedergegeben oder springt bei der Wiedergabe weiter. Das Gerät befindet sich nicht im CD-Modus. Falsche CD eingelegt. Die CD ist falsch eingelegt. Legen Sie die CD mit der beschrifteten Seite nach oben ein. Die CD ist verschmutzt oder defekt. Reinigen Sie die CD, verwenden Sie eine andere CD. Im CD-Fach hat sich Feuchtigkeit niedergeschlagen. Entnehmen Sie die CD und lassen Sie das CD-Fach ca. 1 Stunde zum Trocknen offen stehen.
16 Technische Daten / Herstellerhinweise Technische Änderungen und Irrtümer vorbehalten. Empfangswege DAB+, FM, USB, CD, AUX Sprachbedienung Offline Spracherkennung und Ausgabe (hierfür ist keine Internetverbindung von Nöten, es werden somit auch keine persönlichen Daten auf Internetservern gespeichert oder verarbeitet) Stromversorgung Netzteil DC 12 V, 3 A über mitgeliefertes Netzteil USB (Ladefunktion für externe Geräte mit max. 1A) Dateisystem: FAT16, FAT32 Max. Datenträgergröße: 2 TB Max.
Technische Daten des mitgelieferten Netzteils Hersteller TechniSat Digital GmbH, Julius-SaxlerStraße 3, D-54550 Daun Modellkennung SOY-1200300EU-056 Eingangsspannung AC 230 V Eingangswechselstromfrequenz 50 Hz Ausgangsspannung DC 12,0 V Ausgangsstrom 3,0 A Ausgangsleistung 36,0 W Durchschnittliche Effizienz im Betrieb 90,2 % Effizienz bei geringer Last (10%) 88,6 % Leistungsaufnahme bei Nulllast 0,07 W 40
17 Notizen 41
20210126TVORV3 44