Bedienungsanleitung DIGITRADIO 21 DAB+/UKW/Bluetooth Küchenradio
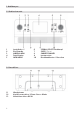
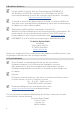
1 Abbildungen 1.1 Bedienelemente 1 2 3 4 5 Lautstärke +/- Ein/Standby MODE/ALARM Farb-Display INFO/MENU 6 7 8 9 10 SCROLL/SELECT Drehknopf SLEEP (Timer) SNOOZE/DIMMER Lautsprecher Direktwahltasten / Favoriten 1.
2 Inhaltsverzeichnis 1 1.1 1.2 Abbildungen................................................................................................................ 2 Bedienelemente........................................................................................................................... 2 Anschlüsse....................................................................................................................................... 2 2 Inhaltsverzeichnis............................................
9.4 9.5 9.6 9.7 9.7.1 9.7.2 Manuelle Sendersuche.............................................................................................................17 Suchlauf-Einstellung................................................................................................................. 18 Audio-Einstellung....................................................................................................................... 18 UKW-Sender auf einem Speicherplatz ablegen................................
3 Sicherheitshinweise 3.1 Vorwort Sehr geehrte Kunden, vielen Dank, dass Sie sich für das DIGITRADIO 21 von TechniSat entschieden haben. Die vorliegende Bedienungsanleitung soll Ihnen helfen, die Funktionen des DIGITRADIO 21 kennen zu lernen und optimal zu nutzen. Sie hilft Ihnen beim bestimmungsgemäßen und sicheren Gebrauch. Sie richtet sich an jede Person, die das Gerät installiert, bedient, reinigt oder entsorgt. Bewahren Sie die Bedienungsanleitung für einen späteren Gebrauch sorgfältig auf.
Schutzklasse II - Elektrogeräte der Schutzklasse II sind Elektrogeräte die durchgehende doppelte und/oder verstärkte Isolierung besitzen und keine Anschlussmöglichkeiten für einen Schutzleiter haben. Das Gehäuse eines isolierstoffumschlossenen Elektrogerätes der Schutzklasse II kann teilweise oder vollständig die zusätzliche oder verstärkte Isolierung bilden. Ihr Gerät trägt das CE-Zeichen und erfüllt alle erforderlichen EU-Normen.
- Reparieren Sie das Gerät nicht selbst. Eine Reparatur darf nur von geschultem Fachpersonal durchgeführt werden. Wenden Sie sich an unsere Kundendienststellen. - Das Gerät darf nur in den dafür angegebenen Umgebungsbedingungen betrieben werden. - Setzen Sie das Gerät nicht Tropf- oder Spritzwasser aus. Ist Wasser in das Gerät gelangt, trennen Sie es vom Stromnetz und verständigen Sie den Service - Setzen Sie das Gerät nicht Heizquellen aus, die das Gerät zusätzlich zum normalen Gebrauch erwärmen.
4 Rechtliche Hinweise Hiermit erklärt TechniSat, dass der Funkanlagentyp DIGITRADIO 21 der Richtlinie 2014/53/EU entspricht. Der vollständige Text der EUKonformitätserklärung ist unter der folgenden Internetadresse verfügbar: http://konf.tsat.de/?ID=23125 TechniSat ist nicht für Produktschäden auf Grund von äußeren Einflüssen, Verschleiß oder unsachgemäßer Handhabung, unbefugter Instandsetzung, Modifikationen oder Unfällen haftbar. Änderungen und Druckfehler vorbehalten. Stand 01/21.
5 Montage des DIGITRADIO 21 Hinweise: - Montieren oder stellen Sie das Gerät nicht in der Nähe von Wärmequellen wie Heizkörpern auf. Vermeiden Sie direkte Sonneneinstrahlungen und Orte mit außergewöhnlich viel Staub. - Der Standort darf nicht in Räumen mit hoher Luftfeuchtigkeit, z. B. Sauna, Badezimmer gewählt werden, da Niederschläge von Kondenswasser zur Beschädigung des Gerätes führen können.
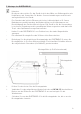
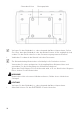
Schraubenlöcher Montageplatte Verlegen Sie das Netzkabel so, dass niemand darüber stolpern kann. Stellen Sie sicher, dass das Netzkabel oder das Netzteil immer leicht zugänglich sind, sodass Sie das Gerät schnell von der Stromversorgung trennen können! > Verbinden Sie danach das Netzteil mit dem Stromnetz. Zur Netzverbindung Netzstecker vollständig in die Steckdose stecken.
5.1 Empfang mit der Wurfantenne Die Anzahl und Qualität der zu empfangenden Sender hängt von den Empfangsverhältnissen am Aufstellort ab. Mit der Wurfantenne kann ein ausgezeichneter Empfang erzielt werden. Wichtig ist oft die exakte Ausrichtung der Wurfantenne, insbesondere in den Randgebieten des DAB+ -Empfangs. Im Internet kann man z. B. unter „www.dabplus.de“ die Lage des nächstgelegenen Sendemastes schnell ausfindig machen. Starten Sie den ersten Suchlauf an einem Fenster in Richtung des Sendemastes.
6.3.2 Gerät ausschalten > Durch Drücken der Taste Ein/Standby können Sie das Gerät in den StandbyModus schalten. Im Display erscheint kurz der Hinweis [Standby]. Datum und Uhrzeit werden im Display angezeigt. Die Displayhelligkeit im Standby-Modus können Sie durch kurzes Drücken der Taste SNOOZE/DIMMER (8) ändern. 6.3.3 Quellenwahl > Mit der Taste MODE/ALARM (3) kann zwischen den Quellen DAB+ (Digital Radio), FM (UKW) und Bluetooth umgeschaltet werden. Drücken Sie hierzu die Taste mehrmals kurz.
6.3.5.2 Slideshow Einige DAB+ Sender übertragen Zusätzliche Informationen wie z. B. Albumcover des Aktuellen Titels, Werbung oder Wetterdaten. Die Größe des Bildes kann durch Drücken des SCROLL/SELECT Drehknopf (6) angepasst werden. 7 Menübedienung Über das Menü gelangen Sie zu allen Funktionen und Einstellungen des DIGITRADIO 21. Die Menü-Navigation erfolgt mit den Tasten INFO/MENU (5) und dem SCROLL/ SELECT Drehknopf (6).
8 DAB+ (Digital Radio) 8.1 Was ist DAB+ DAB+ ist ein neues digitales Format, durch welches Sie kristallklaren Sound ohne Rauschen hören können. Anders als bei herkömmlichen Analogradiosendern werden bei DAB+ mehrere Sender auf ein und derselben Frequenz ausgestrahlt. Dies nennt man Ensemble oder Multiplex. Ein Ensemble setzt sich aus der Radiostation sowie mehreren Servicekomponenten oder Datendiensten zusammen, welche individuell von den Radiostationen gesendet werden. Infos z. B. unter www.dabplus.
Sender, deren Signalstärke unterhalb der erforderlichen Mindestsignalstärke liegt, senden kein ausreichendes Signal. Richten Sie die Wurfantenne ggf. wie unter Punkt 5.1 beschrieben aus. Befinden sich Sender auf der eingestellten Frequenz bzw Kanal, die noch nicht in der Senderliste gespeichert wurden, werde diese nun ebenfalls gespeichert. 8.2.3 Sender wählen > Durch Drehen des SCROLL/SELECT Drehknopf kann die Senderliste aufgerufen und zwischen den verfügbaren Sendern umgeschaltet werden.
8.2.7 Signalstärke > Drücken Sie mehrmals kurz die Taste INFO/MENU, bis der Signalstärkebalken angezeigt wird. > Im Display wird die Signalstärke anhand eines Balkendiagrammes dargestellt. Die Markierung zeigt die Mindestsignalstärke. Sender, deren Signalstärke unterhalb der erforderlichen Mindestsignalstärke liegt, senden kein ausreichendes Signal. Richten Sie die Wurfantenne ggf. wie unter Punkt 5.1 beschrieben aus. 8.2.
9 FM (UKW)-Betrieb 9.1 UKW-Radiobetrieb einschalten > Wechseln Sie durch Drücken der Taste MODE/ALARM in den FM-Modus. > Im Display wird [FM] angezeigt. Beim erstmaligen Einschalten ist die Frequenz 87,5 MHz eingestellt. Haben Sie bereits einen Sender eingestellt oder gespeichert, spielt das Radio den zuletzt eingestellten Sender. Bei RDS-Sendern erscheint der Sendername. Um den Empfang zu verbessern, richten Sie die Wurfantenne aus (Punkt 5.1). 9.
9.5 Suchlauf-Einstellung In diesem Menüpunkt kann die Empfindlichkeit des Suchlaufs eingestellt werden. > Öffnen Sie das MENÜ > [Suchlaufeinst.] und drücken Sie den SCROLL/ SELECT Drehknopf. > Wählen Sie aus, ob der Suchlauf nur bei starken Sendern [Nur starke Sender] stoppen soll oder bei allen Sendern (auch bei schwachen Sendern) [Alle Sender]. Bei der Einstellung Alle Sender stoppt der automatische Suchlauf bei jedem verfügbaren Sender.
9.7.1 UKW -Sender von einem Speicherplatz abrufen > Um einen Sender abzurufen, den Sie zuvor im Favoritenspeicher abgelegt haben, drücken Sie kurz die Taste 3+ und wählen Sie mit dem SCROLL/ SELECT Drehknopf einen Senderspeicher (1...10). Drücken Sie den SCROLL/ SELECT Drehknopf zur Wiedergabe des Senders. Ist kein Sender auf dem gewählten Programmplatz gespeichert, erscheint im Display [(Leer)]. Alternativ kann auch die entsprechende Direktwahltaste 1 oder 2 genutzt werden. 9.7.
Während des Koppel-Vorganges sollten sich beide Geräte innerhalb von 10cm befinden. > In der Liste der gefundenen Bluetooth Geräte an Ihrem externen Gerät sollte nun der Eintrag DIGITRADIO 21 erscheinen. Tippen Sie darauf, um den Koppel-Vorgang abzuschließen. Ist der Koppelvorgang erfolgreich abgeschlossen, erscheint [Verbunden] im Display des DIGITRADIO 21 und es ertönt ein Bestätigungston. > Sie können nun die Musikwiedergabe an Ihrem externen Gerät starten.
11.2 Wecker Der Wecker schaltet das DIGITRADIO 21 zur eingestellten Weckzeit ein. Es können 2 Weckzeiten programmiert werden. Als Beispiel erfolgt die Beschreibung der Programmierung von Wecker 1. 11.2.1 Wecker einrichten > Halten Sie im normalen Betrieb die Taste MODE/ALARM (3) gedrückt, bis die Wecker-Auswahl erscheint. Alternativ: > Drücken Sie im Standby die Taste MODE/ALARM (3) kurz, bis die WeckerAuswahl erscheint.
Dauer > Geben Sie anschließend die Weck-Dauer ein. Übernehmen Sie die Eingabe durch drücken des SCROLL/SELECT Drehknopf. Lautstärke > Zuletzt können Sie die Weckton-Lautstärke mit dem SCROLL/SELECT Drehknopf festlegen. Drücken Sie zum Übernehmen den SCROLL/SELECT Drehknopf. Damit der Wecker ordnungsgemäß funktioniert, muss die Uhrzeit eingelesen werden. Näheres hierzu unter Punkt 12.1.2. Bei aktivem Wecker erscheint ein Wecker-Symbol im Display. 11.2.
> Nachdem alle Einstellungen vorgenommen wurden und letztmalig der SCROLL/SELECT Drehknopf gedrückt wurde, erscheint [Uhrzeit Gespeichert] im Display. 12.1.2 Zeitaktualisierung Hier können Sie festlegen, ob die Zeit-Synchronisierung automatisch über DAB+ oder FM (UKW) erfolgen soll oder ob Sie sie manuell eingeben möchten (Punkt 12.1.1). > Wählen Sie im Untermenü [Systemeinst.] den Eintrag [Datum/Zeit] > [Autom. Update] und drücken Sie den SCROLL/SELECT Drehknopf.
12.1.5 Uhr Design Unter diesem Menüpunkt können Sie das Uhren Design im Standbymodus auswählen. > > Wählen Sie im Untermenü [Systemeinst.] den Eintrag [Datum/Zeit] > [Uhr Design] und drücken Sie den SCROLL/SELECT Drehknopf. Wählen Sie mit dem SCROLL/SELECT Drehknopf folgende Optionen: [Normal Digital] [Digital groß] [Analog klassisch] [Modern Analog] > Drücken Sie zum Speichern den SCROLL/SELECT Drehknopf. 12.2 Sprache > Wählen Sie im Untermenü [Systemeinst.
12.4 Systeminfo Unter Software-Version können Sie die aktuell installierte SW-Version abfragen. > Wählen Sie im Untermenü [Systemeinst.] den Eintrag [Software-Version] und drücken Sie den SCROLL/SELECT Drehknopf. > Es wird die aktuelle SW-Version angezeigt. 12.5 Display Einstellungen Sie können die Displayhelligkeit sowohl für den Betrieb als auch für Standby einstellen. Außerdem stehen verschiednen Farbschemas zur Verfügung. > Öffnen Sie das MENÜ > [Displayeinst.
13 Reinigen Um die Gefahr eines elektrischen Schlags zu vermeiden, dürfen Sie das Gerät nicht mit einem nassen Tuch oder unter fließendem Wasser reinigen. Vor der Reinigung den Netzstecker ziehen und Gerät ausschalten! Sie dürfen keine Scheuerschwämme, Scheuerpulver und Lösungsmittel wie Alkohol oder Benzin verwenden. Keine der folgenden Substanzen verwenden: Salzwasser, Insektenvernichtungsmittel, chlor- oder säurehaltige Lösungsmittel (Salmiak).
15 Technische Daten / Herstellerhinweise Technische Änderungen und Irrtümer vorbehalten. Empfangswege DAB+, FM, Bluetooth Stromversorgung Netzteil DC 5,9 V, 1 A über externes mitgeliefertes Netzteil Frequenzen UKW: 87,5-108 MHz DAB/DAB+: 174-240 MHz Bluetooth: 2,402-2,480 GHz Sendeleistung max.: +1,17 dBm EIRP Bluetooth Version V4.2, AVRCP, A2DP Stromverbrauch im Betrieb max.
21012021ORV2 28