bed_anl_DigiBox_Viaccess_englisch.qxd 13.08.01 11:42 Seite 1 +++ DIGITAL +++ DIGITAL +++ DIGITAL +++ DIGITAL +++ DIGITAL +++ DigiBox VIACCESS Instruction Manual Integrated VIACCESS decoding unit. Receives free-to-air as well as VIACCESS encoded/scrambled satellite programmes.
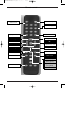
FERNBEDIENUNG V1.qxd 20.09.
inhalt1.qxd 07.09.00 10:41 Seite 4 Contents 1 Illustrations . . . . . . . . . . . . . . . . . . . . . . . . . . . . . .3 2 Contents . . . . . . . . . . . . . . . . . . . . . . . . . . . . . .2, 5 3 Important - please read first . . . . . . . . . . . . . . . . .6 Disposal instructions . . . . . . . . . . . . . . . . . . . . . .6 Safety instructions . . . . . . . . . . . . . . . . . . . . . . . .7 4 4.1 4.2 4.3 4.3.1 4.3.2 4.4 4.5 4.5.1 4.6 4.7 Connections . . . . . . . . . . . . . . . . . . . . .
inhalt1.qxd 07.09.00 10:41 Seite 5 6.13.7 6.13.7.1 6.13.7.2 6.13.7.3 6.13.7.4 6.13.7.5 6.13.7.6 EPG functions . . . . . . . . . . . . . . . . . . . . . . . . . . .23 EPG information . . . . . . . . . . . . . . . . . . . . . . . . . . . . . . . . . .23 Pre-selecting a programme . . . . . . . . . . . . . . . . . . . . . . . . .23 Activating the VCR (timer mode) . . . . . . . . . . . . . . . . . . . . .23 Overview of EPG . . . . . . . . . . . . . . . . . . . . . . . . . . . . . . . . .
SCART connection VCR Input terrestrial antenna Audio outputs HF output Mains power connection 11:42 RS-232 connection/interface SCART connection TV set VIACCESS card reader: Insert appropriate smart card carefully into the slot (gold chip at bottom, and in direction of insertion) until it meets resistance LED display 13.08.01 LNB input On/standby mode Programme selection up/down bed_anl_DigiBox_Viaccess_englisch.
bed_anl_DigiBox_Viaccess_englisch.qxd 13.08.01 11:42 Seite 6 3 Please read this first NOTE:English-speaking customers - the default setting of your receiver is German. You should go directly to Chapter 5 to change the setting to English (point 5.1 on Page 12) > Before connecting the receiver, first check that you have received all necessary parts. The following are included: 1 receiver 1 mains cable 1 remote control unit 1 instruction manual 1 guarantee card 2 batteries (1.
bed_anl_DigiBox_Viaccess_englisch.qxd > > 13.08.01 11:42 Seite 7 Now select the line of text OSD LANGUAGE, by marking the appropriate line with the aid of the arrow up/down controls. Confirm with OK. Safety Instructions For your own safety, you should read the safety instructions carefully before switching on your new receiver for the first time. The manufacturer can accept no responsibility for damage caused by inappropriate handling, or by ignoring the safety advice.
Connecting a DVB receiver to a satellite installation Optional: f. Connection from HF output on the DVB receiver to the HF input of your TV set. a. Connection from LNB to LNB IN connection on DVB receiver b. Mains connection c. Connection from terrestrial antenna to antenna input (RF IN) on DVB receiver. d. SCART connection between a VCR and the VCR Scart connection on the DVB receiver. e. SCART connection between DVB receiver and the TV set. bed_anl_DigiBox_Viaccess_englisch.qxd 13.08.
bed_anl_DigiBox_Viaccess_englisch.qxd 13.08.01 11:42 Seite 9 4 Connections The references in bold type - a b c etc. refer to the diagram on page 8. 4.1 Mains connection The receiver should only be connected to the mains supply after all connections with other components and equipment have been made. This helps to eliminate the likelihood of damage to the receiver or other components.
bed_anl_DigiBox_Viaccess_englisch.qxd 13.08.01 11:42 Seite 10 4.4 Setting the UHF Output Channel The procedure is as follows: > Use the Menu key to select the Main Menu > > Now select the entry Settings, marking it in blue by using the up/down arrow keys Confirm by pressing OK The sub-menu Settings will be displayed. > > Now use the up/down arrow keys to mark the line Audio/Video Settings Confirm by pressing OK.
bed_anl_DigiBox_Viaccess_englisch.qxd > > > 13.08.01 11:42 Seite 11 Once you have found a UHF channel with optimal quality, please remember to enter it into the memory of your TV set. You can now select further settings in the Audio/Video Settings menu, or you can press the Menu key to return to normal operation. The selected setting will be automatically stored in memory when you exit the menu.
bed_anl_DigiBox_Viaccess_englisch.qxd 13.08.01 11:42 Seite 12 5 Installation Now that you have made all the necessary connections to and from your receiver, and have switched it on, you may, if necessary resp. if you wish, optimise the operation of the receiver. 5.1 OSD Language This menu heading gives you the opportunity of selecting a language of your choice, in which the menus will be displayed. The receiver is given a default setting of German in the factory.
bed_anl_DigiBox_Viaccess_englisch.qxd 13.08.01 11:42 Seite 13 > > > Use the up/down arrow keys to mark the entry Basic Settings. Press OK to confirm this selection The sub-menu Basic will be displayed. > You can use the up/down arrow keys to move the marker within the menu, and to change the individual positions as stated. When selecting a menu item, please also note any additional screen notices.
bed_anl_DigiBox_Viaccess_englisch.qxd 13.08.01 11:42 Seite 14 > > Now highlight the entry Audio/Video Settings, using the up/down arrow keys. Confirm by pressing OK The sub-menu Settings Audio/Video will be displayed > Use the up/down arrow keys to move the marker (blue highlighted entry) within the menu, and to change the individual settings as indicated. When selecting an option, please also note any additional on-screen notices.
bed_anl_DigiBox_Viaccess_englisch.qxd 13.08.01 11:42 Seite 15 Subtitel Your DVB receiver has the facility to display sub-titles. Provided the function Sub-titles has been enabled, and the preferred language selected in terms of the Audio signal selection is available, the sub-titles will be superimposed on the picture automatically. If the function has not been enabled, it can be set manually, Sub-titles are indicated by the symbol information display. Please also refer to Point 6.
bed_anl_DigiBox_Viaccess_englisch.qxd 13.08.01 11:42 Seite 16 The following selections can be made in this sub-menu: 5.4.1 Switching DiSEqC on or off DiSEqC (Digital Satellite Equipment Control) is a digital signal that can control the functions of DiSEqC-compatible components via the antenna connection. If your external installation features DiSEqC components, you should enable the DiSEqC control function: > When this entry is highlighted, use the OK key to switch the DiSEqC function on or off. 5.4.
bed_anl_DigiBox_Viaccess_englisch.qxd > 13.08.01 11:42 Seite 17 Confirm by pressing OK. The menu >LNB>Check will now be displayed, together with the DiSEqC setting selected (e.g. A/A 1). The following settings can be made: LOF low band LOF (local oscillator frequency) is the frequency used by the LNB to convert the frequency received into the so-called 1st Intermediate Frequency, which can then be utilised by the receiver.
bed_anl_DigiBox_Viaccess_englisch.qxd Yellow bar: Green bar: 13.08.01 11:42 Seite 18 good reception excellent reception 6 Operation 6.1 Switching on and off > > > Use the key On/standby on the receiver or on the remote control to switch the receiver on. Pressing the same key on the receiver or on the remote control again will switch the receiver off again. The receiver is now in standby mode, the display on the receiver will now show the time.
bed_anl_DigiBox_Viaccess_englisch.qxd > > > 13.08.01 11:42 Seite 19 Press the OK key, and the desired programme will be shown. Use the up/down arrow keys to move up or down the programme list one line at a time. Use the left/right arrow keys to move forward or back one page at a time. 6.2.4 Selecting blocked programmes If a programme is selected that is subject to parental lock, the words PIN Number will appear on the screen > Use the numeric key pad to enter your PIN number.
bed_anl_DigiBox_Viaccess_englisch.qxd 13.08.01 11:42 Seite 20 6.6 TV/Radio selection Your receiver has been pre-programmed with a selection of radio as well as TV programmes. When selecting a radio programme, the TV image is switched off, and only the radio programme name is displayed. > Use the TV/Radio key to select radio mode. The receiver will automatically go to the last radio programme selected. > Press the TV/Radio key again, and the last TV programme selected will be displayed again. 6.
bed_anl_DigiBox_Viaccess_englisch.qxd 13.08.01 11:42 Seite 21 > Confirm with OK. The sub-titles will now be displayed in the language selected. You can also use this procedure to select another language for sub-titles. Please note that this function is only available when sub-titles are actually being broadcast. Also, this manual selection will be lost (i.e. not stored in memory) when changing to other programmes. 6.
bed_anl_DigiBox_Viaccess_englisch.qxd > > Or > 13.08.01 11:42 Seite 22 You may now utilise the EPG functions as per Point 6.13.3. Press the right arrow key to view the EPG-table Next (see Point 6.13.5). Press the TV/Radio key to return to normal signal reception. 6.13.5 Next (Display of immediately following programmes) > Use the right arrow key to select the Next table (programmes immediately following current programmes). > > Or > Or > The EPG functions as per Point 6.13.3 are now available.
bed_anl_DigiBox_Viaccess_englisch.qxd > > > Or > 13.08.01 11:42 Seite 23 . The title line of this table shows an additional window in the heading line, displaying the time of the EPG table being shown. Use the right arrow key to scroll through the tables in chronological order. Holding down the right arrow key a little longer will allow you to scroll through one hour at a time. This will allow you to get to later programmes, or those on following days, more quickly.
bed_anl_DigiBox_Viaccess_englisch.qxd 13.08.01 11:42 Seite 24 The selected entry will now be displayed in red. Your receiver will be switched on at the time when the selected programme is due to begin. If the receiver is switched on by the timer, the letter "t" will be shown on the display, together with the channel number. In this mode, most of the functions of the remote control are disabled in order to prevent an accidental premature interruption of the recording.
bed_anl_DigiBox_Viaccess_englisch.qxd > > 13.08.01 11:42 Seite 25 Use the arrow keys to mark the required channel. Press the OK key to display the EPG Summary of the selected channel. 6.13.7.5 EPG Search The EPG Search function allows you to search for specific types of programmes. The search criteria available are Date, Time Period and Programme Type. The search will only be carried out among those channels for which the EPG function has been activated.
bed_anl_DigiBox_Viaccess_englisch.qxd > > > > 13.08.01 11:42 Seite 26 Use the up/down as well as left/right arrow keys to mark the programme type required. Press the OK key to transfer the selected category to the column Programme Type. Now press the blue function key to start the EPG search. After a few seconds the screen will display a summary of the programmes with the desired content.
bed_anl_DigiBox_Viaccess_englisch.qxd 13.08.01 11:42 Seite 27 The timer can be programmed as follows: Date > Use the arrow keys to mark the Date column > Use the numeric key pad to enter the date on which you wish to record a programme Start > Use the right arrow key to mark the Start column. > Use the numeric key pad to enter the starting time for the timer. Stop > Repeat the steps shown under "Start" to enter the time when the timer should stop, i.e. be switched off.
bed_anl_DigiBox_Viaccess_englisch.qxd 13.08.01 11:42 Seite 28 Status > Use the arrow keys to mark the Status column > Use the OK key to enter the desired status in this line. 1.VCR Your equipment will be switched on and off for the selected programme. If the equipment was switched on by means of the timer, the display will show a "t" together with the appropriate channel number. Most of the functions of the remote control are disabled in order to prevent an accidental interruption of the recording.
bed_anl_DigiBox_Viaccess_englisch.qxd 13.08.01 11:42 Seite 29 The Total List includes all channels. If you do a search in this list, new programmes will be shown in red, and can be transferred from the Total List to the User List. 7.1 Adding/Deleting Channels To add new channels to the user list, or to delete channels, proceed as follows: > Press the Menu key to display the Main Menu.
bed_anl_DigiBox_Viaccess_englisch.qxd 13.08.01 11:42 Seite 30 7.1.1 Adding items to the User Channel List > Use the up/down arrow keys to mark a channel or bouquet that you wish to work on. > Press the OK key, and this field will display a red cross (inclusion in user list). If a single channel is added, the menu background will turn transparent, and the video image of that channel will be displayed in the background. 7.1.
bed_anl_DigiBox_Viaccess_englisch.qxd 13.08.01 11:42 Seite 31 7.3 Locking Channels You have the facility to lock specific channels (parental lock). A locked programme will only be shown on the TV screen if you enter your personal PIN after selecting the channel. This number need be entered only once during an operating session, i.e. the locking will only become operative again the next time the receiver is switched on (standby).
bed_anl_DigiBox_Viaccess_englisch.qxd 13.08.01 11:42 Seite 32 Please Note: The more channels and programmes are added to the Electronic Programme Guide, the longer will it take to acquire/update data. Also, the maximum preview period of 7 days may not be possible if the number of programmes stored in the Electronic Programme Guide is increased. Proceed as follows in order to programme the EPG: > Press the Menu key to display the Main Menu.
bed_anl_DigiBox_Viaccess_englisch.qxd > > > 13.08.01 11:42 Seite 33 appears in display) or to delete a channel from the guide (cross disappears from display). Use the up/down arrow keys to move around the list one line at a time. Use the left/right arrow keys to move around the list one page at a time. When you have completed programming the EPG in this manner, press the Back key to return to the previous menus. Or > Press the Menu key to resume normal operation.
bed_anl_DigiBox_Viaccess_englisch.qxd 13.08.01 11:42 Seite 34 > > Use the up/down arrow keys to mark the entry Search. Confirm with the OK key. The sub-menu >Search will be displayed. > > Use the arrow keys to select the search mode to be used. Press the OK key to display the relevant sub-menu. 7.7.1 All When this search mode is activated, all satellites and transponders available in the system will be scanned. At the end, new programmes will be displayed in red type in the programme/channel list.
bed_anl_DigiBox_Viaccess_englisch.qxd 13.08.01 11:42 Seite 35 > Press OK again to start the search. > The search can be terminated at any time by pressing OK. It is quite likely that a full scan may take 15 minutes or longer. Please note any notes and information displayed on the screen. 7.7.3 Transponder This search mode can be used to search a specific transponder (see Point 9: Technical Terms) for channels. In order to use this function, you will have to enter data relating to the transponder.
bed_anl_DigiBox_Viaccess_englisch.qxd 13.08.01 11:42 Seite 36 > Use the up/down arrow keys to mark the entry Program. > Confirm with the OK key. The menu >Search>Program will be displayed. This menu differs from the Transponder menu only in terms of the list item Service ID. > Proceed as described in Point 7.7.3 above. > Use the up/down arrow keys to mark the entry Service ID. > Use the numeric key pad to enter the Service ID number. 7.
bed_anl_DigiBox_Viaccess_englisch.qxd 13.08.01 11:42 Seite 37 The sub-menu >Factory Settings will be displayed. 7.8.1 Restore Factory Settings This function will delete all personal settings, and will restore all default settings as programmed in the factory. 7.8.2 Delete All Programs This function will delete all channels/programmes stored in memory. > Use the up/down arrow keys to select the entry. > Confirm with the OK key. Please note any notes and information displayed on the screen. 7.8.
bed_anl_DigiBox_Viaccess_englisch.qxd 13.08.01 11:42 Seite 38 can be corrected in this menu as described under points 7.7.3 and 7.7.4 (search for transponders and programmes). Current transponder information can be obtained from your retailer, or from our homepage in the Internet. Under normal circumstances you should not change the settings in this menu. 7.9 System Configuration This menu entry allows you to view all specific data relating to the receiver.
bed_anl_DigiBox_Viaccess_englisch.qxd 13.08.01 11:42 Seite 39 8 Technical Terms Antenna cable: Cable connection between the modulator of the satellite receiver and the antenna input of the TV set, used as an alternative where no SCART connection is provided. AV: see SCART Coaxial cable: Cable connection between the LNB and the satellite receiver, transmits the signals received and transmits power supply to the LNBs.
bed_anl_DigiBox_Viaccess_englisch.qxd 13.08.01 11:42 Seite 40 LNB/LNC (Low Noise Block converter) Receiving unit at the focal point of the parabolic dish antenna, converts the signal from the frequency range of the satellite to the intermediate frequency of the receiver. LOF: Local oscillator frequency, measured in MHz or GHz, varies according to the LNB and the frequency range received. Receiving frequency of the receiver = transmitting frequency of the satellite - LOF.
bed_anl_DigiBox_Viaccess_englisch.qxd 13.08.01 11:42 Seite 41 Transponder: Piece of equipment in the satellite that processes one or more programmes, including receiving the data from the ground station, amplification, retransmission of data back to earth. Universal LNB: Name given to a three-band LNB. It is able to receive the following ranges: FFS (10.70-11.70 GHz), BBS (11.70-12.50 GHz) and FFS High Band (12.50-12.75 GHz). This whole range is usually divided into two bands: Low Band: 10.70 - 11.
bed_anl_DigiBox_Viaccess_englisch.qxd 13.08.01 11:42 Seite 42 9 Technical Data DBS-Tuner: Input frequency range Input level range Noise DBS tuner input Input impedance AFC capture range Demodulation Symbol rate FEC Viterbi rates Roll-off factor 950….2150 MHz -65 dBm… -25dBm max 12 dB F-connector 75 Ohm +/- 3 MHz Shaped QPSK 2….
bed_anl_DigiBox_Viaccess_englisch.qxd 13.08.01 11:42 Seite 43 Teletext filtering Entry teletext data in accordance with standard ETS 300 472 (FBAS) corresp. to ITU-R BT.653-2; lines: 6-22 and 320-335 TV-SCART: Output FBAS with RGB, or only FBAS, or only S-VHS (switchable) VCR-SCART:: Input Output FBAS with RGB or S-VHS FBAS or S-VHS Serial Interface RS 232: Type RS 232 bi-directional Bitrate Max. 115.
bed_anl_DigiBox_Viaccess_englisch.qxd 13.08.01 11:42 Seite 44 Power supply: Mains switch: Power usage: <26 W (in operation, horizontal polarisation, 400 mA supply to LNB) <16 W (in operation, excluding LNB) < 5 W (in standby mode) Mains voltage: 230 V /50 Hz AC General: Ambient temperature Humidity Dimensions (WxDxH) Weight + 15° C ….+ 35° C < 80 % 305 mm x 135 mm x 65 mm 0.
bed_anl_DigiBox_Viaccess_englisch.qxd Problem No reception of channels previously received 13.08.01 11:42 Seite 45 Possible Cause Dish faulty, or position changed Solution Check dish Channel moved to another trans- Initiate search (see point 7.7) ponder Remote control not working Time not displayed in Standby mode Channel no longer broadcast None Wrong mode set Change mode to SAT1 Batteries spent Replace batteries Time not entered Set to ZDF for 30 secs.
bed_anl_DigiBox_Viaccess_englisch.qxd 13.08.01 11:42 Seite 46 Summary for everyday use Switching on and off > > > Switch the receiver on by pressing the On/Standby key on the front panel of the receiver, or on the remote control unit. Press the key again, either on the front panel of the receiver or on the remote control, to switch the receiver off. The receiver is now in standby mode, and the display will show the current time.