Bed_Anl_Digicorder_englisch 18.03.2004 14:09 Uhr Seite 1 Operating Manual DigiCorder S1 Digital receiver with integrated hard disk drive Integrated video recorder PVR Operating Manual With integrated Premiere decoding system and PCMCIA interface for installing a CI module. For the reception of free-to-air and encrypted programmes broadcast via satellite, (e.g.. VIACCESS, IRDETO, SECA ,etc. ) DiSEqC 1.
Bed_Anl_Digicorder_englisch 18.03.2004 14:09 Uhr Seite 2 1 Contents 1 Contents . . . . . . . . . . . . . . . . . . . . . . . . . .2 2 Illustrations . . . . . . . . . . . . . . . . . . . . . . .5 3 Please read this first . . . . . . . . . . . . . . . .8 Safety notes . . . . . . . . . . . . . . . . . . . . . . . .9 4 4.1 4.2 4.3 4.4 4.5 4.6 4.7 Connections . . . . . . . . . . . . . . . . . . . . . .11 Mains power connection . . . . . . . . . . . . . .11 External unit . . . . . . . . . . . . . . . .
Bed_Anl_Digicorder_englisch 7.11 7.12 7.13 7.14 7.14.1 7.14.2 7.14.3 7.14.4 7.14.5 7.14.6 7.14.7 7.14.7.1 7.14.7.2 7.14.7.3 7.14.7.4 7.14.8 7.15 7.15.1 7.15.1.1 7.15.1.2 7.15.2 7.15.2.1 7.15.2.2 7.15.2.3 7.15.2.4 7.15.3 7.15.3.1 7.15.3.2 7.15.3.3 7.16 8 8.1 8.1.1 8.1.2 8.1.3 8.1.4 8.2 8.3 8.4 8.5 8.5.1 18.03.2004 14:09 Uhr Freeze frame . . . . . . . . . . . . . . . . . . . . . .30 Video text . . . . . . . . . . . . . . . . . . . . . . . . .30 Sub-titles . . . . . . . . . . . . . . . . . . . . . . . .
Bed_Anl_Digicorder_englisch 18.03.2004 14:09 Uhr Seite 4 8.5.2 8.5.3 8.5.4 8.6 8.7 Delete all programmes Updating software . . . Copying settings . . . . System configuration . Encryption system . . . . . . . . . . . . . . . . . . . . . . . . . . . . . . . . . . . . . . . . . . . . . . . . . . . . . . . . . . . . . . . . . . . . . . . . . .59 .60 .61 .61 .61 9 9.1 9.1.1 9.1.2 9.1.3 9.2 9.3 9.3.1 9.3.2 9.3.3 9.4 9.4.1 9.5 9.6 Operating a rotating antenna (DiSEqC 1.2) . . . . . . . . . .
Bed_Anl_Digicorder_englisch 18.03.
Bed_Anl_Digicorder_englisch 18.03.2004 14:09 Uhr Seite 6 Alpha-numeric display On/Standby LED display Eject button for CI module Programme select up/down Slot for CI module Inserting the CI module: > Please note the manufacturer’s instructions for both the CI module and card. > Insert the appropriate smart card into the corresponding CI module. > Now insert the CI module carefully in the slot provided.
Bed_Anl_Digicorder_englisch 18.03.2004 14:09 Uhr Seite 7 0 Sehr geehrte Kundin, sehr geehrter Kunde, herzlichen Glückwunsch, dass Sie sich für den DigitalReceiver DIGITAL CIP entschieden haben. Die vorliegende Betriebsanleitung soll Ihnen helfen, die umfangreichen Funktionen Ihres neuen Digital-Receivers optimal zu nutzen. Wir haben die Bedienungshinweise so verständlich wie möglich verfasst und so knapp wie nötig gehalten. Der Funktionsumfang Ihres Gerätes wird durch SoftwareUpdates ständig erweitert.
Bed_Anl_Digicorder_englisch 18.03.2004 14:09 Uhr Seite 8 3 Please read this first > > > > > > > > > > Before operating your unit for the first time, please check that you have received all the components. The package should contain: 1 digital receiver, 1 mains power cable, 1 remote control, 1 operating manual, 1 guarantee card, 2 batteries (1,5V microcell). Insert the batteries supplied in the battery compartment of the remote control unit, taking care to observe the correct polarity.
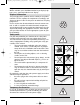
Bed_Anl_Digicorder_englisch 18.03.2004 14:09 Uhr Seite 9 Help: Where available, press the blue function key to display help texts, press again to disable the text display. Disposal information The packaging of this product consists entirely of recyclable materials. Please separate the components accordingly, and dispose of them via the “Dual System” or other local recycling programmes.
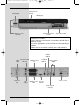
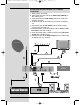
Bed_Anl_Digicorder_englisch 18.03.2004 14:10 Uhr Seite 10 Connecting the DVB receiver to a satellite installation a. Mains power connection b. Connection from the LNC to the LNC input (LNB IN) of the DVB receiver. c. Connection from the LNC output to the LNC input of an analogue receiver. d. Scart connection of the DVB receiver with the television set. e. Connection from the HF output mto the antenna input socket of the television set. f. Connection from a terrestrial antenna to the terrest.
Bed_Anl_Digicorder_englisch 18.03.2004 14:10 Uhr Seite 11 4 Connections The items a b c etc. mentioned below refer to the illustration on page 10. 4.1 Mains power connection The digital receiver should be connected to the mains power supply only once all the other connections with other items of equipment have been made. This will prevent damage to the digital receiver or to other components. a When you have made all the other connections.
Bed_Anl_Digicorder_englisch 18.03.2004 14:10 Uhr Seite 12 4.3.2 Via HF cable If your television set is not equipped with a SCART socket, the digital receiver will have to be connected to the antenna input socket of the television set. If this connection is used, only mono sound reproduction is possible. To make the connection, proceed as follows: e Use a suitable TV connection cable to connect the receiver (HF output) to the antenna input socket of the television set.
Bed_Anl_Digicorder_englisch 18.03.2004 14:10 Uhr Seite 13 4.5.2 Digital Should your amplifier be equipped with an appropriate electrical or optical input, you may connect the sockets AUDIO OUT DIGITAL elektrical resp.. AUDIO OUT DIGITAL optical with the electrical resp. the optical input of your amplifier. Depending on the channel selected, sampling rates of 32, 44,1 and 48 kHz are available. Where broadcast, the Dolby Digital-Signal (AC3) is also available at this output. 4.
Bed_Anl_Digicorder_englisch 18.03.2004 > (Fig. 5-3) (Fig. 5-4) (Fig. 5-5) (Fig. 5-6) 14:10 Uhr Seite 14 audio language. (Fig. 5-3) When the installation assistant has been completed, the programmes in the Favourites list will be sorted accordingly. Confirm by pressing OK, to accept this selection into memory. Country setting > Use the up/down arrow keys to select the time zone corresponding to your location. (Fig. 5-4) The automatic clock setting will be made in accordance with your selection.
Bed_Anl_Digicorder_englisch 18.03.2004 14:10 Uhr Seite 15 Position B/Option B > Use the arrow up/down keys to mark the satellite you wish to receive at the DiSEqC setting Position B/Option B, and confirm by pressing OK. (Fig. 5-10) As your next step, check again on the configuration of your antenna. > If you wish to accept this setting, use the arrow up/down keys to mark the field Yes, and confirm by pressing OK. (Fig.
Bed_Anl_Digicorder_englisch (Fig. 5-13) (Fig. 5-14) 18.03.2004 14:10 Uhr Seite 16 When the scan is completed When the scan has been completed, the number of transponders found, the number of programmes as well as the number of new programmes found will be displayed. In addition, you will be prompted (Fig. 5-14) to decide whether you want to automatically include the programmes found in the TV or Radio lists.
Bed_Anl_Digicorder_englisch 18.03.2004 14:10 Uhr Seite 17 6.2 Basic settings To gain optimum enjoyment from your DVB receiver, you should still make some settings related to your individual preferences. > Press the Menu key to call up the Main Menu. > Use the up/down arrow keys to mark the entry Settings. > Confirm by pressing OK. The sub-menu Settings will be displayed. (Fig. 6-2) > Now use the up/down arrow keys to mark the entry Basic Settings. > Confrim by pressing OK.
Bed_Anl_Digicorder_englisch 18.03.2004 > 14:10 Uhr Seite 18 Press Back to return to the menu Settings, or press Menu to return to normal operation. The settings will be automatically stored in memory. 6.3 Audio/Video settings (Fig. 6-4) (Fig. 6-5) To optimize your digital receiver in conjunction with your television set, you can make further settings in the menu Audio /Video settings. > Press the Menu key to display the Main Menu. > Use the up/down arrow keys to mark the line Settings.
Bed_Anl_Digicorder_englisch 18.03.2004 14:10 Uhr Seite 19 6.3.5 Video system In this line you must set the appropriate television broadcast standard for your television set. Use the left/right arrow keys to select PAL BG, PAL I, PAL DK, SECAM BG or SECAM DK. 6.3.6 Dolby Digital (AC3) A number of movie films are broadcast in the Dolby Digital format. This will be indicated by the dolby symbol ( ) in the information window once you have saelected the programme. If you have a Dolby Digital 5.
Bed_Anl_Digicorder_englisch 18.03.2004 14:10 Uhr Seite 20 6.4 Antenna settings (Fig. 6-6) (Fig. 6-7) When you have completed adjusting the settings of your digital receiver to your individual preferences, you can then, if you like, adjust the antenna settings of your digital receiver. The satellites selected by means of the installation assistant will be displayed in the menu Antenna settings.
Bed_Anl_Digicorder_englisch > 18.03.2004 14:10 Uhr Seite 21 Use the up/down arrow keys to mark the satellite required. Use the up/down arrow keys to move the marker up or down one line at a time. Use the left/right arrow keys to move forward or back one page at a time. If the satellite you are looking for is not shown in the list, please select one of the reserve slots, marked User 1 to User 14. > Confirm by pressing OK.
Bed_Anl_Digicorder_englisch 18.03.2004 14:10 Uhr Seite 22 Symbol rate The symbol rate indicates the volume of data transmitted per second. This could be, for instance, 27500 (27500 symbols per second). Use the numeric keys to enter the appropriate symbol rate. User LNC If you have entered User LNC as the DiSEqC type, you can make additional settings: LOF low band LOF (Local oscillator frequency) is the frequency at which the LNC converts the frequency received into the so-called 1.
Bed_Anl_Digicorder_englisch 18.03.2004 14:10 Uhr Seite 23 downloaded to the receiver. To do this, switch the unit on and switch to reception of a major channel, such as ZDF, that broadcasts a time signal, for about 30 seconds, to acquire the current time automatically. 7.2 Programme selection 7.2.1 Using the programme up/down keys > Use the programme up/down keys either on the unit or on the remote control to move up or down by one programme slot at a time. 7.2.
Bed_Anl_Digicorder_englisch 18.03.2004 > > (Fig. 7-2) > > > (Fig. 7-3) > or > 14:10 Uhr Seite 24 Press OK. The active programme list will be displayed. Now use the red function key Category to open a window displaying the programme list types (Favourites list, Providers list and Total list). The active type of programme list will be highlighted. (Fig. 7-2) In addition, the entry Hard drive recordings will be shown, allowing you to access the hard drive navigator (Point 7.15.2).
Bed_Anl_Digicorder_englisch > > > 18.03.2004 14:10 Uhr Seite 25 Insert the CI module into the slot. Insert the smart card into the card slot of the CI module. Note that the gold-coloured chip of the smart card should be on the upper surface of the card, and pointing in the direction of insertion.
Bed_Anl_Digicorder_englisch 18.03.2004 > > (Fig. 7-9) 14:10 Uhr Seite 26 times available (Fig. 7-9) Use the up/down arrow keys to select the preferred starting time. Confirm by pressing OK. Provided the movie has been authorised for the selected starting time, you can enjoy the programme at the desired time. 7.4 Volume control You have the option of adjusting the volume of your digital receiver.
Bed_Anl_Digicorder_englisch 18.03.2004 14:10 Uhr Seite 27 Press the Language Select key. Where available, a list will now appear on screen showing the currently available languages as well as Dolby Digital (AC 3). > Use the up/down arrow keys to select the line Dolby Digital. > Confirm by pressing OK. You can now enjoy the programme in Dolby Digital sound.
Bed_Anl_Digicorder_englisch 18.03.2004 14:10 Uhr Seite 28 7.10 Transponder information > > > > (Fig. 7-14) > Press OK to call up the navigator. Use the arrow keys to mark the programme for which you wish to view the data. Press the Option key to display the data of the transponder selected (Fig. 7-14). Use the coloured function keys to also display Audio/Video information, Programme information, and, where appropriate, information on the encryption system used (CA).
Bed_Anl_Digicorder_englisch 18.03.2004 14:10 Uhr Seite 29 Use the red and green function keys respectively to page forward or back one page at a time. > Press the yellow function key to display the teletext group indicated in the yellow field. > Press the blue function key to display the teletext group indicated in the blue field. Mixed mode > Press the teletext key again to switch to mixed mode (simultaneous display of teletext information and TV picture).
Bed_Anl_Digicorder_englisch 18.03.2004 - 14:10 Uhr Seite 30 display information on porogramme contents on screen mark selected programmes which will be switched on automatically at the starting time programme timers search for programmes according to type (genre), and to select them for viewing. 7.14.1 Downloading SFI data The programme information is updated at the time set on your receiver in accordance with Point 8.2 (SFI channel. This can only take place when your unit is in standby mode.
Bed_Anl_Digicorder_englisch 18.03.2004 14:10 Uhr Seite 31 7.14.4 Now (table with current programme contents) Initially, the SFI table “Now” (Fig. 7-16) will be displayed, showing programmes currently being broadcast. The yellow bar to the right of the programme name indicates the elapsed broadcast time of the current programme. The programme currently selected is highlighted. > Use the up/down arrow keys to move the marker one line at a time.
Bed_Anl_Digicorder_englisch 18.03.2004 > 14:10 Uhr Seite 32 or Press the numeric key “0” to go to the PVR navigator. Press Back to return to the table “Next”. 7.14.7 SFI functions To utilise the following SFI functions, call up the SFI as described in Point 7.14.3. 7.14.7.1 SFI Info The function SFI Info allows you to display a biref information on the programme or channel selected. Where SFI information is available, this will be indicated by the symbol next to the appropriate programme.
Bed_Anl_Digicorder_englisch > > > > > > 18.03.2004 14:10 Uhr Seite 33 If you wish to delete a timer event programmed via SFI, proceed as described above to mark the selected programme. Press the red function key Timer to open a selection window. Use the up/down arrow keys to mark the line Timer delete. Confirm by pressing OK. To delete an active timer, switch the digital receiver off by pressing the On/Standby key. Press this key again to switch the receiver on, and revert to normal operation. 7.14.
Bed_Anl_Digicorder_englisch 18.03.2004 > > > > > (Fig. 7-21) > > (Fig. 7-22) > 14:10 Uhr Seite 34 Press the blue function key SFI Menu to open a selection window. Use the up/down arrow keys to mark the line Genres. Confirm by pressing OK. Use the green function key Genres to open a window showing the available programme categories. (Fig. 7-21) Use the arrow keys to select the desired programme category, and confirm by pressing OK.
Bed_Anl_Digicorder_englisch 18.03.2004 14:10 Uhr Seite 35 7.15.1.1 Instant recording Start and end recording manually Option 1: > Switch to the channel that carried the programme you wish to record. > Press the Record key to record the currently broadcast programme. You can continue to watch the programme on screen while the recording is in progress. > To interrupt the viewing of the current programme at a specific point, press the yellow function key Play/Pause.
Bed_Anl_Digicorder_englisch 18.03.2004 14:10 Uhr Seite 36 Starting a recording manually and ending it automatically > > > > > > Switch to the channel that will broadcast the programme you wish to record. Press the Record key to record the current programme. The programme will continue to be displayed on the screen while the recording is running. Press the On/Standby key A prompt will appear on screen, asking you whether you wish to record the current programme to the end.
Bed_Anl_Digicorder_englisch 18.03.2004 14:10 Uhr Seite 37 order to prevent an accidental premature interruption of the recording. When the receiver is in standby mode, an active timer will be indicated by a clock symbol shown on the display. 3. Programme change timer If your receiver is in normal operating mode, it will switch to the pre-selected programme slot at the designated starting time.
Bed_Anl_Digicorder_englisch 18.03.2004 14:10 Uhr Seite 38 Stop > Repeat the steps as set out under “Start” to enter the stop, or ending time (except for programme change timer). Repeat > Use the arrow keys to mark the column Rpt. > Press OK. A selection window will be opened, showing various suggestions for repeats. 1x Timer on once T Daily repeat 1 W Repeat once a week 1-5 Repeat only on workdays 6-7 Repeat only on weekends > Use the up/down arrow keys to select the desired function.
Bed_Anl_Digicorder_englisch 18.03.2004 14:10 Uhr Seite 39 Deleting timer programming > > > > To delete an existing timer setting, use the up/down arrow keys to mark the setting. Press the green function key Delete. A prompt will be displayed:”Do you really want to delete this timer?” Use the left/right arrow keys to select Yes. To delete the timer entry confirm by pressing OK.
Bed_Anl_Digicorder_englisch 18.03.2004 14:10 Uhr Seite 40 Example: Timeshift playback You have missed the start of the Formula 1 race - no problem! The PVR will show you the race at a later time (timeshift), while continuing to record the event.
Bed_Anl_Digicorder_englisch 18.03.2004 14:10 Uhr Seite 41 7.15.2.2 Pause/Freeze frame > ▲ To pause during the playback of a recording (freeze frame), press the yellow function key while the unit is in Play mode. The message “Pause II”will appear. Press the yellow function key again to continue playing the recording from the same position. > 7.15.2.3 Fast forward and Reverse ▲ ▲ ▲ ▲ To locate a specific point in a recording, your PVR is equipped with functions for fast forward and reverse play.
Bed_Anl_Digicorder_englisch 18.03.2004 14:10 Uhr Seite 42 7.15.3.1 Managing recordings In this menu (Fig. 7-27) you have the opportunity to manage your recordings. > Press OK to go to the sub-menu Manage recordings. A list will be displayed showing all the recordings on the hard drive. > Use the up/down arrow keys to mark the desired programme. (Fig. 7-27) Delete > To delete the selected recording, press the red function key Delete.
Bed_Anl_Digicorder_englisch 18.03.2004 14:10 Uhr Seite 43 Monitoring the hard drive > To monitor the hard drive, use the left/right arrow keys to mark the field Check. > Press OK, then confirm the screen prompt displayed by pressing OK again to start the checking procedure. The status of the hard drive will now be checked, the result will be displayed on screen. Formating the hard drive When the hard drive is formatted, the data system is replaced.
Bed_Anl_Digicorder_englisch 18.03.2004 14:10 Uhr Seite 44 function, and how programmes can be included in the EPG. When calling up the programme list by means of the OK key the Favourites programme list will be displayed. 8.1.1 Calling up programme list management (Fig. 8-1) (Fig. 8-2) (Fig. 8-3) Proceed as follows to manage the Favourites list: > Press the Menu key to call up the Main Menu. (Fig.
Bed_Anl_Digicorder_englisch 18.03.2004 14:10 Uhr Seite 45 8.1.2 Adding programmes to the Favourites list To include programmes shown on the Total list in the Favourites list, proceed as described in Point 8.1.1 to call up the programme list management, and move to the Total list. > Press the blue function key Functions. A selection window will be displayed, showing the available functions. (Fig. 8-4) > Use the up/down arrow keys to mark the line Add. > Confirm by pressing OK.
Bed_Anl_Digicorder_englisch 18.03.2004 14:10 Uhr Seite 46 The following prompt will be displayed on screen:“Remove programme(s) from list?”. > Use the left/right arrow keys to select Yes or No. > Confirm by pressing OK. The programmes removed in this manner remain in the Total list, and can be included in the Favourites list again at any time. 8.1.3.2 Deleting from the Total list To remove programmes from the Total list, proceed as described in Point 8.1.3.1.
Bed_Anl_Digicorder_englisch 18.03.2004 14:10 Uhr Seite 47 8.2 Programming the electronic programme guide To obtain a better overview, you can programme the electronic programme guide SFI in such a way that it contains only your favourite programmes.
Bed_Anl_Digicorder_englisch 18.03.2004 14:10 Uhr Seite 48 this manner, press the yellow function key SFI to include the marked programmes in the electronic programme guide. > Press the Menu key to revert to normal operation. You can now start the download procedure manually: > Switch off the receiver, using the On/Standby key (Standby). > Now, while “Standby” appears in the display, press the SFI key. The receiver will now perform the download procedure.
Bed_Anl_Digicorder_englisch 18.03.2004 14:10 Uhr Seite 49 Press OK to select On. In the line Update time use the numeric keys to set the time at which the automatic download of SFI data is to be carried out. > To start the download of updated SFI data manually, press the red function key Start now.
Bed_Anl_Digicorder_englisch 18.03.2004 > > 14:10 Uhr Seite 50 Repeat the code entry. When you have completed changing the unit PIN code in this manner you will automatically be taken back to the Parental Control menu. Note! Do not forget your unit PIN code. If you should forget it, please consult your specialist retailer! 8.3.2 Mode > In this line, use the left/right arrow keys to select parental control on or off. 8.3.3 Selecting a programme > > > (Fig. 8-12) > > > > > > > Press OK.
Bed_Anl_Digicorder_englisch 18.03.2004 14:10 Uhr Seite 51 8.4 Programme scan As mentioned, your digital receiver has been pre-programmed for reception of the ASTRA and EUTELSAT satellites. To receive new programmes, or those of other satellites, various options are provided to preform a programme scan (search). 1. Automatic scan Select this type of search mode to scan all satellites selected in the menu LNC Settings (Point 6.4 and 8.4) for programmes. 2.
Bed_Anl_Digicorder_englisch 18.03.2004 14:10 Uhr Seite 52 8.4.2 Satellite scan (Fig. 8-16) UTo scan a specific satellite for programmes, select the option Satellite scan (Fig. 8-16). You can select whether you wish to scan for all programmes (free-to-air and encrypted) or only for free-to-air programmes. > Press the OK key again to open the selection table of active satelites.
Bed_Anl_Digicorder_englisch 18.03.2004 14:10 Uhr Seite 53 symbols per second). > Use the up/down arrow keys to mark the line Symbol rate. > Use the numeric keys to enter the appropriate symbol rate. Polarisation > Use the up/down arrow keys to mark the line Polarisation. > In this line, use the OK key to enter the polarisation plane (horizontal or vertical) on which the desired programme is broadcast. Scan mode > Use the up/down arrow keys to mark the line Scan mode.
Bed_Anl_Digicorder_englisch 18.03.2004 14:10 Uhr Seite 54 cally, you can select whether to include them in the Favourites list in sorted or unsorted order. Sorted The programmes found will be sorted into the Favourites list in accordance with a pre-programmed list order. The order in which programmes are sorted will depend on the audio language was selected in Point 6.3.2 resp. on the country selected in Point 6.2.2 and 6.2.3.
Bed_Anl_Digicorder_englisch 18.03.2004 14:10 Uhr Seite 55 8.5.1 Activate default setting When this function is selected, the default settings pre-programmed at the factory are activated again, your own settings are deleted, and the installation assistant AutoInstall will be started. > Use the up/down arrow keys to mark the line Activate default setting. > Press OK. The following prompt will appear: “Do you really want to activate the default setting?”.
Bed_Anl_Digicorder_englisch (Fig. 8-24) 18.03.2004 14:10 Uhr Seite 56 default settings, and the desired changes will have to be entered again. For the new software to be downloaded automatically, the digital receiver must be in standby mode. The download procedure will be indicated on the display by “SAtL”. Do not interrupt this procedure, e.g. by switching the receiver on or off.
Bed_Anl_Digicorder_englisch 18.03.2004 14:10 Uhr Seite 57 9 Operating a rotary antenna installation (DiSEqC 1.2) Your digital receiver is ready to operate a motorised rotary antenna installation The DiSEqC control function (DiSEqC level 1.2) allows you to control a suitable motor via the coaxial cable. > Call up the menu Antenna settings as described under Point 6.4 (Fig. 9-1) and switch the DiSEqC control (Point 6.4.1) to on. > Now use the up/down arrow keys to select the DiSEqC position (e.g.
Bed_Anl_Digicorder_englisch 18.03.2004 > > (Fig. 9-6) Seite 58 To delete the limits, press the green function key Delete lim. Confirm the screen prompt by pressing OK (Fig. 9-6) 9.1.2 Set Eastern limit > (Fig. 9-7) 14:10 Uhr > > > > > To enter the Eastern limit, first use the arrow keys to mark the field Save.
Bed_Anl_Digicorder_englisch 18.03.2004 14:10 Uhr Seite 59 longitude. Now press the arrow key left. In this field, use the OK key to indicate whether you are referring to longitude East (East) or west (W). > Now use the arrow keys to mark the field for entering the geographical latitude. > Use the numeric keys to enter the geographical latitude. > Now press the arrow key left. > In this field, use the OK key to indicate whether you are referring to latitude North (N) or South (S).
Bed_Anl_Digicorder_englisch 18.03.2004 14:10 Uhr Seite 60 9.3.1 Selecting a satellite position 9.3.1.1 Selecting a pre-programmed satellite position > (Fig. 9-10) To include a satellite position in the satellite list, use the arrow keys to mark the field Sat new. > Confirm by pressing OK. A list showing the available satellite positions will be displayed. (Fig. 9-10) > Now use the up/down arrow keys to mark a satellite position that you wish to include in the satellite list.
Bed_Anl_Digicorder_englisch 18.03.2004 14:10 Uhr Seite 61 9.3.2 Adjusting the satellite antenna To adjust the antenna for the desired satellite, or to determine whether the desired satellite can be received at the set position, a test transponder has been programmed for each satellite. The indicators for signal strength and signal quality provided by this test transponder facilitate the exact positioning of the antenna. 9.3.2.
Bed_Anl_Digicorder_englisch (Fig. 9-13) 18.03.2004 14:10 Uhr Seite 62 focus procedure. While the automatic adjustment is in progress, the message Autofocus will be displayed. (Fig. 9-13) 9.3.3 Saving a satellite position (Fig. 9-14) (Fig. 9-15) (Fig. 9-16) (Fig. 9-17) NWhen the Autofocus function has been completed, you can proceed to save the satellite position in memory. > Use the arrow keys to mark the field Save. > Press OK.
Bed_Anl_Digicorder_englisch > > > > 18.03.2004 14:10 Uhr Seite 63 Press the yellow function key Actions to open the window displaying the actions available. Use the up/down arrow keys to mark the line turn to Sat. Confirm by pressing OK. Press the green key (turn to Sat), the antenna will be turned toward the satellite position selected. Example: 9.
Bed_Anl_Digicorder_englisch 18.03.2004 14:10 Uhr Seite 64 DiSEqC: Digital Satellite Equipment Control: a digital control signal used to control and switch DiSEqC compatible components of the external installation via the antenna cable. An example of how an installation consisting of DiSEqC components can be configured is shown in (Fig. 10-1).
Bed_Anl_Digicorder_englisch 18.03.2004 14:10 Uhr Seite 65 mit neighbouring programmes with opposite polarisation (horizontal and vertical or laevorotatory and dextrorotatory). In order to receive the two polarisation planes either two single LNCs or one V/H LNC are required.
Bed_Anl_Digicorder_englisch 18.03.2004 14:10 Uhr Seite 66 11 Technical data DBS tuner: Input frequency range Input level range DBS tuner input Input/output impedance Output for 1.
Bed_Anl_Digicorder_englisch Output digital: SP/DIF output Video parameters: Output: Output level FBAS Output level Y Output level C Output level RED Output level GREEN Output level BLUE S/N loaded Teletext Teletext filtering Download Teletext data 18.03.2004 14:10 Uhr Seite 67 electrical, cinch socket optical, Toslink Dolby Digital AC3 1 Vs-s +/- 0.3 dB into 75 1 Vs-s +/- 0.3 dB into 75 1 Vs-s +/- 0.3 dB into 75 0,7 Vs-s +/- 0.1Vp-p into 0,7 Vs-s +/- 0.1Vp-p into 0,7 Vs-s +/- 0.
Bed_Anl_Digicorder_englisch 18.03.2004 14:10 Uhr Seite 68 LNC switched off in standby mode 22 kHz modulation: 22 kHz, Amplitude 0.6 V +/- 0.2 V Programme memory/satellite positions: No. of programmes Favourites list TV: 999 TV programmes No. of programmes Favourites list Radio: 999 Radio programmes Number of programmes: Total list TV/Radio: In total 6000 programmes can be stored in the Total list DiSEqC: DiSEqC 1.0 and DiSEqC 1.
Bed_Anl_Digicorder_englisch 18.03.2004 14:10 Uhr Seite 69 12 Troubleshooting guide Problem Possible cause Solution Various programmes not shown in programme list Wrong programme list selected Select different programme list (see Point 7.2.3.
Bed_Anl_Digicorder_englisch 18.03.2004 Problem 14:10 Uhr Seite 70 Possible cause Solution Current time not displayed while in standby mode Current time not downloaded Switch to major programme, e.g. ZDF, for approx. 30 seconds. Unit cannot be switched on, or cannot be operated Unit blocked Perform flash reset: Note! All personal settings are lost in this process. > Disconnect mains power plug. > Press Standby and Programme Up keys on unit simultaneously, and keep them pressed down.
Bed_Anl_Digicorder_englisch 18.03.2004 14:10 Uhr Seite 71 13 Annexu Co-ordinates of some German cities(1) Town/city Aachen Augsburg Berlin Beucha Bielefeld Bonn Brandenburg Braunschweig Bremen Bremerhaven Chemnitz Cottbus Daun Dippach Dortmund Dresden Duisburg Düsseldorf Eisenach Emden Erfurt Essen Flensburg Frankfurt/M. Frankfurt/O. Freiburg/Br. Fuerstenberg Fuerth Gera Goerlitz Göttingen Greifswald Halle/Saale Hamburg Hannover Heidelberg Heilbronn Hildesheim Hof Karlsruhe Geogr.
Bed_Anl_Digicorder_englisch 18.03.2004 14:10 Uhr Seite 72 Co-ordinates of some German cities (2) Town/city Kassel Kiel Koblenz Köln Krefeld Landshut Leipzig Ludwigshafen Lübeck Lüneburg Magdeburg Mainz Mannheim München Neubrandenburg Neumünster Nürnberg Oberhausen Oldenburg/Holsn. Oldenburg Osnabrück Passau Potsdam Regensburg Rostock Saarbrücken Salzgitter Salzwedel Schwerin Solingen Stuttgart Trier Ulm Weimar Wiesbaden Wilhelmshaven Wismar Wuppertal Würzburg Zwickau Geogr.
Bed_Anl_Digicorder_englisch 18.03.2004 14:10 Uhr Index AC3 . . . . . . . . . . . . . . . . . . . . . . . . . . . . .19, 28 Autofocus 67 Automatic scan . . . . . . . . . . . . . . . . . . . . . . . . . . . .56 Language, operating . . . . . . . . . . . . . . . . . . . . . . . .17 Service breaks . . . . . . . . . . . . . . . . . . . . . . . . . . . . . .9 DiSEqC . . . . . . . . . . . . . . . . . . . . . . . . . . . . . . . .69 DiSEqC 1.2 . . . . . . . . . . . . . . . . . . . . . . . . . . . . . . .
Bed_Anl_Digicorder_englisch 18.03.2004 14:10 Uhr Seite 74 SFI . . . . . . . . . . . . . . . . . . . . . . . . . . . . . . . .31 SFI channel . . . . . . . . . . . . . . . . . . . . . . . . . . . . . . . .52 Safety notes . . . . . . . . . . . . . . . . . . . . . . . . . . . . . . . .9 Sleep timer . . . . . . . . . . . . . . . . . . . . . . . . . . . . . . . .46 Updating software . . . . . . . . . . . . . . . . . . . . . . . . . .60 Special functions . . . . . . . . . . . . . . . . . . . . . . . . . . .
Bed_Anl_Digicorder_englisch 18.03.
Bed_Anl_Digicorder_englisch 18.03.2004 14:10 Uhr Seite 76 For everyday operation Switching on and off > > > Use the On/Standby key either on the unit or on the remote control to switch on the digital receiver. Press the key again to switch the unit off. The unit is now in standby mode, and the current time is shown on the display.
Bed_Anl_Digicorder_englisch 18.03.
Bed_Anl_Digicorder_englisch 18.03.