bed_anl_DIGITY 1_englisch_4.qxd 21.06.
bed_anl_DIGITY 1_englisch_4.qxd 21.06.02 13:41 Seite 2 Table of contents 1 Illustrations . . . . . . . . . . . . . . . . . . . . . . . . . . . . . .3 2 Contents . . . . . . . . . . . . . . . . . . . . . . . . . . . . . .2, 5 3 Please read first - Safety notes! . . . . . . . . . . . . . .6 4 4.1 4.2 4.3 4.4 4.5 4.6 Connection . . . . . . . . . . . . . . . . . . . . . . . . . . . . . .8 Mains power connection . . . . . . . . . . . . . . . . . . . . . . . . . . . . .9 External unit . . . . . . . . .
bed_anl_DIGITY 1_englisch_4.qxd 21.06.02 13:41 Seite 3 7 7.1 7.1.1 Change basic programming . . . . . . . . . . . . . . . . .22 Configure programme lists . . . . . . . . . . . . . . . . . . . . . . . . . .22 Select programme list . . . . . . . . . . . . . . . . . . . . . . . . . . . . . .23 7.1.2 a) b) c) 7.1.3 a) b) 7.1.4 7.1.5 7.2 7.3 7.4 7.4.1 7.4.2 7.4.3 7.5 7.5.1 7.5.2 7.6 Including Programmes in Programme List . . . . .23 Selecting programmes . . . . . . . . . . . . . . . . . . . . . . . . . .
ÜBFERNBE.QXD 25.09.
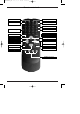
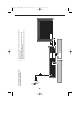
RS 232 interface Audio output left/right Mains connection Channel up/down 13:41 5 SCART connector VCR SCART connector TV LED 21.06.02 LNB input On/Standby bed_anl_DIGITY 1_englisch_4.
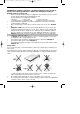
bed_anl_DIGITY 1_englisch_4.qxd 21.06.02 13:41 Seite 6 3 Please read this first NOTE:English speaking customers - the default setting of your receiver is German. You should go directly to chapter 5 to change the setting to English (point 5.1 on page 10) > Before setting up and connecting your equipment, check whether you have received all items that should have been supplied with the unit.
bed_anl_DIGITY 1_englisch_4.qxd > > 21.06.02 13:41 Seite 7 The receiver may only be operated in a temperate climate. Never open the cover of the unit! You may be subject to an electrical shock. Any necessary opening of the unit may only be carried out by qualified personnel. Operational breaks: During a thunderstorm, or during prolonged periods of non-use, the unit should be disconnected from the mains.
Connecting the DVB receiver to a satellite installation a. Connection from LNB to LNB IN connection on DVB receiver b. Mains connection c. SCART connection between a VCR and the VCR-SCART connection on the DVB receiver d. SCART connection between the DVB receiver and the TV set bed_anl_DigiCom1A_neutral.qxd 29.06.
bed_anl_DIGITY 1_englisch_4.qxd 21.06.02 13:41 Seite 9 4 Connections The various references below - a b c etc., refer to the diagram on page 8. 4.1 Mains connection The receiver should be connected to the mains supply only after it has been connected to all other components in the system. This serves to avoid damage to both the receiver and to other components. b Once you have made all other connections, use the mains cable supplied to connect the receiver to a mains socket 230V/50Hz. 4.
bed_anl_DIGITY 1_englisch_4.qxd 21.06.02 13:41 Seite 10 5 Installation Now that you have connected your new receiver, and have commenced operating it, you can, if necessary, optimize its functions for your needs. 5.1 OSD Language This menu point gives you the option of setting the language according to your preferences. In order to select a different OSD language, proceed as follows: > Press the Menu key to display the Main Menu.
bed_anl_DIGITY 1_englisch_4.qxd 21.06.02 13:41 Seite 11 The menu Basic settings will be displayed. > Use the arrow up/down keys to move the marker within the menu, and to change the individual settings as indicated. When selecting a menu item, please note any relevant information displayed on screen. The following settings can be made: 5.2.1 Parental control setting: Your unit can be set to resist unauthorised use by children.
bed_anl_DIGITY 1_englisch_4.qxd 21.06.02 13:41 Seite 12 > > Now mark the line Audio/Video settings by means of the arrow up/down keys. Confirm by pressing OK. The menu Settings Audio/Video will be displayed. > Use the arrow up/down keys to move the marker within the menu, and to change the individual items. When selecting a menu item, please also pay attention to any related on-screen displays. The following settings/adjustments may be made: 5.3.
bed_anl_DIGITY 1_englisch_4.qxd 21.06.02 13:41 Seite 13 type of LNB, then you must adjust the receiver as follows : > Press the Menu, key in order to display the Main menu. > > Use the arrow up/down keys to mark the line Settings. Confirm by pressing OK. The menu Settings will be displayed. > > Now mark the line LNB Settings by means of the arrow up/down keys. Confirm by pressing OK. The menu LNB Settings will be displayed. The following adjustments can be made in this sub-menu: 5.4.
bed_anl_DIGITY 1_englisch_4.qxd > 21.06.02 13:41 Seite 14 Make adjustments in this line by means of the key OK DiSEqC on or off. Since only one LNB can be addressed when the DiSEqC control is switched off, the menu is restricted to the configuration of a single LNB. 5.4.2 Setting the switching matrix and the LNB properties The menu lists the four switching criteria of the DiSEqC control.
bed_anl_DIGITY 1_englisch_4.qxd 21.06.02 13:41 Seite 15 receiver. So-called Universal LNBs operate with 2 LOFs, in order to cover the entire reception range of from 10.7 to 11,8 GHz (low-band) and from 11,7 to 12,75 GHz (high band). When this line is marked, use the numeric keys to enter the LOF frequency of the low band of your LNB. LOF high band When this line is marked, use the numeric keys to enter the LOF frequency of the high band of your LNB.
bed_anl_DIGITY 1_englisch_4.qxd 21.06.02 13:41 Seite 16 For example 1 for programme slot 1 1, then 4 for programme slot 14 2, then 3, then 4 for programme slot 234 When entering programme numbers consisting of several digits, you have approx. 3 seconds time after pressing a key to complete the entry. If you wish to enter a programme number consisting of only one or two digits, you can speed up the selection process by keeping your finger pressed down on the last digit a little longer. 6.2.
bed_anl_DIGITY 1_englisch_4.qxd > > 21.06.02 13:41 Seite 17 Now use the arrow up/down keys to select the desired programme list. Confirm by pressing OK. The selected list will now be displayed. As described above the desired programme can be selected and set. 6.2.4 Calling up blocked/restricted programmes If a programme is selected that is blocked by the child-proof feature, the prompt PIN-Number will appear on the screen. > Use the numeric keys to enter your PIN number.
bed_anl_DIGITY 1_englisch_4.qxd 21.06.02 13:41 Seite 18 6.6 Going back to previous programme viewed Press the Back key on the remote control unit to go back to the previous programme viewed. > Press this key again to again go back to the programme viewed before the current one, i.e. to switch back and forth between two programmes. 6.7 Displaying clock and programme information This function enables you to view the programme information relating to the programme currently selected.
bed_anl_DIGITY 1_englisch_4.qxd 21.06.02 13:41 Seite 19 6.10 Teletext 6.10.1 Using the teletext decoder of the TV set In so far as it is broadcast, teletext is available on your TV set. In order to view teletext, use the remote control unit of your TV set. Should you experience problems, such as overlapping of teletext and picture contents, you should set your receiver to FBAS mode (Point 5.3). 6.10.
bed_anl_DIGITY 1_englisch_4.qxd > > 21.06.02 13:41 Seite 20 Press the EPG key in order to display the information. You can scroll through lengthy texts with the aid of the arrow up/down keys, and you can page through them with the aid of the arrow left/right keys. Press the Back key to return to the previous table of information. 6.11.4 Switching EPG off > Press the Back key to return to normal operation. 6.12 Timer Your receiver is equipped with a timer.
bed_anl_DIGITY 1_englisch_4.qxd 21.06.02 13:41 Seite 21 or > Press the TV/Radio key to return to normal operation. The receiver will now select the chosen programme at the programmed time, and will, unless otherwise selected, return to standby mode after the programme has ended. 6.12.2 Manual Programming/Changing timer settings In addition to the option of programming the timer via the EPG, yoi can also programme the timer manually.
bed_anl_DIGITY 1_englisch_4.qxd 21.06.02 13:41 Seite 22 Channel In this line you should select the TV channel on which you want to record a programme: > Mark the appropriate line Channel by means of the arrow keys. > Press the OK.key. A programme list will be displayed. > Use the arrow keys to select the desired programme. > Confirm by pressing OK. The selected programme will now be taken over into the timer menu. Date > Use the arrow keys to mark the column Date.
bed_anl_DIGITY 1_englisch_4.qxd 21.06.02 13:41 Seite 23 This means that, for instance, you can programme one list exclusively with sports programmes, another with news programmes. etc.. Each user programme list contains all programmes that you have specifically included, using the procedure described below. This chapter also describes how you can delete programmes from the list, and how you can block programmes from unauthorised use (child protection).
bed_anl_DIGITY 1_englisch_4.qxd 21.06.02 13:41 Seite 24 This list will show the programmes sorted by provider. > Press the green function key (Selection) in order to display a list of providers, from which one can be selected. > > Use the arrow keys to mark the provider selected. Confrim by pressing OK. A list of programmes relating to the selected provider will be displayed. Programmes that have already been entered in the selected user list are marked with a check sign.
bed_anl_DIGITY 1_englisch_4.qxd > > > > 21.06.02 13:41 Seite 25 Mark the programmes to be deleted as described above. Press the red (Delete) function key. The query “Really delete program(s)?” will be displayed. Press the arrow left/right keys to select Yes or No. Confirm entry by pressing OK. 7.1.4 Sorting programmes In order to sort the programmes in a user programme list in the order most convenient to you, proceed as follows: > Call up a programme list display by pressinf the OK key.
bed_anl_DIGITY 1_englisch_4.qxd 21.06.02 13:41 Seite 26 7.2 Changing the PIN The PIN number is set at the factory to 0000 in order to activate the parental control feature, you must enter a personal PIN number in place of the factory setting. Please note! Do not forget your PIN number. If you do forget it, please consult your retailer or serviceman! In order to change the PIN number, proceed as follows: > Press the Menu key to call up the Main Menu.
bed_anl_DIGITY 1_englisch_4.qxd 21.06.02 13:41 Seite 27 > > Use the arrow up/down keys to mark the line Search. Confirm by pressing OK. The sub-menu >Search will be displayed. > Now use the arrow up/down keys to select the search method you wish to employ. 7.4.1 Satellite When you activate this search mode, all active satellites (Point 5.4) and transponders will be scanned for programmes. > Use the arrow up/down keys to select the menu line Satellite. > Press the OK key to display the sub-menu.
bed_anl_DIGITY 1_englisch_4.qxd 21.06.02 13:41 Seite 28 > Press the red function key again to end the scan. A full scan may take more than 15 minutes. Please also note any additional information provided on screen. 7.4.2 Transponder Use this menu point to search for programmes specifically from a particular transponder (see Point 9 Technical Terms. For this, it is necessary to enter the transponder data. > Use the arrow up/down keys to mark the line Transponder. > Confirm by pressing OK.
bed_anl_DIGITY 1_englisch_4.qxd 21.06.02 13:41 Seite 29 To perform a manual search, call up the menu >Search >Manual Search. > Use the arrow up/down keys in order to mark the line Manual Search. > Confirm by pressing OK. The menu >Search>Manual Search. will be displayed. This menu differs from the Transponder nmenu only in terms of the menu points PCRPID, Audio-PID and Video-PID. > Proceed as described under Point 7.4.3.
bed_anl_DIGITY 1_englisch_4.qxd 21.06.02 13:41 Seite 30 > > Use the arrow up/down keys to mark the line Settings. Confirm by pressing OK. The sub.menu >Settings will be displayed. > > Now use the arrow up/down keys to mark the menu line Factory settings. Confirm by pressing OK. The sub-menu >Factory settings will be displayed. 7.5.1 Activating default setting This function allows you to go back to the default setting programmed in the factory, at the same time deleting your own settings.
bed_anl_DIGITY 1_englisch_4.qxd 21.06.02 13:41 Seite 31 7.6 System configuration You can access specific equipment data under this menu item. > Use the arrow up/down keys to mark this line in the sub-menu Settings.. > Confirm by pressing OK. > Press the Menu key to return to normal operation.
bed_anl_DIGITY 1_englisch_4.qxd 21.06.02 13:41 Seite 32 Intermediate Frequency (IF): The frequency range broadcast by a satellite cannot be transmitted via a cable connection. The LNB thus converts the signal to an interim frequency range of 950 to 2050 MHz, which enables the signal to be received and processed by the receiver. 1.
bed_anl_DIGITY 1_englisch_4.qxd 21.06.02 13:41 Seite 33 Software Update: Digital television is a new medium. Apart from improved sound and image quality, it also provides the facility for interactive services. These new services are continually being developed and improved by programme providers. In order to use these services it may occasionally be necessary to update the software of the receiver. Supply voltage: LNBs are provided with electrical current via the coaxial cable.
bed_anl_DIGITY 1_englisch_4.qxd 21.06.02 13:41 Seite 34 Memory capacity: FLASH memory SDRAM (CPU) SDRAM (CPU) EEPROM 0,5Mbytes 2 MBytes 2 MBytes 1 kByte Audio Parameters: Input analogue: Input levels L/R Input impedance 0,5 V r.m.s. (nominal) > 40 kOhm Output analogue: Output levelsl L/R Output impedance THD Crossover Initial volume 0,5 V r.m.s.
bed_anl_DIGITY 1_englisch_4.qxd 21.06.02 13:41 Seite 35 Number of active satellite positions: max.4 (DiSEqC 1.
bed_anl_DIGITY 1_englisch_4.qxd 21.06.02 13:41 Seite 36 10 Troubleshooting Guide Problem Possible cause Solution No picture, no sound, LED not lighted No mains current Check mains plug and cable No picture, no sound, LED on Short circuit in LNB connection Switch unit off, repair short-circuit, switch unit on again Defective or missing cable connec- Check all cable connections tion Defective LNB Replace LNB Wrong external unit set on receiver Adjust setting (see Point 5.
bed_anl_DIGITY 1_englisch_4.qxd 21.06.02 13:41 Seite 37 Dear customer, we would like to repeat that, in case you experience the following problems, you should at first try to remedy the technical problem yourself, using the tips provided, before contacting customer services. The unit is not working properly (controls do not respond, picture frozen...) > Disconnect the mains plug for about 5 seconds. > Then switch the receiver on again. If the problem still persists, contact your customer services.
bed_anl_DIGITY 1_englisch_4.qxd 21.06.02 13:41 Seite 38 Brief instructions for daily use Switching on and off > > > Switch the receiver on by pressing the On/Standby key on the remote control unit. Press the key again to switch the receiver off again. The receiver is now in standby mode. Programme selection 6.2.1 Using the programme up/down keys > Use the programme up/down keys on the remote control unit to move up or down by one programme slot at a time. 6.2.