TechniFon i1 USB Phone driver Phoning via the internet for free1) WWW TechniFon i1 USB Phone User Manual 1) Phoning via the internet for free. To use Technisat TechniFon i1 you need to have access to the internet, with possible additional costs arising.
Please read this first! Before starting the use of the device, please check whether the delivery is complete. The following items are included: 1 TechniFon i1 USB Phone, 1 USB Connecting Cable, 1 CD-ROM, 1 Connecting Cable TechniFon / Receiver, 1 Guarantee Card, 1 Installation Guide If any of these items are missing or appear to be damaged, please contact your dealer or call our technical support immediately.
Content: Connecting the cables . . . . . . . . . . . . . . . . . . . . . . . . .4 Software installation . . . . . . . . . . . . . . . . . . . . . . .5 - 7 VoIP software support by various providers . . . . . .8 Activating Drivers for the provider Skype . . . . . . . . .9 Configuration of the TechniFon i1 for Skype . . . . .10 Using TechniFon i1 with Skype . . . . . . . . . . . . .12 - 14 Troubleshooting . . . . . . . . . . . . . . . . . . . . . . . . . . . .15 Disposal notes . . . . . . . . . . . . .
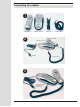
Connecting the cables: 1 USB handset USB base station 2 USB cable handset cable USB handset USB base station USB cable USB plug handset cable 3 Connect the USB plug with your laptop or PC 4
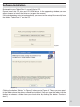
Software-Installation Enclosed to your TechniFon i1 you will find a CD. Please insert this CD into your CD-ROM drive. In the appearing window you can either choose to install the driver or to open the manual. If this window does not start automatically, you can start the setup file manually from the folder “TechniFon i1” on the CD. Figure 1 (Figure 2) Clicking the button “Weiter” in Figure 2 takes you to Figure 3. There you can specify the folder where the drivers should be installed.
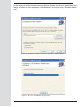
In the lower part of the window you can choose whether the drivers should be installed for all users on your computer (“Alle Benutzer”) or only for you (“Aktueller Benutzer”). Figure 3 - Confirm your inputs / choices by clicking the “Weiter” button.
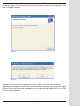
If you see Figure 5, the installation process has been successfully completed. Click the “Schließen” button. Figure 5 Figure 6 Choose “Ja” to restart your computer now or “Nein” to restart later manually. Note that the computer needs to be restarted before you can start using your TechniFon i1.After restarting your computer you can connect the TechniFon i1 to a USBPort of your computer.
VoIP software support by various providers Using the TechniFon i1 USB Phone with appropriate VoIP Software, so-called “SoftPhones”, you can communicate via internet with other users all over the world, no matter where you are. For software download and getting more information about supported soft-phones please visit the websites of the providers. Skype: http://www.skype.com MSN Messenger: http://messenger.msn.com SJPhone: http://www.sjlabs.com X-Lite: http://www.globalipphones.
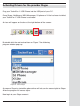
Activating Drivers for the provider Skype Plug your TechniFon i1 USB Phone into the USB port of your PC. Once Skype, Net2phone, MSN Messenger, SJ phone or X-Lite has been installed, your TechniFon i1 USB Phone is activated. An icon will appear on the bar at the right bottom of the screen: Figure 7 By double click the red marked icon on Figure 7 the following program window pops up: Figure 8 - Select Skype As soon as Skype is started the phone driver will ask you for access rights to Skype.
Figure 9 Possible choices: • Zugriff auf Skype erlauben (admit full access rights to Skype) • Zugriff auf Skype erlauben, aber jedes Mal nachfragen (admit full access rights to Skype, but ask again on every startup) • Zugriff auf Skype nicht erlauben und blockieren Select your user account and login. Setup the TechniFon i1 for Skype To telephone with your TechniFon i1 you have to ensure that the phone is installed as I/O device in your Skype audio device settings. Please follow these steps: 1.
Figure 10 4. Now Click on “Tastatur” on the left side of the menu 5. Activate the shortcuts as shown in figure 11 (red marked) Figure 11 6. Save configuration by clicking the “Speichern” button.
Using TechniFon i1 with Skype If you want to make a call, your contact list will appear automatically. Figure 12 Press the [Down] button to scroll the contact list. To get back to the top, press the [Down] button for 2 seconds..
Interact with other Skype-users 1. Call someone on the contact list: Figure 13 Select the name you want to call and press the [OK] button. The call will be initiated. To terminate the call, just ring off. 2. How to answer the phone To answer the phone, lift up the handset. To end the call, just ring off.
Make a call via landline: Please note: To use Skype for landline calls and to be able to be contacted by phone, you need a valid account at Skype. Please find more information at http://www.skype.com/int/de/. Lift up the receiver handset and press the [Start] button to move to the tab “Wähltasten”. Figure 14 Enter the number by pressing the buttons on the phone or clicking on the buttons in the program (you can also press the buttons on the keypad like dialling on a common phone).
Troubleshooting notes: Error Possible Cause Measures No sound or only sound from the Wrong setup in Windows or the Check the audio setup of the speakers. VoIP Software of your provider. phone in the system preferences of your computer. Check your audio setup in the preferences of your soft phone. No picture when calling and using Ask the provider of your soft a webcam. phone (e.g. Skype) whether the webcam you are using is supported. Check your webcam with its own software to be sure that it works.
Disposal notes The packing of this product entirely consists of recyclable materials. This product must not be disposed as household waste at the end of its lifetime. It has to be brought to a special recycling and collecting point for electronic waste. That is indicated by the symbols on the device, the manual or the packing of the product. By recycling these materials you help saving our environment. Please contact your local government to find out nearest collecting point.