bed_anl_SkyFunk3_engl.qxd 25.09.
bed_anl_SkyFunk3_engl.qxd 25.09.03 09:07 Seite 2 Contents Chapter 1 2 3 4 5 6 7 Topic . . . . . . . . . . . . . . . . . . . . . . . . . . . . . . . . . . . . . . . . . . . . . . . . . . . . .Page Safety advice . . . . . . . . . . . . . . . . . . . . . . . . . . . . . . . . . . . . . . . . . . . . . . . .2 General . . . . . . . . . . . . . . . . . . . . . . . . . . . . . . . . . . . . . . . . . . . . . . . . . . . .3 Connections . . . . . . . . . . . . . . . . . . . . . . . . . . . . . . . . . . . . . .
bed_anl_SkyFunk3_engl.qxd 25.09.
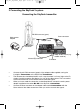
bed_anl_SkyFunk3_engl.qxd 25.09.03 09:07 Seite 4 3 Connecting the SkyFunk 3 system Connecting the SkyFunk transmitter Mini DIN connector (green) Scart connector Mains power adapter Adapter cable Transmitter Transmitter Video-/Audio source (e.g. satellite receiver) Infrared (IR) extension > > > > IR window Connect the mini DIN connector (green) of the adapter cable supplied, carring the inscription Transmitter to the SkyFunk 3 Transmitter.
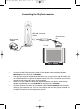
bed_anl_SkyFunk3_engl.qxd 25.09.03 09:07 Seite 5 Connecting the SkyFunk receiver Mini DIN connector (violet) Mains power adapter Adapter cable Scart connector Receiver TV set Receiver > > > > Connect the Mini DIN connector (violet) of the adapter cable supplied, labelled Receiver with the SkyFunk 3 receiver. The SkyFunk receiver should be positioned in such a way that the red IR window has an unobstructed line of sight to the remote control unit.
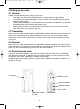
bed_anl_SkyFunk3_engl.qxd 25.09.03 09:07 Seite 6 4 Setting up the units 4.1 General Please note the following when setting up the units: > If possible, the units should be positioned 1-2 metres above the ground/floor > To avoid the units being damaged in a fall to the floor, they should always be positioned on a level surface. > There should preferably be as few obstructions (e.g. electrical appliances) as possible located between the transmitter and receiver units.
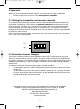
bed_anl_SkyFunk3_engl.qxd 25.09.03 09:07 Seite 7 5 Operation When you have worked through all the points, your SkyFunk 3 is ready for operation. > Switch on both units by means of the mains power switches. 5.1 Setting the transmitter and receiver channels To change the transmitter resp. receiver channel, select the desired channel on both units (transmitter and receiver). The switches for channel selection are located on the rear panel of the units. To select, e.g.
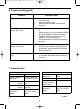
bed_anl_SkyFunk3_engl.qxd 25.09.03 09:07 Seite 8 6 Trouble-shooting guide Problem No picture, no sound Possible cause > > > Interference in transmission of picture and sound > > > > Mains switch or receiver and/or transmitter not switched on Cable connections faulty Receiver and transmitter set to different channels Antennae of the system not aligned optimally Interference on the channel selected. Remedy: select different transmission channel.