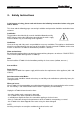
ST 6002 S OPERATING INSTRUCTIONS 1 2 3 VIDEO 4 5 6 AUDIO 7 8 9 SKEW ENTER 0 CNCL MUTE Satellite Receiver TechniSat ST 6002 S Stereo MENU TechniSat ST 6002 S TechniSat ST 6002 S STAND BY TechniSat® Satellitenfernsehprodukte GmbH,TechnikPark, W-5568 Daun 202/ /93
TechniSat ST 6002 S Contents Seite 2 Diagram : Front Panel, Remote Control Back Panel 3 3 Important Safety Instructions 6 4 Main Features of the ST 6002 S 7 5 Breif Introduction 5.1 Installation 5.1.1 Connection of the outside unit and television8 5.1.2 Setting up the receiver 5.2 Operation 8 8 9 10 6 Installation 6.1 Installation of the outside unit 6.1.1 General 6.1.2 Basic programming / Initial Set-Up 6.1.3 Setting the east / west limits 6.1.4 Programming of satellite positions 6.1.
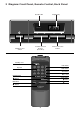
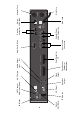
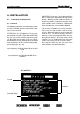
2 Diagram: Front Panel, Remote Control, Back Panel Standby LED 4-Fig.
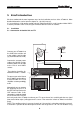
- LNB PWR OUT DC 14/18V 400 mA MAX RF IN ( + B(R)-AUDIO-(L)A DecoderOutput Video Output Scart Socket Decoder or Videorecorder PULSE M2 M1 220V Actuator Power Cable Connection 240V F2 F1 Main Lead AC 240V 50 Hz 110 WATTS MAX 82 ohm, ± 45 mA MAX + FERRIT – Switch Polariser Connection 220V/240V 50 mA MAX 36V 1,5 A MAX +5V Sensor Cable Connection GND EXT BUS Serial Port RS 232 Scart Socket for TV EURO SCART FOR TV Audio Output right left EURO SCART FOR VCR/DECODER UHF Output DECO
TechniSat ST 6002 S 3. Safety Instructions In the interest of safety, please read and observe the following instructions before using your new ST 6002 S. This sheet and the following pages concerning installation and operation should be retained for future reference. Installation: The procedures described in this manual should be followed carefully. NOTE: Always connect the LNB before connecting to the mains supply. Failure to do this may cause damage to the appliance.
TechniSat ST 6002 S 4 Features of the ST 6002 S: The ST 6002 S has the following features: – – – – – – – – – – – – – – – – – 200 preprogrammed channel places OSD (On-Screen-Display) Infra-red remote control for all functions Timer function for 8 settings Integrated dish positioner 50 storable satellite positions Autofocus Panda Wegener compatible noise reduction Volume control Adjustable video bandwidth Switchable modulator PAL G/I Free selection and storing of audio and video parameters Scart connectio
TechniSat ST 6002 S 5 Brief Introduction We have condensed the most important steps for the installation and use of the ST 6002 S. More detailed information can be found in chapters 6 - 10 of this manual. It is essential that a high quality outside unit with Triple-Band-LNB is used. If another kind of LNB is used, the procedure is the same, but you will not be able to receive all satellites. 5.1 Installation 5.1.
TechniSat ST 6002 S 5.1.2.
TechniSat ST 6002 S If a satelite cannot be found: Sat programming CNCL F 113 (Bsp.) F 113 CH 01 F System-Menu Sat programming Sat 27,5w Intel 601 (Example) Position 5204 (Eg.) F Position 5402 (Eg.) CH 01 F F F F F Position Position 5402 (Eg.) Position 5406 (Eg.) Sat 27,5w Intel 601 Sat 45w PanAmSat CH 01 CH 01 CH 01 CH 01 CH 01 CNCL 2 x F “Programme of the F 1 2 7 ( E g . ) last programmed- 001 F Satellite” “Programm PRO 7 from ASTRA” F 001 R 19,2o ASTRA 003 F 003 (Eg.
TechniSat ST 6002 S 6. INSTALLATION 6.1. IMPORTANT: If you press any button whilst the dish is moving, the movement will stop immediately. Where possible avoid this when programming satellites and when using the automatic satellite search. Otherwise, satellites that have already been saved could be deleted. Installation of Outside Unit 6.1.1. General The following instructions assume that the system has been installed correctly so that all the satellites can be received.
TechniSat ST 6002 S Switch on the receiver using the mains power switch (on the appliance). The following menu appears on the TV screen: To go to the System Menu switch the receiver into stand-by mode using the remote control unit ( ). Now hold down the buttons on the front of the receiver simultaneously for a few seconds. The System Menu will appear on the screen on a blue background. An arrow appears next to Basic Programming.
TechniSat ST 6002 S 6.1.2 Basic Programming / Initial Set Up Initially to program the receiver you have to carry out a Master Reset. Therefore, move the cursor to the option "Master Reset" on the System Menu and press ENTER. ENTER After the first press a red warning screen appears. This will disappear when you press ENTER twice more and your receiver is then set. ENTER ATTENTION: The preprogramming of the receiver is not affected by the cancellation procedure.
TechniSat ST 6002 S 6.1.3 Setting the East/West Limits Choose the option "Set Dish Limit" and press ENTER. Then move the cursor to "Position 5000". First move the dish west by pressing > on either RCU or on front panel until the desired west limit is obtained. (Whilst the dish is being moved the position no's will be displayed on the screen.) ENTER Move the cursor using to "West Limit" and press ENTER. This limit is automatically stored.
TechniSat ST 6002 S 6.1.4 Programming of Satellite Positions Choose the option "Program Satellite " from the System Menu and press ENTER to display a table of parameters. ENTER Move cursor to "Sat" and use the keys to select the desired satellite i.e. ASTRA 19.2 E. Then move cursor to "Channel" and select a known frequency i.e. 1250 MHz Eurosport. Now move the cursor to "Position" and move the dish using the buttons until you receive the desired channel.
TechniSat ST 6002 S Return the cursor to "Sat" and use the buttons to select the satellite which you wish to store next. Repeat the same procedure as described above. All satellites can be stored by this method. NOTE: Not all satellite channels are transmitting continuously. Additionally, it may also be necessary to alter the "Skew" values depending on the polariser type (refer to later section on "Changing Channel Parameters"). Programming of Future Satellites 1.
TechniSat ST 6002 S Automatic Location of Satellites 1. Choose the option “Auto location” on the System Menu. The use of this function requires that ASTRA has already been stored and that a TechniSat actuator is connected to the St 6002 S. Note only satellites with a comparatively strong signal can be stored by this method. ENTER 2. Start with Eutelsat 16 E. Press the buttons until this satellite appears in the display. Then press ENTER and confirm by pressing ENTER again.
TechniSat ST 6002 S 3. Repeat the same procedure for Eutelsat 13,10 E, and then for satellites further west of ASTRA. If you do not find a satellite using this method, program it manually as described before. 4. After you have stored all satellites west of ASTRA, program those which are further east of ASTRA.
TechniSat ST 6002 S 6.1.6. External Programming It is possible to transfer data between two ST 6002 S or between a personal computer and the ST 6002 S. To do this you require a cable with two RS 232 connectors. If you wish to exchange data with a personal computer you require in addition the appropriate software (disc). Prerequisite is that the computer has a RS 232 serial port. Both the cable and the software can be ordered from TechniSat. Select "Interface ext-link" from the System Menu.
TechniSat ST 6002 S 6.1.7 System Options Move the cursor to the menu option "Change System Options" and press the ENTER button.
TechniSat ST 6002 S Frequency shift It is possible to tune in the receiver to the frequency of the LNB should it not be supplying the exact IF-frequency: 1. Select a channel which is already stored, and which is transmitting in the 11GHz range. Switch the receiver into stand-by mode and call up the System Menu by holding down the buttons on the front panel simultaneously ENTER 2. First select the option “Change system options”, then “Global shift LNB”.
TechniSat ST 6002 S 6.2. Connecting a Videorecorder or Decoder + FERRIT – EXT BUS Connection of a Videorecorder F1 RF IN + - 82 ohm, ± 45 mA MAX UHF OUT 220V 240V FUSE 250V T500mA CH To record the signal of the ST 6002 S you can connect the videorecorder either to the “VCR/Dec” ( ( scart socket or to the UHF output. It is also possible to use the video/audio phono sockets.
TechniSat ST 6002 S 6.
TechniSat ST 6002 S 7. Operation 7.1. General The receiver ST 6002 S has many functions. For ease of use and so that it is not necessary to use a different button for each function the receiver uses "On Screen Display" and function keys. In this way related functions are condensed into "Menus". An arrow shows which function is in use. Underneath each menu the various keys which may be used are shown.
TechniSat ST 6002 S 7.2. Direct Operation You can select the desired channel via the Key Pad. Simply select the channel number (see the program tables). The channel number will appear on the receiver display and also on the screen. When you choose a 3-fig. channel number the receiver goes directly to the desired channel. If a 1or 2-fig. number is selected, the receiver waits initially for a further number. If this is not selected after a few seconds it will directly go to the 1- or 2-fig. channel.
TechniSat ST 6002 S 7.3. Menu Operation 7.3.1. Channel Selection CNCL Move the cursor to “Channel selection” and press ENTER. Use the keys to move the cursor to the desired channel and press ENTER. Stored channels are marked with a quaver. It is also possible to enter the channel no. directly, 3 digits ie. 009 Eurosport NOTE: To view any particular channel you simply have to select the channel no. It is not necessary to select the relevant satellite first.
TechniSat ST 6002 S 7.3.2. Satellite Selection Choose the option “Satellite selection” from the menu and press ENTER. A list of all the satellites will appear, those which are stored being marked with a quaver. Move the cursor to the desired satellite and press ENTER. Now the dish moves until the position is reached. Non-stored satellites can not be accessed.
TechniSat ST 6002 S 7.3.3 . Setting the Timer 1. Move the cursor to “Program timer events” and then press ENTER. Select Event 1 and press ENTER. 2. Use the buttons to move the cursor to “Channel” and with the buttons select the required channel. The name of the respective satellite is automatically called up. You also have the option of entering the channel no. directly via the key pad. ENTER 3.
TechniSat ST 6002 S 7.3.4. Setting the Clock Move the cursor to “Internal clock adjustment” and then press ENTER. Use the position keys to move the cursor to the appropriate line and keep pressing the keys until the required data appears. Then press ENTER to start the clock. To return to the main menu press CNCL. The clock continues to function once the receiver has been switched off at the mains. A special battery is built in to the receiver with a guaranteed long life.
TechniSat ST 6002 S 7.3.5. Alignment Dish Position a) If you wish to shift all satellite positions, eg. after a storm has influenced the dish position, first choose a satellite with a less powerful signal. Then move the dish using the buttons until you receive an optimum picture. Set the cursor to “Shift all satellites” and press ENTER. The shift which is made to the present satellite position will be used to automatically correct the other satellite positions.
TechniSat ST 6002 S 7.3.6. Parental Channel Lock It is possible to deny access to channels which you only wish to be called up via the remote control. Operating the appliance using the buttons on the front panel is no longer possible: a) Having selected the appropriate channel select the option “Parental channel lock” and press ENTER. The message “Channel locked” will appear on the screen. On the receiver display the channel indicator F*** will be replaced by L***.
TechniSat ST 6002 S 8.2 Channel Data Changing the channel sequence You can use this function to put the channels in the order which you prefer. To transfer the present channel move the cursor to “Channel data” and press ENTER. Now select the option “Copy channel data” and enter the channel number you wish to move the channel to. NOTE: The data of the channel you wish to move to will be overwritten. This can be avoided by making use of a free channel as an intermediate channel ie.
TechniSat ST 6002 S 8.3 Expanding the Programmable Range of a Satellite Only a certain number of channels are available to each satellite unless you choose to extend them eg. ASTRA Ch1-61 & 199-200 (16 channels have been set aside for Astra 1C) NOTE: A full listing of the preprogrammed channels and the respective satellites is available at the back of this manual. 1.
TechniSat ST 6002 S 8.4 Programming The Channels of new Satellites 1. First program the new satellites as described in the section on "Programming of Future Satellites". 2. Select an already stored channel whose parameters are similar to the ones of the new channel. Move the cursor to "copy channel data" and press ENTER. Move the cursor to "sat" and select the new satellite e.g. "Spare 1". 3. Now move the cursor to "Channel" and choose the one you wish to use for the new satellite. Then press ENTER.
TechniSat ST 6002 S 8.5 Changing the Channel Name Select the channel whose name you wish to alter. Once again select "Channel data" followed this time by "Change Channel Name". ENTER You can alter the name of the channel using the buttons to select both characters and numbers. Move the cursor using the keys. The maximum number of characters which can be entered is ten. The new name of the channel can be stored using the ENTER button.
TechniSat ST 6002 S ENTER 36
TechniSat ST 6002 S 8.6 Changing Channel Parameters 8.6.1. Video Menu: To change the present video parameters first press the VIDEO button on the RCU. The video menu appears on the screen. Now you can change the following parameters: "IF tune" - IF (950 - 2050 MHz) which can be keyed in directly "B/W" - Video bandwidth, 18/27 MHz selectable. Switch to narrow (18 MHz) for reception of weak signals. "Level" - You can alter the video level (1 - 4) to change the channel brightness.
TechniSat ST 6002 S 8.6.2 Audio Menu To call up this menu press the AUDIO button. The following parameters can be changed: "B/W" - The audio bandwidth can be switched between 150, 280 or 350 MHz. "De-Emph" - You can choose between 50us, J17 and Wegener. "Pair" - If you switch it on, you can choose only the most common audio subcarrier freq. pairs (e.g. 7.02/7.20) as Audio A & B frequencies. This simplifies the programming of stereo programmes. "Mode" - Select either mono or stereo.
TechniSat ST 6002 S 8.6.3 Skew Menu "Skew" - If you wish to fine tune the polarity, you can alter the current of the polariser from -45 mA to +45 mA until you receive a picture of optimum quality. The display of the signal strength may also help you. "Format" - Vertical: vertical or right circ. polarisation Horizontal: horizontal or left circ.
TechniSat ST 6002 S 8.
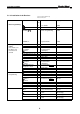
TechniSat ST 6002 S Channel Programming: Ch.Nr. Programme 1 2 3 4 5 6 7 8 9 10 11 12 13 14 15 16 17 18 19 20 21 22 23 24 25 26 27 28 29 30 31 32 33 34 35 36 37 38 39 40 41 42 43 44 45 46 47 48 49 50 ZF MHz PRO 7 RTL SAT. 1 DSF ARD 1 PLUS 3 SAT NORD 3 SPORTKANAL EUROSPORT MTV Europe PREMIERE SKY ONE SKY NEWS CNN Int. RTL 4 VERONIQUE LIFESTYLE, CHILDR.CH. TELECLUB FILMNET MTV Europe n-tv Cinemania CNC 1.406 1.229 1.288 1.523 1.494 1.347 1.582 1.214 1.259 1.421 1.464 1.318 1.377 1.627 1.391 1.273 1.332 1.
TechniSat ST 6002 S Ch.Nr. Programme 51 52 53 54 55 56 57 58 59 60 61 62 63 64 65 66 67 68 69 70 71 72 73 74 75 76 77 78 79 80 81 82 83 84 85 86 87 88 89 90 91 92 93 94 95 96 97 98 99 100 101 102 103 104 105 ZF MHz A B 1.421 1.332 RADIO LUX. INT. 1.391 SKY RADIO 1.318 STAR SAT RADIO 1.406 DTSCH. WELLE II 1.229 DTSCH. WELLE I 1.229 DLF III 1.288 DEUTSCHLANDF.II 1.288 DEUTSCHLANDF.I 1.288 RADIOROPA INFO 1.406 SAT 1 1.475 3 SAT 1.525 ARD 1 Plus 1.625 RTL 1.675 ARTE 1.549 Vox 1.600 PRO 7 1.809 DSF 1.
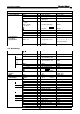
TechniSat ST 6002 S K.Nr. Programm 106 107 108 109 110 111 112 113 114 115 116 117 118 119 120 121 122 123 124 125 126 127 128 129 130 131 132 133 134 135 136 137 138 139 140 141 142 143 144 145 146 147 148 149 150 151 152 153 154 155 156 157 158 159 160 ZF MHz RTP Internac. TV 7 (Tunesienne) Business-TV Onda C.Musica SER 40 Pricipales SER Convencional TV-Ton Eurosport RTL 2 TRT/Red Hot Dutch mbc SuperChannel TV 5 Europe DW-Fernsehen Euronews TV 5 Europe VISEUROPE Neuapost. Kirche TV Sport Dtsch.
TechniSat ST 6002 S K.Nr. Programm 161 162 163 164 165 166 167 168 169 170 171 172 173 174 175 176 177 178 179 180 181 182 183 184 185 186 187 188 189 190 191 192 193 194 195 196 197 198 199 200 ZF MHz A B Cine Cinetti 1.880 Canal Plus 1.772 France 2 1.814 Canal Plus 1.898 RTL 997 SAT.1 1.073 3 sat 1.150 ARD Eins Plus 1.304 MCM 977 Canal plus franz. 1.054 arte 1.131 Antenne 2 1.284 RAISAT 1.419 Brightstar 1.016 Bravo 1.055 Parliamentary Ch. 1.095 Childrens Ch. 1.135 Kindernet/Discovery1.
TechniSat ST 6002 S 10 Technical Specifications Tuner Input frequency: Input impedance: Input level: Input Connector: LNB Power: 950-2050 MHz 75 Ohm -60dBm to -30dBm F-Type +18/+14V DC 400mA max. short circuit protected 27 MHz, 18 MHz AGC PLL frequency synthesized Bandwidth: Gain Control: Tuning: Video Output Deemphase: Bandwidth: CCIR REC: 405-1, 625 Lines 5 MHz Ed Rejection: Level: Output Connector: Level Control: 40 dB min.
TechniSat ST 6002 S Audio Frequency Range: Mode: Bandwidth: Deemphase: Frequncy response: Output level: 5.0 bis/to 8.8 MHz adjustable Mono/Stereo selectable 150/ 280/ 350 kHz switchable 50µS/ J17/ Panda Wegener kompatibel 20 Hz bis/to 15 kHz +/- 2dB 3 Vss an 600 Ohm: 50µS/WP 2 Vss an 600 Ohm: J17/ 3 Vp-p by 600 Ohm: 50us/WP 2 Vp-p by 600 Ohm: J17 Scart, Cinch (L,R) 8 steps and mute 7.02 & 7.20, 7.38 & 7.56, 7.74 & 7.92, 8.10 & 8.28 6.50, 6.65, 7.02, 7.20, 7.38, 7.56, 7.74, 7.92, 8.10, 8.
® TechniSat ist ein eingetragenes Warenzeichen der TechniSat Satellitenfernsehprodukte GmbH, TechnicPark, W-5568 Daun