EN FR PL Instruction Manual TechniPad 8 / 8G / 10 / 10G
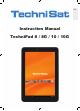
EN 1 Figures TechniPad 8/8G FR 1 2 3 PL 4 5 6 7 8 12 9 10 11 14 15 1 2 3 4 1) Volume Volume + On/Standby incl. charging LED Microphone 5 6 7 8 9 Headphone output (3.
EN TechniPad 10/10G 1 2 3 FR 4 5 6 PL 7 8 9 10 11 12 13 14 1 2 3 4 5 1) MicroSD card reader1) SIM card reader1) 2) Volume Volume + Reset button 15 6 7 8 9 On/Standby incl. charging LED Front camera Microphone Headphone output (3.
EN 2 Table of contents FR 1 Figures. . . . . . . . . . . . . . . . . . . . . . . . . . . . . . . . . . . . . . . . . . . . 2 2 Table of Contents . . . . . . . . . . . . . . . . . . . . . . . . . . . . . . . . . . . 4 3 Please read this first. . . . . . . . . . . . . . . . . . . . . . . . . . . . . . . . . 5 PL 3.1 3.2 3.3 3.3.1 3.3.2 3.3.3 3.3.4 3.3.5 3.3.6 Intended use. . . . . . . . . . .
.4 5.5 5.5.1 5.5.2 5.5.3 Accounts. . . . . . . . . . . . . . . . . . . . . . . . . . . . . . . . . . . . . . . . . . . . . . . . . . . . . . . . . . System. . . . . . . . . . . . . . . . . . . . . . . . . . . . . . . . . . . . . . . . . . . . . . . . . . . . . . . . . . . Date & time. . . . . . . . . . . . . . . . . . . . . . . . . . . . . . . . . . . . . . . . . . . . . . . . . . . . . . . . Accessibility. . . . . . . . . . . . . . . . . . . . . . . . . . . . . . . . . . . . . . . . . . . . . . . . . . .
EN 3.3 Important instructions FR Please observe the following instructions to avoid any safety hazards, to prevent damage to the device and to help protect the environment. PL 3.3.1 Safety For your own protection, read the safety notes carefully before using your new device. The manufacturer accepts no liability for damage caused by inappropriate handling, or by non-compliance with the safety precautions.
3.3.2 Disposal EN The packaging material used for your receiver consists entirely of recyclable materials. Please sort the components appropriately and dispose of them in line with your local waste disposal regulations . At the end of its useful life span, this product must not be disposed of with your regular household waste. It must be taken to a recycling collection point for electrical and electronic equipment. The symbol on the product, the operating manual or the packaging refers to this.
EN 3.3.4 Care and cleaning FR The housing and the display should only be cleaned using a dry, soft cloth or appropriate special cleaners such as the TechniSat LCD panel cleaning set, and only when switched off. PL You can purchase the LCD screen cleaning kit at your dealer, under the name LCD screen cleaner and item number 0000/3830. Using damp cloths and other spray cleaners or very aggressive chemical detergents is likely to cause damage to the high quality surfaces of the housing and the display.
4 Basic operation EN Dear customer, the exact procedure for operating, setting up and selecting options for the various apps (applications/programmes), and for the Android operating system, depends on the respective software developers and can also change when the app or the operating system is updated. Unfortunately TechniSat does not exercise any influence over this, so only a basic method of operation can be described in this manual.
EN FR 4.2 Unlocking/locking the screen > If the tablet is is Standby mode (display is locked and switched off), press the On/Standby button for a short time to switch on the display. The locked screen appears after the display has been reactivated. The screen must now be unlocked to be able to use the tablet. PL > Tap on the lock icon, then move your finger in the direction of the opened lock icon that now appears.
4.3 Homescreen EN The homescreen already contains several apps and widgets when delivered ex works, but it can be adapted completely according to your wishes as described under Point 4.3.1. > You can move between pages on the homescreen by swiping your finger from one side to the other. The time and the battery charge level are displayed in the bottom lines (status bar) on the right along with various messages. The , and icons are located on the left hand side.
EN FR PL 4.3.1 Placing apps and widgets on the homescreen > To place new apps or widgets on the homescreen, first access the list of all installed apps and widgets by tapping on . > Now switch between APPS and WIDGETS as necessary by tapping on the respective tab on the upper left-hand edge of the screen. > You can move to the next page of the alphabetically sorted list of apps/widgets by swiping your finger from one side to the other.
4.5 Volume adjustment > EN Control the volume using the Volume - or Volume + buttons; see page 2 #1 and #2 or page 3 #3 and #4. or > Tap on the time displayed in the status bar and switch to quick settings by tapping in the upper area of the message field. > Now push the slide control to the volume position you want. 4.6 Installing apps Apps can either be installed on the tablet by copying the APK file to the tablet or via one of the many available app shops. 4.6.
EN FR The Installation of apps from unknown sources function must be activated first if it has been deactivated. > PL To do this, either tap on the APK file and then Settings, or access the item via the Setup menu (Point 5.3.2). Installation of apps from unknown sources represents a certain security risk, which is why an appropriate security message appears.
4.7 Uninstalling apps EN > Access the settings as described under Point 5. > In the DEVICE category, tap on Apps. > Select the All app list on the right side of the screen by scrolling to the left or the right through the lists. > Tap on the app you want to uninstall. A display appears containing a variety of information (for example the memory being used, required access rights) and options for this app.
EN FR 5 Settings > Access the settings menu by tapping the app on the homescreen or in the app list or on the Settings item in the quick settings (see Point 4.3). Please note that in some menu items advanced options and settings can be accessed via in the upper right corner of the screen. PL 5.1 Wireless & networks 5.1.1 Wi-Fi > In the WIRELESS & NETWORKS category, select the Wi-Fi item and tap on the slide switch to activate Wi-Fi.
5.1.1.1 Selecting the Wi-Fi network > EN Tap on the Wi-Fi network that you wish to connect the tablet to. If the network key for the selected Wi-Fi network has already been correctly entered once, the tablet will now be automatically connected with this Wi-Fi network. If the selected Wi-Fi network is still unknown, the input mask now appears so the password can be entered. > Enter the password, then tap on Connect. The tablet will now be connected with the Wi-Fi network if the input was correct.
EN 5.1.1.2 Entering a Wi-Fi network manually If the network you wish to connect the tablet to is not found while searching through the available Wi-Fi networks, or if this is switched to invisible (SSID is switched off), the SSID can also be entered manually. FR PL > Tap on the plus icon in the upper right hand corner to open the input mask. > Use the numeric keypad to enter the SSID of the network. > Select the network key being used in the Security menu.
5.1.2 Bluetooth > EN In the WIRELESS & NETWORKS category, select the Bluetooth item and tap on the slide switch to activate Bluetooth. FR Devices in your environment with Bluetooth enabled are now searched for and subsequently displayed on the screen. PL Please note that unknown (not yet paired) devices can only be found if their visibility is switched on. The visibility of the tablet can be switched on and off by tapping the device name in the list.
EN FR 5.1.3 Data usage > In the WIRELESS & NETWORKS category, select the Data usage item. The data use of the apps for the selected period will be displayed. PL You can see detailed information by restricting the display to a certain period of time and/ or selecting an app. 5.2 Device 5.2.1 Sounds > In the DEVICE category, select the Sounds item. You can set the volume for playing media, messages and the alarm using Volumes.
5.2.2 Display > EN In the DEVICE category, select the Display item. FR PL Set the desired display brightness using Brightness. Note that the battery life reduces as the display brightness is increased. The image to be displayed in the wallpaper of the homescreen can be selected using wallpaper. See also Point 4.3.2. Use Sleep to select the time period that should elapse before the tablet automatically locks the display and switches off, where no operation occurs in this period.
EN You can select the resolution with which the image is displayed via the HDMI output using HDMI Resolution. FR If parts of the screen are not displayed on the TV or there are black edges around the picture, the size of the picture display can be adjusted and adapted to the TV using Screen Zoom. PL 5.2.4 Storage > In the DEVICE category, select the Storage item. Information concerning the level of usage of the internal memory or of an inserted MicroSD card is displayed in this menu.
5.2.6 Apps > EN In the DEVICE category select the Apps item. FR PL In this menu information is displayed about which apps you have downloaded, which apps are installed on the SD card, which apps are currently active, as well as all installed apps. Further information and options about the apps can be obtained by tapping on the respective app. The information and options which are available differ according to the list in which you tapped the app. 5.3 Personal 5.3.
EN FR 5.3.2 Security > In the Personal category, select the Security item. PL Security-related settings for the tablet can be performed in the Security menu. For example you can determine whether the tablet can be unlocked simply by swiping with the finger or, for example, whether it is necessary to enter a PIN number. 5.3.3 Language & input > In the Personal category, select the Language & input item.
5.3.4 Backup & reset > EN In the Personal category, select the Backup & reset item. FR PL You can use this menu to configure backups of your data (app data, Wi-Fi passwords etc.) as well as resetting the tablet to the factory settings. 5.4 Accounts > In the ACCOUNTS category, select the Add an account item to add a Google account, for example, to your tablet. Accounts already added are displayed in this category. You can also make any necessary changes.
EN 5.5 System FR 5.5.1 Date & time PL > In the SYSTEM category, select the Date & time item. You can use this menu to manually adjust the time or activate the automatic setting as well as select the time and date format you want. 5.5.2 Accessibility > In the SYSTEM category, select the Accessibility item. In addition to the adjustment of the font size undertaken under Point 5.2.2, you can also use Large text to enable/disable a further increase in the size of the text.
5.5.3 About the tablet > EN In the SYSTEM, category, select the About tablet item. FR PL You can use this menu to access information about the tablet (e.g. the Android version being used). 6 Technical data / functional scope LCD panel TechniPad 8/8G Diagonal Resolution Width/height ratio touch screen 20.4 cm 1024 x 768 4:3 Yes (multi-capacitive) TechniPad 10/10G Diagonal Resolution Width/height ratio touch screen 25.8 cm 1280 x 800 16:10 Yes (multi-capacitive) Cameras Front camera Rear camera 2.
EN Connector - headphone socket FR Model PL Connector - USB port Plug-in connector Model 3.5 mm jack (stereo) internal speaker automatically switches off Micro-B (socket) USB 2.
7 Technical Terms EN App FR App is an abbreviation for Application and is the designation for an application (program) for a tablet or smartphone. These can be downloaded and installed directly from an online shop. Standby The mode in which the TV is not fully switched off, has a low power consumption and can be switched on using the remote control.
EN Network switch FR A network switch serves to distribute the available bandwidth of the network line attached to it (input) to all the other network lines (output) attached to the switch. PL PIN The Personal Identification Number serves to provide simple security against unauthorised access.
8 Troubleshooting guide Fault EN Possible cause Solution The device cannot be operated; shows no response The device is blocked Press the Reset button briefly to restart the tablet (see p.2 #11 or p.
EN FR PL 32
EN FR PL Mode d´emploi TechniPad 8 / 8G / 10 / 10G
EN 1 Illustrations TechniPad 8/8G FR 1 2 3 PL 4 5 6 7 8 12 9 10 11 14 15 1 2 3 4 1) Volume Volume + Marche/veille avec LED de charge Microphone 5 6 7 8 9 Sortie casque audio (Prise Jack 3,5 mm) Prise 5V DC Port USB Lecteur de carte SIM1) 2) Lecteur de carte MicroSD1) 10 11 12 13 14 15 Sortie HDMI Bouton «Reset» Caméra avant Haut-parleur droit Caméra arrière Haut-parleur gauche Insertion de la carte : insérez la carte correspondante avec les contacts orientés vers l'écran et la fente de la ca
EN TechniPad 10/10G 1 2 3 FR 4 5 6 PL 7 8 9 10 11 12 13 14 1 2 3 4 5 1) Lecteur de carte MicroSD1) Lecteur de carte SIM1) 2) Volume Volume + Bouton «Reset» 15 6 7 8 9 Marche/veille avec LED de charge Caméra avant Microphone Sortie casque audio (Prise Jack 3,5 mm) 10 11 12 13 14 15 Prise 5V DC Sortie HDMI Port USB Caméra arrière Haut-parleur droit Haut-parleur gauche Insertion de la carte : insérez la carte correspondante avec les contacts orientés vers l'écran et la fente de la carte orientée
EN 2 Table des matières FR 1 Illustrations. . . . . . . . . . . . . . . . . . . . . . . . . . . . . . . . . . . . . . . . 2 2 Table des matières . . . . . . . . . . . . . . . . . . . . . . . . . . . . . . . . . . 4 3 À lire avant utilisation . . . . . . . . . . . . . . . . . . . . . . . . . . . . . . . 5 4 Commandes de base. . . . . . . . . . . . . . . . . . . . . . . . .
5.4 5.5 5.5.1 5.5.2 5.5.3 Comptes. . . . . . . . . . . . . . . . . . . . . . . . . . . . . . . . . . . . . . . . . . . . . . . . . . . . . . . . . . Système. . . . . . . . . . . . . . . . . . . . . . . . . . . . . . . . . . . . . . . . . . . . . . . . . . . . . . . . . . Date & heure . . . . . . . . . . . . . . . . . . . . . . . . . . . . . . . . . . . . . . . . . . . . . . . . . . . . . . Aides à l'utilisation . . . . . . . . . . . . . . . . . . . . . . . . . . . . . . . . . . . . . . . . . . . . . . . .
EN 3.3 Consignes importantes FR Veuillez tenir compte des consignes suivantes afin d'éviter tout risque pour la sécurité, tout endommagement de l'appareil et, également, afin de contribuer à la protection de l'environnement. PL 3.3.1 Sécurité Pour votre sécurité, vous devez lire attentivement les consignes de sécurité avant d’utiliser l’appareil pour la première fois.
3.3.2 Mise au rebut EN L'emballage de votre appareil se compose exclusivement de matériaux recyclables. Merci de . les introduire dans le circuit du tri sélectif FR En fin de vie, ce produit ne doit pas être jeté avec les ordures ménagères ordinaires, mais ramené à un point de collecte pour le recyclage des appareils électriques et électroniques. C'est ce qu’indique le symbole l’emballage.
EN 3.3.4 Entretien et nettoyage FR Le boîtier et l'écran doivent être nettoyés uniquement à l'aide d'un chiffon sec et doux ou des produits nettoyants spéciaux, comme le kit de nettoyage d'écran LCD de TechniSat, et exclusivement lorsque l'appareil est arrêté. PL Vous pouvez vous procurer le kit de nettoyage pour écran LCD dans les commerces spécialisés sous la référence suivante: 0000/3830.
4 Commandes de base EN Cher client, la procédure exacte d'utilisation et de réglage et les possibilités des différentes applications (applications/programmes) ainsi que du système d'exploitation Android dépendent des développeurs et peuvent varier, y compris suite à une mise à jour de l'application ou du système d'exploitation. TechniSat n'a malheureusement aucune influence sur ces variations et seules les commandes de base peuvent être décrites dans cette notice.
EN FR 4.2 Déverrouillage/verrouillage de l'écran > Lorsque la tablette est en veille (l'écran est verrouillé et désactivé), appuyez brièvement sur la touche Marche/Veille, pour activer l'écran. Une fois l'écran réactivé, l'écran de verrouillage apparaît. Pour utiliser la tablette, l'écran doit être déverrouillé. PL > Tapez sur le symbole représentant un cadenas puis déplacez vos doigts en direction du symbole représentant un cadenas ouvert.
4.3 Ecran d'accueil EN L'écran d'accueil contient déjà, par défaut, quelques applications et widgets mais il peut être adapté à votre convenance comme cela est décrit au chapitre 4.3.1. FR PL > Vous pouvez passer d'une page à l'autre de l'écran d'accueil grâce à un simple glissement des doigts. Sur la barre inférieure (barre d'état), sont affichés à droite l'heure et l'état de charge de la batterie ainsi que différentes notifications. Sur le côté gauche, se trouvent les symboles , et .
EN FR PL 4.3.1 Positionnement des applications et des widgets sur l'écran d'accueil > Pour positionner les nouvelles applications ou widgets sur l'écran d'accueil, appelez d'abord la liste de toutes les applications et widgets installés en tapant sur . > Le cas échéant, passez de APPS à WIDGETS en tapant sur le registre correspondant sur le bord supérieur gauche de l'écran.
4.5 Réglage du volume > EN Réglez le volume à l'aide des touches Volume - ou Volume +, voir page 2 #1 et #2 ou page 3 #3 et #4. ou > tapez sur l'heure dans la barre d'état et passez aux réglages rapides en tapant sur la partie supérieure du champ de notification. > Déplacez ensuite le curseur vers la position permettant d'obtenir le volume souhaité. 4.
EN FR Si la fonction Installation d'applications à partir de sources inconnues est désactivée, vous devez d'abord l'activer. > PL Pour cela, tapez soit sur le fichier APK puis sur Paramètres, soit appelez la rubrique par l'intermédiaire du menu "Paramètres" (chapitre 5.3.2). L'installation d'applications à partir de sources inconnues présente un certain risque pour la sécurité, c'est pourquoi un message de sécurité correspondant apparaît.
4.7 Désinstallation d'applications EN > Affichez les réglages comme décrit au Chapitre 5. > Tapez, dans la catégorie paramètres sur Applications. > Sélectionnez, sur le côté droit de l'écran, la liste d'applications Toutes, en parcourant les listes vers la gauche ou vers la droite. > Tapez sur l'application à désinstaller. Un affichage apparaît avec différentes informations (par exemple espace mémoire utilisé, droits d'accès exigés) ainsi que les options de cette application.
EN FR 5 Paramètres > PL Appelez le menu "Paramètres" en tapant sur l'application dans l'écran d'accueil ou dans la liste des applications ou la rubrique Paramètres dans les réglages rapides (voir Chapitre 4.3). Attention : dans certaines rubriques de menus, des options et paramètres avancés peuvent être appelés à l'aide de dans le coin supérieur droit de l'écran. 5.1 Sans fil et réseaux 5.1.
5.1.1.1 Choix du réseau Wi-Fi (sans fil) > EN Tapez sur le réseau Wi-Fi (sans fil) auquel vous souhaitez connecter la tablette. Si la clé du réseau Wi-Fi sélectionné a déjà été entrée correctement une fois, la tablette se connecte automatiquement à ce réseau Wi-Fi. Si le réseau Wi-Fi (sans fil) sélectionné est encore inconnu, le masque de saisie du mot de passe apparaît. > Entrez le mot de passe et tapez ensuite sur Connecter. Si l'entrée est correcte, la tablette se connecte au réseau Wi-Fi (sans fil).
EN 5.1.1.2 Saisie manuelle du réseau Wi-Fi (sans fil) Si, lors de la recherche de réseaux Wi-Fi (sans fil) disponibles, le réseau auquel vous souhaitez connecter la tablette n'a pas été trouvé ou si ce réseau a été rendu invisible (SSID désactivé), vous pouvez saisir manuellement son SSID. FR PL > Tapez sur le symbole "Plus" dans le coin supérieur droit afin d'ouvrir le masque de saisie. > Entrez le SSID du réseau à l'aide du clavier. > Sous "Sécurité", sélectionnez la clé de réseau utilisée.
5.1.2 Bluetooth > EN Sélectionnez, dans la catégorie SANS FIL & RESEAUX, la rubrique Bluetooth et tapez sur le curseur, pour activer le Bluetooth . FR Les appareils avec Bluetooth activé présents à proximité sont alors recherchés puis affichés à l'écran. PL Attention : les appareils inconnus (non couplés) ne peuvent être trouvés que si leur visibilité a été activée. La visibilité de cette tablette peut être activée/désactivée en tapant sur le nom de l'appareil dans la liste.
EN FR 5.1.3 Consommation de données > Sélectionnez, dans la catégorie SANS FIL & RESEAUX, la rubrique Consommation données. La consommation de données des applications est affichée pour la période sélectionnée. PL Vous pouvez obtenir des informations détaillées en réduisant la représentation à une période déterminée et/ou en sélectionnant une application. 5.2 Appareil 5.2.1 Sons > Sélectionnez, dans la catégorie APPAREIL, la rubrique Son.
5.2.2 Écran > EN Sélectionnez, dans la catégorie APPAREIL, la rubrique Affichage. FR PL Sous Luminosité, vous pouvez régler la luminosité d'écran souhaitée. Attention: la durée de vie de la batterie diminue lorsque la luminosité augmente. Sous Fond d’écran, vous pouvez sélectionner l'image qui doit être affichée sur l'écran d'accueil en fond d’écran. Voir également le chapitre 4.3.2.
EN Sous HDMI Resolution, vous pouvez sélectionner avec quelle résolution l'image est reproduite par la sortie HDMI. FR Si, sur le téléviseur, des parties de l'image ne sont pas représentées ou si des bordures noires apparaissent autour de l'image, vous pouvez, sous Screen Zoom, régler la taille de l'image affichée et l'adapter ainsi au téléviseur. PL 5.2.4 Stockage > Sélectionnez, dans la catégorie APPAREIL, la rubrique Stockage.
5.2.6 Applications > EN Sélectionnez, dans la catégorie APPAREIL, la rubrique Applications. FR PL Dans ce menu sont affichées les applications que vous avez Téléchargées, les applications installées sur la Carte SD, les applications actuellement Actives ainsi que Toutes les applications installées. Pour des informations et options supplémentaires concernant les applications, tapez sur l'application correspondante.
EN FR 5.3.2 Sécurité > Sélectionnez, dans la catégorie Personnel, la rubrique Sécurité. PL Les paramètres de sécurité de la tablette peuvent être effectués dans le menu Sécurité. Par exemple, vous pouvez déterminer si la tablette est déverrouillée par un simple glissement des doigts ou, par exemple, si la saisie d'un code PIN doit être demandée. 5.3.3 Langue et saisie > Sélectionnez, dans la catégorie Personnel, la rubrique Langue et saisie.
5.3.4 Sauvegarder & réinitialiser > EN Sélectionnez, dans la catégorie Personnel, la rubrique Sauvegarder et réinitialiser. FR PL Dans ce menu, vous pouvez configurer la sauvegarde de vos données (données d'application, mots de passe WLAN etc.) et Restaurer valeurs d’usine. 5.4 Comptes > Sélectionnez, dans la catégorie COMPTES, la rubrique Ajouter un compte, pour ajouter, par exemple un compte Google, sur votre tablette.
EN FR 5.5 Système 5.5.1 Date et heure > Sélectionnez, dans la catégorie SYSTÈME, la rubrique Date et heure. PL Dans ce menu, vous pouvez régler manuellement l'heure ou bien activer le réglage automatique et sélectionner le format souhaité pour la date et l'heure. 5.5.2 Accessibilité > Sélectionnez, dans la catégorie SYSTÈME, la rubrique Accessibilité. En plus du réglage effectué selon le chapitre 5.2.
5.5.3 A propos de la tablette > EN Sélectionnez, dans la catégorie SYSTÈME, la rubrique À propos de la tablette. FR PL Dans ce menu, vous pouvez obtenir des informations concernant la tablette (par exemple version d'Android utilisée).
EN Raccordement - Prise casque FR Type 3,5 mm Jack (Stéréo) désactivation automatique des haut-parleurs internes PL Raccordement - port USB Connecteur Type Micro-B (femelle) USB 2.
7 Termes techniques EN Applications FR "App" est l'abréviation de "Application" et désigne un programme pour une tablette ou un smartphone. Ces applications peuvent être téléchargées et installées directement à partir de magasins en ligne. Veille État dans lequel le téléviseur n'est pas entièrement éteint, il consomme alors une faible quantité de courant et peut être rallumé avec la télécommande.
EN Commutateur réseau FR Un commutateur réseau sert à répartir la bande passante disponible du câble réseau connecté (entrée) entre tous les autres câbles réseaux connectés (sortie) du commutateur. PL PIN Le Personal Identification Number (numéro d'identification personnelle) permet une sécurisation simple contre les accès non autorisés.
8 Aides pour la recherche d'erreurs Erreur Cause probable EN Résolution L'appareil ne peut pas être utilisé, aucune réaction L'appareil se bloque Appuyez brièvement sur le bouton de réinitialisation pour redémarrer la tablette (voir p.2 #11 ou p.
EN FR PL 64
EN FR PL Instrukcja obsługi TechniPad 8 / 8G / 10 / 10G
EN 1 Zdjęcia TechniPad 8/8G FR 1 2 3 PL 4 5 6 7 8 12 9 10 11 14 15 1 2 3 4 1) Głośność Głośność + Włącz/Standby Wskazanie LED Mikrofon 5 6 7 8 9 Złącze słuchawkowe (3,5mm) Złącze zasialania 5V Wejście USB Czytnik kart SIM 1) 2) Czytnik kart MicroSD1) 10 11 12 13 14 15 HDMI Wyjście Restart Kamera przednia Prawy głośnik Kamera tylna Lewy głośnik Wkładanie karty pamięci: Odpowiednią kartę należy włożyć do czytnika, stykami w stronę ekanu. Kartę należy docisnąć do pojawienia się oporu.
EN TechniPad 10/10G 1 2 3 FR 4 5 6 PL 7 8 9 10 11 12 13 14 1 2 3 4 5 1) Czytnik kart microSD1) Czytnik kart SIM1) 2) Głośność Głośność + Restart 15 6 7 8 9 Włącz/Standby Wskazanie LED Kamera przód Mikrofon Wyjście słuchawkowe (3,5mm) 10 11 12 13 14 15 Złącze zasialania 5V Wyjście HDMI Wejście USB Kamera tył Prawy głośnik Lewy głośnik Wkładanie karty pamięci: Odpowiednią kartę należy włożyć do czytnika, stykami w stronę ekranu. Kartę należy docisnąć do pojawienia się oporu.
EN 2 Spis treści FR 1 Zdjęcia . . . . . . . . . . . . . . . . . . . . . . . . . . . . . . . . . . . . . . . . . . . 2 2 Spis treści . . . . . . . . . . . . . . . . . . . . . . . . . . . . . . . . . . . . . . . . 4 3 Zawartość zestawu . . . . . . . . . . . . . . . . . . . . . . . . . . . . . . . . . 5 4 Informacje wstępne . . . . . . . . . . . . . . . . . . . . . .
5.4 5.5 5.5.1 5.5.2 5.5.3 Konta . . . . . . . . . . . . . . . . . . . . . . . . . . . . . . . . . . . . . . . . . . . . . . . . . . . . . . . . . . . . System . . . . . . . . . . . . . . . . . . . . . . . . . . . . . . . . . . . . . . . . . . . . . . . . . . . . . . . . . . Data i godzina . . . . . . . . . . . . . . . . . . . . . . . . . . . . . . . . . . . . . . . . . . . . . . . . . . . . . Pomoc w użytkowaniu. . . . . . . . . . . . . . . . . . . . . . . . . . . . . . . . . . . . . . . . . . . . . . .
EN 3.3 FR Dla własnego bezpieczeństwa należy uważnie przeczytać poniższe wskazówki przed uruchomieniem nowego urządzenia. Producent nie odpowiada za szkody powstałe w wyniku nieprawidłowego użytkowania lub nie przestrzegania instrukcji dotyczących bezpieczeństwa. PL Ważne wskazówki 3.3.1 Instrukcje dotyczące bezpieczeństwa Pod żadnym pozorem nie wolno otwierać urządzenia! Istnieje ryzyko porażenia prądem elektrycznym.
3.3.2 Wskazówki dotyczące utylizacji EN Opakowanie urządzenia składa się wyłącznie z materiałów nadających się do ponownego przetworzenia. Należy je odpowiednio posortować w celu ponownego wprowadzenia do obiegu. FR Produkt nie może być po zakończeniu użytkowania poddawany utylizacji ze zwykłymi odpadami z gospodarstwa domowego. Należy go oddać do punktu utylizacji zużytych urządzeń elektrycznych i elektronicznych.. Wskazuje na to symbol na produkcie, instrukcji użytkowania lub opakowaniu.
EN 3.3.4 Czyszczenie i konserwacja FR Do czyszczenia matrycy i obudowy tabletów TechniPad należy używać tylko i wyłącznie suchej i miękkiej ściereczki i/lub odpowiednich produktów. Przed rozpoczęciem czyszczenia ekranu należy wyłączyć urządzenie. PL Do czyszczenia ekranu zalecamy zestaw do czyszczenia paneli LCD nr. art.: 0000/3830. Nie zastosowanie się do zaleceń może spowodować zwarcia, rysy lub trwałe uszkodzenia powierzchni ekranu!. 3.3.
4 Informacje wstępne EN W przypadku urządzeń posiadających system operacyjny Android oraz wyposażonych w liczne aplikacje stworzone przez rożnych programistów nie jesteśmy w stanie zagwarantować, że po kolejnych aktualizacjach poniższa instrukcja nie będzie w pełni odpowiadać układowi i poszczególnym funkcjom.
EN FR 4.2 Blokowanie/odblokowywanie ekranu > Jeżeli tablet jest w trybie czuwania lub jest wyłączony należy uruchomić urządzenie naciskając przycisk Włącz/Standby. Po pojawieniu się ekranu, wyświetlona zostanie blokada ekranu. Aby móc korzystać z urządzenia należy je odblokować. PL > Naciśnij symbol kłódki i przeciągnij w stronę symbolu otwartej kłódki. Następnie ekran blokady zniknie.
4.3 Ekran główny EN Po pierwszym uruchomieniu tabletów TechniPad na ekranie głównym znajduje się kilka fabrycznie zainstalowanych aplikacji TechniSat. Aby zmienić wygląd ekranu głównego należy postępować zgodnie z punktem 4.3.1. > Aby zmienić ekran główny (dostępnych jest kilka równocześnie) wystarczy przytrzymać palcem ekran i przeciągną w lewą lub w prawą stronę. Na ekranie tabletów wyświetlany jest również tzw. pasek stanu (dolny pasek menu).
EN FR PL 4.3.1 Umieszczanie aplikacji i widżetów na ekranie głównym > W celu umieszczenia nowych aplikacji oraz widżetów na ekranie głównym, proszę wywołać listę zainstalowanych aplikacji dotykając na ikonę . > Możecie Państwo przełączać pomiędzy aplikacjami i widżetami, wybierając odpowiednią zakładkę . > Przesuwając palec z boku na bok można przejść do listy alfabetycznej. > Proszę wybrać aplikację i wcisnąć na ikonę i trzymać.
4.5 Głośność > EN Proszę zmienić głośność przy pomocy przycisków na obudowie. lub > Stuknij zegar w pasku po prawej stronie na ekranie głównym, przejdź do ustawień głosowych. > Przesuń suwak w celu ustawienia żądanej głośności. 4.6 Instalacja aplikacji Aplikacje można instalować bezpośrednio z pliku (apk) lub z dostępnego sklepu online. 4.6.1 Instalowanie aplikacji z pliku apk > Proszę skopiować plik instalacyjny na tablet.
EN FR Jeśli wyłączona jest funkcja instalowania aplikacji z nieznanych źródeł to należy ją włączyć. > PL Wystarczy dotknąć plik apk i uruchomi się menu w którym możecie Państwo włączyć opcję instalowania aplikacji z nieznanych źródeł lub wywołać menu tak jak opisano w punkcie 5.3.2.f. Instalowanie aplikacji z nieznanych źródeł stwarza zagrożenie dla bezpieczeństwa, w związku z tym pojawia się ostrzeżenie.
4.7 Usuwanie aplikacji EN > Proszę wywołać ustawienia (punkt 5). > Proszę wybrać opcję aplikacje. > Następnie należy wywołać wszystkie. > Proszę dotknąć aplikację, która ma być odinstalowana. FR PL Pojawi się okno z różnymi informacjami np. (ilość zużywanej pamięci, prawa dostępu, etc..) oraz opcjami. > Proszę dotknąć w górnej części okna funkcję odinstaluj i potwierdzić poprzez dotknięcie na OK. Aplikacja zostanie odinstalowana, wyświetlona zostanie informacja.
EN FR 5 Ustawienia > Proszę wywołać ustawienia zgodnie z punktem 4.3. Należy zwrócić uwagę, że dostępne są również ustawienia zaawansowane dla niektórych funkcjonalności dostępne w prawym górnym rogu ekranu. PL 5.1 Sieci bezprzewodowe 5.1.1 WLAN > Proszę wybrać kategorię sieci bezprzewodowe i sieci WLAN i przy pomocy przełącznika suwakowego włączyć obsługę sieci bezprzewodowych. Jeśli dostępne są połączenia bezprzewodowe to pojawi się poniższa informacja.
5.1.1.1 Wybór sieci WLAN > EN Proszę wybrać żądaną sieć WiFi z którą chcecie się Państwo połączyć. Następnie należy wprowadzić klucz sieciowy. W przypadku gdy łączymy się z siecią po raz drugi klucz nie będzie wymagany. > Proszę wcisnąć Połącz. Jeśli hasło było poprawne tablet połączy się z siecią. Proszę zwrócić uwagę na odpowiednie ustawienie routera w celu przyznania dostępu do sieci dla tabletu.
EN 5.1.1.2 Ręczne wprowadzanie sieci WLAN W przypadku gdy podczas wyszukiwania sieci tablet nie znalazł żądanego połączenia, należy wprowadzić ręcznie dane dla sieci (SSID, hasło). FR PL > Proszę dotknąć symbolu Plus. > Przy pomocy klawiatury dotykowej proszę wprowadzić SSID (nazwa sieci). > W przypadku gdy sieć jest zablokowana proszę wpisać hasło. > Po wpisaniu hasła należy dotknąć Połącz. Jeśli poprawnie wprowadzono dane sieci, tablet uzyska połączenie.
5.1.2 Bluetooth > EN Proszę wybrać opcję sieci bezprzewodowe i WLAN, następnie proszę dotknąć Bluetoth. Tablet automatycznie rozpocznie przeszukiwanie urządzeń Bluetooth. Należy pamiętać, że urządzenia zostaną wyszukane tylko wtedy jeśli będą miały włączoną opcję Bluetooth. Widoczność tableta przez inne urządzenia można aktywować i dezaktywować poprzez dotknięcie odpowiednich opcji. > Wybierz nazwę urządzenia z którym chcesz sparować tablet. Po krótkiej chwili pojawia się informacja na temat klucza.
EN FR 5.1.3 Dane o ilości pobranych danych > Proszę wywołać kategorie sieci bezprzewodowe i WLAN i wybrać pobór danych. Zostanie wyświetlona informacja o ilości pobranych danych. PL Poniżej znajdują się szczegółowe dane m. in. informacja ile danych zostało pobranych przez poszczególne aplikacje. 5.2 Urządzenie 5.2.1 Dźwięki > Proszę wywołać zakładkę Urządzenie a następnie przejść do dźwięki. Poziom głośności pozwala na regulację głośności dla multimediów, powiadomień czy też budzika.
5.2.2 Wyświetlacz > EN Proszę wybrać w kategorii urządzenie punkt wyświetlacz. FR PL Proszę ustawić żądaną wartość podświetlenia wyświetlacza. Należy pamiętać, że żywotność baterii zmniejsza się wraz ze wzrostem jasność ekranu. Mogą państwo wybrać tło, które będzie wyświetlane na ekranie głównym jako pulpit. Zobacz również punkt 4.3.2. Po upływie określonego czasu czuwania tablet automatycznie blokuje ekran i wyłącza się z trybu pracy.
EN Mogą Państwo wybrać rozdzielczość HDMI w której obraz jest przesyłany za pośrednictwem wyjścia HDMI. FR Jeżeli część wizerunku nie jest wyświetlana lub widać czarną ramkę wokół obrazu, należy ustawić ekran, tak aby powiększyć rozmiar ekranu, a następnie dopasować go do telewizora. PL 5.2.4 Pamięć > Proszę wybrać w menu kategorię pamięć. W tym menu widoczna jest informacja o stanie wewnętrznej pamięci urządzenia a także zainstalowanych kartach microSD.
5.2.6 Aplikacje > EN Proszę wybrać w menu kategorię aplikacje. FR PL W tym punkcie widoczne są informacje o dostępnych, a także aktualnie używanych i zainstalowanych aplikacjach. Aby uzyskać więcej informacji należy, wybrać odpowiednią aplikację. W zależności od wybranej listy, dostępne są różne opcje. 5.3 Użytkownicy 5.3.1 Usługa nawigacji > Proszę wywołać kategorię użytkownik. W tym menu można skorzystać z usług nawigacji, na przykład włączyć lub wyłączyć odbiornik GPS..
EN FR 5.3.2 Bezpieczeństwo > Proszę wybrać w menu kategoriuę bezpieczeństwo. PL W tym menu zawarte są ustawienia związane z zabezpieczeniami urządzenia. Na przykład mogą Państwo określić czy po włączeniu będzie wymagany kod PIN. 5.3.3 Wybór języka- ustawienia osobiste > W menu proszę wybrać ustawienia osobiste. W tym menu można wybrać preferowany język, sprawdzić pisownie, a także włączyć lub wyłączyć wyszukiwanie głosowe. Mogą Państwo również skonfigurować inną klawiaturę.
5.3.4 Zapisz /Usuń > EN Proszę wybrać w menu kategorię zapisywanie. FR PL W tym menu można utworzyć kopię zapasową danych (aplikacja dane, Wi-Fi hasła itp.) skonfigurować i ustawić tablet do stanu fabrycznego. 5.4 Konta > Proszę wybrać w kategorii Konto opcje dodaj (np. konto Google). W tej kategorii dodane pozycje, są wyświetlane i można dokonać w nich niezbędnych zmian. W istniejących kontach, można np. sprawdzić skrzynkę lub napisać e-mail, synchronizować dane kontaktów oraz kalendarz.
EN 5.5 System FR 5.5.1 Data i godzina PL > Proszę wybrać kategorię system i przejjść do ustawień daty i godziny. W tym menu mogą Państwo ręcznie lub automatycznie dostosować ustawienia daty i godziny. 5.5.2 Pomoc w użytkowaniu > Proszę wybrać w menu System opcje dostępność. Oprócz ustawień z pkt 5.2.2, można również dokonać zmiany rozmiaru czcionki dużego tekstu za pomocą dalszego rozszerzenia tekstu.
5.5.3 Informacje o urządzeniu > EN Proszę wybrać w menu system opcję informacje o urządzeniu. FR PL W tym menu można uzyskać dostęp do informacji na temat urządzenia (np. używanej wersji oprogramowania Android).
EN Złącze słuchawkowe FR Typ PL Złącze USB Rodzaj złącza Typ 3,5 mm (Stereo) Automatyczne odłączenie głośników wbudowanych Micro-B (Buchse) USB 2.
7 Wyjaśnienie EN App FR Skrócona nazwa aplikacji. Aplikacje są dostępne w internetowych sklepach, do których dostęp umożliwia tablet. Tryb gotowości Tryb w którym tablet nie jest do końca wyłączony, może być w szybkim czasie uruchomiony. Bluetooth Interfejs radiowy, który umożliwia bezprzewodową wymianę danych. Znak CE Producent deklaruje, że tablet jest zgodny z dyrektywami Unii Europejskiej. DHCP Dynamic Host Configuration Protocol.
EN FR PL Switch sieciowy Switch sieciowy służy do przydzielania dostępnej szerokości pasma do urządzeń zewnętrznych. PIN Osobisty numer identyfikacyjny służy do prostego zabezpieczenia przed nieautoryzowanym dostępem. Router Router działa podobnie jak switch sieciowy z tym, że dodatkowo potrafi przydzielać adresy IP poprzez serwer DHCP i inne parametry sieci. Karta SIM Identyczna karta jak używana w telefonach komórkowych. Standby Tryb gotowości.
8 Rozwiązywanie problemów Problem EN Możliwa przyczyna Rozwiązanie Urządzenie nie może być użytkowane, brak reakcji. Urządzenie jest zablokowane Naciśnij i zwolnij przycisk reset, aby rozpocząć ponowną prace. Urządzenie nie może połączyć się z wybraną siecią bezprzewodową.
EN FR PL 96 m000/1372