Manual TechniVision ISIO 42 / 47 / 55
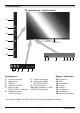
1 Illustrations TV connections / Local control 1. 2: 3: 4: 19 5: 6: 12 13 7: 8: 9: 10 6 Common Interface Network port USB port LNB Input (DVB-S) Antenna input (DVB-C, DVB-T, analogue) Headphone output (3.
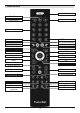
1 Illustrations On/Standby Sleep Timer Remote control code Sound on/off Numeric keypad keys Recording TV/Radio mode Stop / DVR Rewind 0/AV (source selection) Fast forward Pause / playback Arrow keys: EPG WWW Page up Page down Back Info OK Options selection Volume +/- Programme +/- Function selection Function keys / off Menu Timer Teletext Freeze frame / Jogshuttle Zoom / Format Audio channel PaT Genre 3
2 Please read this first Dear customer, This quick start manual only describes the most important connection options and basic operation steps to enable you to start using the TechniPlus ISIO quickly. It does not in any way replace the full instruction manual for the TV. There are many additional functions described in the full instruction manual that are not covered in this quick start manual.
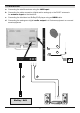
3 Connection a Connecting the satellite antenna using the LNB input. b Connecting the cable connection (digital and/or analogue) or the DVB-T antenna to the antenna input on the television. c Connecting the television to a BluRay/DVD player using an HDMI cable. d Connecting the analogue or digital audio output to hi-fi stereo equipment or surround sound equipment.
3. Satellite antenna a Connect the LNB input on the TV to your external unit using a suitable coaxial cable. To do this also observe points 8.1 and 10.5 of the instruction manual. 3.2 Antenna/cable connection (analogue and digital) b Connect the antenna input for the LCD TV to either a terrestrial antenna or to the connection socket for the cable or antenna connection. To receive DVB-T signals and DVB-C and analogue cable channels simultaneously, use the TechniSat DVB C/T switch (part no. 0000/3263) 3.
4 Basic operation Dear Customer The following section starts by covering basic operation as well as recurrent operating steps for the TV. This should make it easier to read the instruction manual, since it avoids repeated description of identical steps at each individual stage. If it is necessary for a function or setting for the TV to be different from the basic operation, the difference in operation is described in detail in the relevant section in the instruction manual.
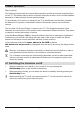
4.2 Calling up the main menu and navigating through the menus / functions The following example will illustrate how you reach the main menu and call up a submenu. The objective of the example is to call up the Picture settings menu. > Press the Menu button. The main menu appears on the screen. > Select the Settings menu item by moving the highlight over this item using the arrow keys. > Press the OK button to open the Settings menu.
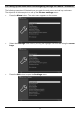
> Use the up/down arrow keys to highlight the Picture settings item. > The Picture settings menu is opened by then pressing the OK button. You can also highlight the individual menu items in the same way as you highlight an item on a submenu to open it and alter the respective settings. The menu items in some menus have to be highlighted by moving sideways. This is done by pressing the right/left arrow keys.
4.3 Accepting settings / Exiting menus and functions In some menus and functions the changes made must be accepted manually in order to save them permanently. If this does not happen, the function or the values that existed before the change was made will be reset automatically on exiting the menu. If an Accept field or the green function key with Accept is displayed in the bottom line of the screen, you can see that the changes made must be saved manually to be accepted.
4.4.1 Arrow selection method > If is shown on the left and .on the right next to the set value, you can alter this using the left/right arrow keys. 4.4.2 Selection list If is shown on the right next to the set value, the value can be changed using the selection list. > Press the OK button to open the selection list. > Highlight the setting you want using the up/down arrow keys.
4.4.3 Entering numbers Enter the new setting with the aid of the numeric keypad key if a question mark number value or is shown inside the marking. or a Note the number of digits used in the entry as there must always be the same number used. This means that if a five-digit value is required, for example "10600", but you only wish to set a four-digit value, for example "9750", then you must enter a "0" at the beginning for every unused position.
The SMS keyboard is operated using the numeric pad on both the alphabetic and the QWERTY keyboard, and can be used at any time. The coloured buttons thus incorporate the functions described above. > Press one of the numeric pad keys 0 - 9 and select the various letters, numbers, characters and symbols. The first letter of the respective row of characters is highlighted after first pressing a numeric pad key.
4.5 Options selection In some menus and operating modes (e.g. TV mode, music/images playback etc.), you have the option of calling up additional functions and options via the options selection function. > Pressing the Option button opens the option selection in the lower right-hand corner of the screen. In this example we can see the option selection for the channel list. > Every additional press of the Options button moves the highlight down one line each time.
5 Initial installation On initial installation of the TV, the “AutoInstall” wizard starts automatically. Using the installation wizard is the simplest way for you to create the most important settings for your TV. The initial installation process shown here serves merely as an example. The exact process for the initial installation will depend on the settings you select. Therefore please follow all instructions displayed on screen carefully.
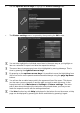
Display mode > Use the up/down arrow keys to select your preferred display mode and confirm by pressing the OK button. The values for the selected display mode can be adjusted as you want after the AutoInstall, as described in section 10.1 in the instruction manual. When selecting the natural and intensive display modes, note the message(s) that appear as well as sections 3.3.3, 7.9 and 10.1 in the instruction manual and confirm by pressing the OK button.
Antenna configuration (DVB-S) In this step of the installation you can adjust your TV setup to the configuration of your satellite antenna. “Antenna configuration (DVB-T)” appears immediately if DVB-S has been disabled. > Press the OK button to accept the default antenna setting and continue with the “Antenna configuration (DVB-T)” section.
Network configuration > If you do not want to run the network configuration check, press the Info button. > If you want to change the network settings, press the Option button and proceed as described in sections 10.4.2 and 10.4.3 of the instruction manual, then confirm with the green function key to accept the settings. > After the network check has been successfully completed, press the OK button to move on to the next step.
Regional channels Some broadcasters transmit channels with varying regional content. On this page you can define your preferences for these regional channels. > Using the arrow keys highlight the channel provider for the preferred regional channel you wish to set up and select this using the selection list. If you subsequently select another regional channel for a channel provider as per section 7.2.4, this will be saved in the same way for this channel provider.
ISIO Internet list updates The TV now checks whether there is a new list of website links available. > If you do not want to wait for a search for new software or a software download, you can, if necessary, skip this step by pressing the Info button. Loading EPG data Your TV has the EPG (Electronic Programme Guide). To enable the data for the electronic programme guide to be displayed, it must first be downloaded.
Product registration By registering your product with TechniSat, you will receive an additional three years of warranty claim from the date of purchase, as well as the two-year warranty claim under law. Your legal rights are not affected by this. (Please note that an Internet connection is required for this.) Exiting the installation wizard > Confirm the final message from the installation wizard by pressing the OK button.
6 Operating the unit 6.1 Switching the TV on and off 6.1.1 Switching on using the mains power switch on the television > Switch on the television by pressing in the mains power switch. The TV now performs an initialisation and cannot be operated during this time. This process takes several seconds to complete. 6.1.
6.2 Channel selection 6.2.1 Using the channel up/down buttons > You can switch between channels one at a time using the Channel +/- buttons on the remote control or on the TV. 6.2.2 Using the numeric pad keys > Use the numeric keypad keys to enter the number of the channel you want.
6.2.3.2 Selecting a list To make it easier for you to find channels, your device provides various channel lists. You can select your favourites lists or display the channels sorted alphabetically from the list of all channels, the TV provider lists or according to genre. > Press the OK button to open the active channel list. > You can now use option selection to select the channel list you want (favourites list, total list, TV broadcaster lists and genre lists).
6.3 AV source > Press the AV button to open the AV sources selection window and select a device connected to the HDMI inputs (HDMI 1 /2) or to the SCART socket (EuroAV) on the TV. > Select the source you want using the up/down arrow keys and confirm by pressing the OK button to switch over to the selected input. To do this also observe sections 7.2.1 - 7.2.3, 7.2.6, 10.8 and 12 of the instruction manual. 6.4 Channel/source information 6.4.
6.5 Receiving encrypted channels > Insert a CI-/CI+- module with the upper side pointing to the rear in the slot. > Insert the smartcard into the CI / CI+ module card slot. To do this also note section 7.5 in the instruction manual. 6.5.1 Smartcard PIN code With encrypted channels, channels that are not suitable for children can be pre-blocked by means of a parental control code/symbol. To unblock the specific channel it is necessary to enter the smartcard PIN code stored on the smartcard.
6.9 Display mode You can use the display mode selection option to switch between the preset display modes during actual operation: economical (home use), natural (default), intensive (presentations), film (cinema) and PC (graphics). > You can select the sound you want using the the sound mode item in the Options selection. You can set the display modes to your wishes, as described under section 10.1 in the instruction manual. 6.
6.12 Format switchover / Zoom > Pressing the Zoom/Format button allows you to select the various pre-defined formats (original, optimum, optimum 16:9, full zoom and stretch) as well as the user-defined setting, where you can adjust the picture as you wish, aufrufen.
6.15 Electronic Programme Guide (EPG) Your TV has EPG electronic programme information.. You can use this to display programme information for one or multiple digital channels on the screen and to obtain a very quick overview of the current programmes, or programmes being broadcast that day, or on following days. To do this also observe sections 7.15 and 10.7 in the instruction manual. > Press the SFI button to call up the electronic programme guide.
6.16 Function selection > You can open the Navigation menu (NAV menu) to select the function you want by pressing the function selection button. To do this also observe sections 7.16 and 10.8 in the instruction manual. 6.17 HbbTV > Switch to a channel that is broadcasting HbbTV data. > Launch the HbbTV application by pressing the red function key. Display and use of the HbbTV application is determined by the data received. Generally it is operated as described below.
6.18 Internet Your device can use an existing broadband connection to access the Internet. To do this the TV must be connected to the home network/DSL router via either LAN or WLAN. Internet access provides you with various Internet functions such as unrestricted browsing, use of interactive services, video on demand and the new ISIO Live TechniSat service portal. When using this please be sure to note the messages and displays on the screen, as well as sections 7.22, 10.4.4 and 10.4.2 or 10.4.
6.18.1.2 Selecting a list Your TV provides various Internet lists to make it easier for you to find web links. You can select and display all your configured favourites lists as per section 13. > Use the Internet lists item in the Options selection to select the Internet list you want. 6.18.1.3 Filtering by genre > Use the Options selection feature to call up the Genre filters item and use the up/ down arrow keys to highlight the genre by which you want to filter the list.
6.18.3 Navigating in the opened website > After the website you want has been loaded and displayed, either a colour-highlighted area/term/text or a mouse cursor appears somewhere on the screen. > You can use the arrow keys to move the highlight/frame, or the cursor, to the areas provided (e.g. a forwarding link, a button, dropdown list etc. > The associated action is accepted by pressing the OK button.
6.18.8 Search engine > By using the Options selection to call up the Search item, the search engine web page selected in section 10.4.4.7 of the instruction manual is automatically called up. 6.18.9 Status > Under the Status option in the Options selection, select the general status or the security status item to display various technical details concerning the active website. 6.181.
7.1.2 Timeshift recording > If you are watching a programme and are interrupted by a telephone call, for example, you can press the Pause / playback button to pause the programme and to start recording it at the same time. > To continue playing back the programme from this point, press the Play / Pause button again. You are now watching the programme with a time delay to the live broadcast (Timeshift), while the programme continues to be recorded in the background. 7.1.
7.2 DVR playback You can gain access to your DVR recording using the DVR Navigator. 7.2.1 Calling up the DVR Navigator The DVR Navigator can be called up in the following ways. Depending on whether you are in TV or radio mode, a list appears with all the TV or radio recordings available on the attached storage medium. In doing so also be absolutely sure to observe section 10.8 in the instruction manual. The broadcast information can be faded in and out through repeated pressing of the Info button. 7.2.1.
7.2.2 Pausing / freeze frame > To pause playback of a recording (freeze frame), press the Pause / Play button during playback. > Press the Pause / Play button again to resume playback from the same location. 7.2.3 Fast forward/Rewind Your DVR has fast forward and rewind functions so you can get to a specific place in a recording. > Press the Fast forward or rewind button during playback. uu or tt appears in the previously mentioned small Infobox.
TechniSat Warranty How to get your three-year warranty Step by step 1. Register your products within four weeks of purchase - either by sending in your completed registration card (see reverse) or online at www.technisat.com. Once the fault has been repaired, the Service Report will be returned to you along with the repaired device with an appropriate comment from our service workshop. Dealer 2.
Warranty TechniSat Guarantee certificate 3 Years Warranty Dear Customer, You have purchased a high quality TechniSat product that has been put through multiple quality tests and a stringent goods outwards check at every stage. Should you still encounter a problem with your equipment, contrary to expectations, you can always take advantage of a two-year legal warranty claim. This warranty claim can of course be exercised at any time without having registered the product.
Warranty Note on Making a claim under warranty The warranty can only be invoked if: 1. the fully completed registration card has been received by us no later than 4 weeks after purchase, or you have registered the product online during this period. 2. you have first attempted to resolve the issue by contacting your dealer or our technical hotline on +49 (0) 3925 9220 1800 (normal charges will apply for overseas calls). 3.
Service Report ✂ If, contrary to expectations, you encounter a problem with your equipment, despite the ultra-modern manufacturing and constant quality checking, we would ask you to first contact our technical hotline on +49 (0) 3925 9220 1800 (normal charges will apply for overseas calls). If we cannot solve the problem in this manner, we would ask you to contact your dealer or supplier. If you do so, please complete the following Service Report beforehand.