AIRBORNE TRANSCEIVER MODEL TDFM-7300 User’s Manual July 2008 Technisonic Industries Limited 240 Traders Blvd, Mississauga, Ontario L4Z 1W7 Tel:(905) 890-2113 Fax:(905) 890-5338 www.til.
CAUTION This unit contains static sensitive devices. Wear a grounded wrist strap and/or conductive gloves when handling printed circuit boards. WARNING: This device complies with Part 15 of the FCC Rules. Operation is subject to the following two conditions: (1) this device may not cause harmful interference and (2) this device must accept any interference received, including interference that may cause undesired operation.
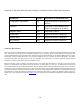
Summary of DO-160C Environmental Testing for Technisonic Model TDFM-7300 Transceiver. Conditions Section Description of Conducted Tests Temperature and Altitude 4.0 Equipment tested to categories C4 and D1. Vibration 8.0 Equipment is tested without shock mounts to categories B, M and N. Magnetic Effect 15.0 Equipment is class Z. Power Input 16.0 Equipment tested to category B. Voltage Spike 17.0 Equipment tested to category B. RF Emission 21.0 Equipment tested to category Z.
SECTION 1 GENERAL DESCRIPTION 1.1 DESCRIPTION The TDFM-7300 is an airborne low band VHF FM transceiver capable of operating between 30 and 50 MHz. 1.2 TECHNICAL CHARACTERISTICS Specification Model Designation: Characteristic TDFM-7300 Physical Dimensions: Approx. 3.75" X 5.75" X 8.0” Weight: ~6.0 lbs. (2.7 kg) Operating Temperature Range: -30°C to +60°C Power Requirement: Voltage: Current: 28.
Receiver section VLO Sensitivity: (uV) Selectivity: (dB) Intermodulation: (dB) Spurious Attenuation: (dB) Image attenuation: (dB) Hum and Noise: (dB) Audio Distortion: 0.
SECTION 2 OPERATING INSTRUCTIONS 2.1 GENERAL A 5-line display and a keypad and a rotary knob provide the operator control of the unit. The knob has multiple functions including volume, and channel. The microphone, key line and headphone audio can be wired separately for each of the 4 bands therefore switching from band to band is performed at an audio panel such as the Technisonic A71X series. 2.3 POWER SWITCH To switch the transceiver on, press and hold the knob until the radio powers up.
2.6 FUNC KEY Pressing the FUNC key will bring up the first functions menu: F1-F4 = Channels – Pressing one of these keys will load a preprogrammed channel. 4 = Record – Pressing 4 will cause the transceiver to record the next message received on the band selected. 5 = Playback – Pressing 5 will play the last message recorded. Pressing the FUNC key again will bring up the second menu. The following functions are available: 2 = Configuration – Enters the configuration menu (see 2.18 configuration menu).
SECTION 3 INSTALLATION INSTRUCTIONS 3.1 GENERAL This section contains information and instructions for the correct installation of the TDFM-7300 Transceiver. 3.2 EQUIPMENT PACKING LOG Unpack the equipment and check for any damage that may have occurred during transit. Save the original shipping container for returns due to damage or warranty claims. Check that each item on the packing slip has been shipped in the container. 3.
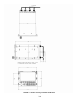
FIGURE 3-1 Outline Drawing for Model TDFM-7300 3-4
3.
P1 - 15 Pin (high density) D Connections – Use FEMALE Connector Pin # 1 2 3 4 5 6 7 8 9 10 11 12 13 14 15 Description 4 MHz 8 MHz 10 MHz 20 MHz 40 MHz Audio 5 No connection No connection No connection Tune Indicator Speaker 5 Tune Enable Ground PTT5 Mic 5 TABLE 3-3 3.7 INSTALLATION - WIRING INSTRUCTIONS Figure 3-2 shows all required connections and recommended wire sizes for the TDFM-7300 transceiver. 3.8 MAIN GROUND – J1 PINS 1 AND 14 Both pins should be connected to ground.
1N4006 diode in series with the cathode towards the audio panel in this case. 3.13 TX DATA AND RX DATA – J1 PINS 12 AND 13 These pins provide RS-232 serial communications for use with the RC-7300 remote control head if installed. Consult the RC-7300 installation manual for details. 3.14 CHANNEL UP AND CHANNEL DOWN – J1 PINS 16 AND 17 These pins can be used to scroll up and down through the zone/channel/mode/talk group selections for the band currently displayed on the screen.