TF-L26B ATV BEDIENUNGSANLEITUNG
Inhaltsverzeichnis VORSICHTSMASSNAHMEN………………………………………...………………………… G3 ANSCHLUSSBEISPIELE....……………………………………………………………………. G4 BEDIENELEMENTE..…………………………………………………………………………… G5 GRUNDFUNKTIONEN..……………………………………………………………...………… G7 OSD-MENÜEINSTELLUNG...…………………………………………………………………… G9 WARTUNG....... ………………………………………………………………………………… G17 FEHLERSUCHE UND FEHLERBEHEBUNG……………………………………………….. G18 TECHNISCHE DATEN...………………………………………...…………………………...
Lieber Kunde! Vielen Dank für den Kauf dieses LCD TV. Wenn Sie den Karton zum ersten Mal öffnen, prüfen Sie, ob alle Zubehörteile vorhanden sind. Vor dem Anschließen der Teile lesen Sie bitte die Gebrauchsanleitung des LCD TV sorgfältig durch und bewahren Sie sie griffbreit zum späteren Nachlesen auf. FAV Bedienungsanleitung X 1 Fernbedienung X 1 Batterien X 2 AV-Kabel X 1 Netzkabel X 1 Bitte prüfen Sie die Zubehörteile in der Verpackung.
VORSICHTSMASSNAHMEN VORSICHT STROMSCHLAGGEFAHR NICHT ÖFFNEN VORSICHT: ZUM VERHINDERN VON STROMSCHLAGGEFAHR DEN DECKEL (ODER DIE RÜCKSEITE) NICHT ABNEHMEN. ES BEFINDEN SICH KEINE VOM BENUTZER WARTUNGSFÄHIGE TEILE IM GERÄT. REPARATUREN DÜRFEN NUR VON QUALIFIZIERTEM WARTUNGSPERSONAL DURCHGEFÜHRT WERDEN. Dieses Symbol gibt an, dass sich eine gefährliche Spannung mit Stromschlaggefahr im Geräteinneren befindet.
ANSCHLUSSBEISPIELE Antenna TV STB S-VIDEO SCART SCART RF(75 ) Rear of the TV main unit Camcorder S-VIDEO AV2 / AV1 IN AUDIO OUT VIDEO L Pr P r Pb S y n c M a s te r 6 8 8 R PC Y Pb DF PC AUDIO Y VGA HDMI HDMI Small Tips DVD Player AC SWITCH • • AC IN Power Supply Obey the same voltage and frequency indication on the rating label of the main unit.
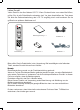
BEDIENELEMENTE HAUPTGERÄT VOL 1 2 VOL CH 3 CH 4 MENU SOURCE MENU SOURCE 5 6 7 8 9 Lautstärke erhöhen (VOL.+) Lautstärke vermindern (VOL -) Senderwahltasten ( CH) Senderwahltasten ( CH ) Menütaste (MENU) b a 1. 2. 3. 4. 5. 6. Taste zur Auswahl der Eingangsquelle (SOURCE) 7. Taste Power/Stand-by (z) 8. Fernbedienungssensor 9. Betriebsleuchte FERNBEDIENUNG Batterien einlegen Zwei Batterien “LR03/AAA” Reichweite Remote sensor 30 30 Within approx.
Bedienelemente 1. Taste Power/Stand-by ( z ) 1 2 3 22 4 21 20 5 6 7 19 18 -/- - 8 9 10 11 17 12 13 14 15 16 2. 3. 4. 5. Geräuschunterdrückungstaste (NR) Schlummerfunktionstaste (SLEEP) NICAM-Klangmodustaste (I/II) Informationsanzeigetaste (INFO) 6. Bildeinfriertaste (FREEZE) 7. Zahlentasten (0, 1-9) 8. Taste Sender zurück ( ) 9. Menütaste (MENU) 10. Richtungstasten ( ) 11. Bestätigungstaste (ENTER) 12. Taste zum Verlassen des Menüs (EXIT) 13. Lautstärkeregelung (VOLUME) 14.
GRUNDFUNKTIONEN Gerät ein-/ausschalten Achten Sie darauf, dass alle Anschlüsse einwandfrei durchgeführt wurden, bevor Sie das Gerät einschalten. Sobald Sie den Netzstecker mit der Steckdose verbinden, schaltet sich das Kontrolllämpchen des Einschalters ein und das Gerät geht in den Stand-by-Modus über. Drücken Sie die Taste [z] und das Kontrolllämpchen des Einschalters leuchtet blau. Erneut [ z] drücken, um das Gerät ganz auszuschalten.
Einstellen der Lautstärke Taste [VOLUME +/-] drücken, um die Lautstärke zu erhöhen oder zu vermindern. Hinweis: Die Werkseinstellung des OSD (On Screen Display - Bildschirmanzeige) ist English, jedoch verwenden wir in dieser Bedienungsanleitung sowie in allen OSD-Abbildungen die englische Sprache als Beispiel. Funktion NICAM Die Taste [I/II] auf der Fernbedienung drücken. Dieser Vorgang hat keinen Einfluss auf Sender mit NICAM-Signal.
Einstellen des Sleep-Timers Der Sleep-Timer schaltet das Gerät automatisch nach Ablauf einer vorprogrammierten Zeit aus. Drücken Sie die Taste [SLEEP] mehrmals hintereinander auf der Fernbedienung, um den gewünschten Soundmodus aufzurufen. Ausv15 (Min) v 30 (Min) v 45 (Min) v 60 (Min) v90 (Min) v 120 (Min) v Aus (Der Sleep-Timer startet, sobald die Einstellung beendet ist.) Prüfen der verbleibenden Zeit bis zum Ausschalten.
BILD-Menü SOUND-Menü Drücken Sie auf [MENU] und das Menü “Picture” (Bild) erscheint. Drücken Sie auf [ a ], um das Bildmenü aufzurufen und um die Optionen zu ändern, wie unter „Allgemeine Bedienfunktionen“ beschrieben. Drücken Sie auf [MENU], dann [p] und das Menü “Sound” (Klang) erscheint. Drücken Sie auf [ a ], um die Optionen zu ändern, wie unter „Allgemeine Bedienfunktionen“ beschrieben.
FUNKTIONSMENÜ Geben Sie ein 4-stelliges Passwort ein Drücken Sie auf [MENU], dann [ p] und das (Das Standardpasswort ist „0000”.) Menü “Function” (Funktion) erscheint. Wenn Sie das Passwort vergessen haben... Function Language b Blue Back b TTX Language b English Off WEST Lock Reset Geben Sie „2008“ ein. Geben Sie das Passwort nicht an Kinder weiter a a a a a Dieses Untermenü erscheint.
Confirm Password –––– Tuning Lock (Sendersuchsperre): Die Kanalsendersuche ist deaktiviert, wenn sie auf “ON” (Ein) steht. Exit iiii) Bitte geben Sie das neue Passwort noch einmal ein. Nachdem das neue Passwort eingerichtet wurde, kehrt man automatisch zum vorherigen Menü zurück. Max. Lautstärke: Zum Einstellen der maximalen Lautstärke. Volume Lock (Lautstärkensperre): Hiermit halten Sie die Lautstärke immer auf einer einzigen Stufe.
Sendermenü Manual Tune (Nur möglich, wenn “TV” als Eingangsquelle eingerichtet ist.) Drücken Sie auf [MENU], dann [p ] und das Menü “Channel” (Sender) erscheint. Channel Search Store Move Channel Auto Tune Manual Tune Fine Tune Skip Color System b b Sound System b Channel Swap Move Select Select b b a 873 MHz a Off 0 Exit Fine Tune (Feinabstimmung): Das aktuelle Programm wird innerhalb eines Frequenzbereichs haargenau analysiert und das Ergebnis manuell gespeichert.
Channel swap (Sender austauschen): Austauschen von zwei gespeicherten Sendern. (z. B.: Sender 3 und 8) Bewegen Sie den Cursor, indem Sie auf [ o/p ] drücken, geben Sie die Sendernummer mit [ b/a ] ein. PC-MENÜ (Nur möglich, wenn “PC” als Eingangsquelle eingerichtet ist.) Drücken Sie auf [MENU], dann [ p] das Menü “PC” erscheint. und PC Swap b Channel 1 b Channel 2 Channel Swap Move Select 0 0 H Position V Position Clock Phase Auto a a a Exit 1). Ändern Sie die Nummer nach Kanal 1 von "0" auf "3".
Advance menu (Erweiterte Einstellungen) PIP/POP: Einstellen der entsprechenden Optionen des PIP (Bild-in-Bild) oder POP (Bild-auf-Bild) Modus. Drücken Sie auf [ a], um die Optionen zu ändern, wie unter „Allgemeine Bedienfunktionen“ beschrieben. Drücken Sie auf [MENU], dann [ p ] und das Menü “Advance” erscheint. Drücken Sie auf [ a], um die Optionen zu ändern, wie unter „Allgemeine Bedienfunktionen“ beschrieben. Advance Advance Scale 3D NR Color Temp.
Q: Verfügbar X Nicht verfügbar PIP: Nur für PIP Sub/Main (Unter/Haupt) TV AV1 TV X AV1 PIP/POP-Quellenkonfiguration AV2 SVIDEO SCART YPbPr PC HDMI X X X X O O O X X X X X O O O AV2 X X X X X O O O SVIDEO X X X X X O O O SCART X X X X X X X O YPbPr O O O O X X PIP PIP PC O O O O X PIP X PIP HDMI O O O O O PIP PIP X G16
WARTUNG Reinigen der LCD-Anzeigefläche Die LCD-Anzeigefläche darf nicht mit spitzen Gegenständen berührt werden. Staub und Fingerabdrücken auf der LCD-Anzeigefläche können mit einem weichen, sauberen Tuch abgewischt werden. Immer gerade, von der Mitte der LCD-Anzeigefläche nach außen wischen. Niemals chemische Mittel, wie Plattensprays, Antistatiksprays, Benzin oder Verdünner zum Reinigen der LCD-Anzeigefläche verwenden.
FEHLERSUCHE UND FEHLERBEHEBUNG Symptom Mögliche Ursache Korrekturmaßnahmen Kein Bild und kein Ton Das Netzkabel ist nicht richtig mit dem Hauptgerät verbunden. Verbinden Sie das Netzkabel mit dem Hauptgerät. Das Netzkabel ist nicht mit einer Netzsteckdose verbunden. Das Netzkabel mit der Steckdose verbinden. Es wurde die falsche Eingangsquelle gewählt. Wählen Sie eine korrekte Eingangsquelle. Die Eingangsquelle funktioniert nicht mit dem TV-Gerät. Führen Sie die richtigen Anschlüsse durch. Kein Ton.
TECHNISCHE DATEN TF-L26B ATV Bildschirmmerkmale Displaytyp Aktive Fläche Aspect Ratio (Bildschirmformat) LCD 575,8 (H) X 323,8 (V) mm 16:9 Anschlüsse Eingang: TV Tuner (RF 75Ω) Composite Video-Eingang (AV1/2) S-Video-Eingang 1 2 Auflösung des Bildschirms: Helligkeit Kontrastverhältnis Punktpitch 1366 (H) X 768 (V) 450 cd/m2 800:1 0,1405 (H) X 0,4215 (V) mm (S-VIDEO) HDMI-Eingang (HDMI) Component Input (YPbPr) VGA-Eingang (VGA) 1 1 1 1 Maximale Farbanzahl Reaktionszeit 16.7M 5 ms.
TF-L26B ATV GEBRUIKERSHANDLEIDING
Inhoudstafel VOORZORGEN……………………………………………………………………..................... D3 AANSLUITVOORBEELDEN..………………………………………………………………....... D4 BEDIENINGSTOETSEN.............……………………………....………….............................. D5 BASISFUNCTIES……………………………………………………………………….............. D7 INSTELLING OSD-MENU……………………………………………………………………...... D9 ONDERHOUD...……………………………………………………………………………….....D17 VERHELPEN VAN STORINGEN………………………………………………..................... D18 TECHNISCHE KENMERKEN…………………………………………………………………..
Beste klant, Bedankt voor het kopen van deze LCD-TV. Als u de doos voor het eerst opent, gelieve dan te controleren of alle accessoires aanwezig zijn. Gelieve de gebruikershandleiding aandachtig door te lezen voordat u delen aansluit en de stroom inschakelt en bewaar deze handleiding binnen handbereik van uw LCD-TV. -/- - User manual X 1 Remote control X 1 Batteries X 2 AV cable X 1 Power cord X 1 Gelieve de accessoires te controleren bij het openen van het pak.
VOORZORGSMAATREGELEN OPGELET RISICO VAN EEN ELEKTRISCHE SCHOK. NIET OPENEN OPGELET: OM HET RISICO VAN EEN ELEKTRISCHE SCHOK TE VERMINDEREN, CAUTION ION HET DEKSEL (OF DE ACHTERZIJDE) NIET VERWIJDEREN. CAUTION BINNENIN BEVINDEN ZICH GEEN DELEN DIE DOOR DE GEBRUIKER ONDERHOUDEN KUNNEN WORDEN DOE EEN BEROEP OP EEN ERKENDE EN BEVOEGDE TECHNISCHE DIENST Dit symbool duidt aan dat binnenin deze eenheid een gevaarlijke spanning aanwezig is die tot een elektrische schok kan leiden.
AANSLUITVOORBEELDEN Antenna TV STB S-VIDEO SCART SCART RF(75 ) Rear of the TV main unit Camcorder S-VIDEO AV2 / AV1 IN AUDIO OUT VIDEO L Pr P r Pb S y n c M a s te r 6 8 8 R PC Y Pb DF PC AUDIO Y VGA HDMI HDMI Small Tips DVD Player AC SWITCH • Power Supply • AC IN Obey the same voltage and frequency indication on the rating label of the main unit.
BEDIENINGSTOETSEN HOOFDEENHEID VOL 1 2 VOL CH 3 CH 4 MENU SOURCE MENU SOURCE 5 6 7 8 9 1. Toets om het volume te verhogen (VOL+) 2. Toets om het volume te verminderen (-VOL) 3. Toets kanaal omhoog ( CH ) 4. Toets kanaal omlaag (CH ) 5. Menu-toets (MENU) Knop broningang (SOURCE) Stroom/Stand-bytoets ( z ) Sensor afstandsbediening Stroomled b a 6. 7. 8. 9. AFSTANDSBEDIENING Aanbrengen van de batterijen Twee “LR03/AAA” batterijen Bedieningsbereik Remote sensor 30 30 Within approx.
Bedieningstoetsen 1 2 3 22 4 21 20 5 6 7 19 18 -/- - 8 1. 2. 3. 4. 5. 6. 7. 8. 9. 10. 11. 12. 13. 14. 15. 9 10 11 17 12 13 16. 14 15 16 17. 18. 19. 20. 21. 22. Stroom/Stand-bytoets ( z ) Toets beeldruisonderdrukking (NR.
BASISBEWERKINGEN Aan/uitschakeling van de eenheid. Controleer of alle nodige aansluitingen correct gebeurd zijn alvorens de stroom in te schakelen. Als de AC-stekker aangesloten is op een AC-stopcontact, brandt de stroomled rood en gaat de eenheid over in stand-bymodus. Druk op [z ], de stroomled wordt blauw. De hoofdeenheid is volledig ingeschakeld. Druk nogmaals op [ z] om de stroom uit te schakelen.
Regel het volumeniveau Druk op [VOLUME +/-] om het volumeniveau te verhogen of te verlagen. Opmerking: De fabrieksinstelling voor de OSD-taal (On Screen Display) is “ English ”. Omwille van het gemak bij de beschrijving, worden alle OSD-afbeeldingen in deze handleiding in het Engels als voorbeelden weergegeven. NICAM-functie Druk op [I/II] van de afstandsbediening. Deze handeling heeft geen invloed op de kanalen zonder NICAM-signaal.
Het gebruik van de sleep-timer De sleep-timer schakelt de stroom automatisch uit nadat een vooraf ingestelde tijd verstreken is. Druk herhaaldelijk op [SLEEP] op de afstandsbediening om de gewenste sleep time te selecteren. Off (uit) v15 (Min) v 30 (Min)v 45 (Min) v 60 (Min) v90 (Min) v120 (Min) vOff (uit) (De sleep timer start als de instelling voltooid is.
Beeldmenu Druk op [MENU], het menuscherm “Picture” (beeld) verschijnt. Druk op [ a ] om naar het beeldmenu te gaan en de opties in te stellen zoals beschreven in “Common procedure of operation” (gewone bedieningsprocedure). Klankmenu Druk op [MENU], vervolgens op [p] tot het menuscherm “Sound” (Klank) verschijnt. Druk op [ a ] om naar het menu te gaan en de opties in te stellen zoals beschreven in “Common procedure of operation” (gewone bedieningsprocedure).
Functie- menu 3) Geef het wachtwoord van 4 digits in (De standaardinstelling is “0000”.) Druk op [MENU], vervolgens op [p ] tot het menuscherm “Function”(Functie) verschijnt. Als u het wachtwoord vergeten bent... Function Language b Blue Back b TTX Language b English Off WEST Lock Reset Geef dan “2008” in om het in te voeren. Vermijd dat jonge kinderen dit wachtwoord kennen. a a a a a Het submenu verschijnt.
Confirm Password –––– Tuning Lock (tuningvergrendeling): De kanaaltuning is uitgeschakeld als deze functie op “On” (aan) gezet wordt. Exit iiii) Geef uw nieuwe wachtwoord nogmaals in. Nadat het nieuwe wachtwoord is ingesteld, keert u automatisch terug naar het hogere menuniveau. Max Volume: Om de waarde van het maximumvolume in te stellen. Volume Lock (volumevergrendeling): Houdt de status van de volumeregeling beschikbaar, of vergrendeld (niet vrijgegeven).
Kanaalmenu Manual Tune (Alleen beschikbaar als de “TV” ingesteld is als de ingangsbron.) Druk op [MENU], vervolgens op [ p ] tot het menuscherm “Channel (Kanaal) verschijnt. Channel Search Store Move Channel Auto Tune Manual Tune Fine Tune Skip Color System b b Sound System b Channel Swap Move Select Select b b a 873 MHz a Off 0 Exit Fine tune (Fijnregeling): Dit scant het huidige programma binnen een frequentiebereik nauwkeurig en het resultaat wordt manueel opgeslagen.
Channel swap (kanaalomschakeling): Wissel de programma-informatie uit die op twee verschillende kanalen opgeslagen is. (bv.: kanaal 3 & 8) Verplaats de cursor door het indrukken van [ o/p ], geef het kanaalnummer in door op [ b/a ] te drukken. PC-menu (Alleen beschikbaar als de “PC” ingesteld is als de ingangsbron.) Druk op [MENU], vervolgens op [p ] tot het menuscherm verschijnt. PC Swap b Channel 1 b Channel 2 Channel Swap Move Select 0 0 H Position V Position Clock Phase Auto a a a a Exit 1).
Gevorderd menu PIP/POP: Stel de gerelateerde opties van de modus Druk op [MENU], vervolgens op [ p ] tot het PIP (Picture-in-picture) of POP menuscherm verschijnt. (Picture-on-picture) in. Druk op [ a ] om naar het menu te gaan en Druk op [ a] om naar het menu te gaan en de opties in te stellen zoals beschreven in de opties in te stellen zoals beschreven in “Common procedure of operation” (gewone “Common procedure of operation” bedieningsprocedure). (gewone bedieningsprocedure).
Q: Beschikbaar X: Niet beschikbaar PIP (beeld-in-beeld): Alleen voor PIP Sub TV AV1 AV2 SVIDEO SCART YPBPR PC HDMI TV X X X X X O O O AV1 X X X X X O O O AV2 X X X X X O O O SVIDEO X X X X X O O O SCART X X X X X X X O YPBPR O O O O X X PIP PIP PC HDMI O O O O O O O O X O PIP PIP X PIP PIP X Main D16
ONDERHOUD Reiniging van het LCD-scherm Raak het LCD-scherm niet aan met scherpe voorwerpen. Als er zich stof en vingerafdrukken op het oppervlak van het LCD-scherm bevinden, veeg deze dan weg met een propere, zachte doek. Wrijf in een rechte beweging van het midden van het LCD-scherm naar de buitenkant. Gebruik nooit chemicaliën zoals reinigingssprays voor fonoplaten, antistatische sprays, benzeen of thinner om het LCD-scherm te reinigen.
VERHELPEN VAN STORINGEN Symptoom Mogelijke oorzaak Corrigerende acties Geen beeld en geen geluid. De stroomkabel is niet goed op de hoofdeenheid aangesloten. Sluit de stroomkabel op de hoofdeenheid aan. De stroomstekker is niet aangesloten op een AC-stopcontact. Steek de stroomstekker in een AC-stopcontact. De verkeerde ingangsbron is geselecteerd. Selecteer een correcte ingangsbron. De ingangsbron is niet goed op de TV aangesloten. Zorg voor de nodige aansluitingen Alleen geen geluid.
TECHNISCHE KENMERKEN TF-L26B ATV Schermkenmerken Schermtype Actief bereik Schermverhouding: Schermresolutie Helderheid: Contrastverhouding Dot Pitch Maximumkleur Reactietijd Aansluitingen LCD 575.8(H) X 323.8(V) mm 16:9 1366(H) X 768(V) 450 cd/m2 800:1 0.1405(H) X 0.4215(V) mm 16.
TF-L26B ATV USER MANUAL
Table of contents PRECAUTONS…………………………………………………………………………………… E3 CONNECTION EXAMPLES…………………………………………………………………… E4 CONTROLS ……………………………………………………………………………………… E5 BASIC OPERATIONS…………………………………………………………………………… E7 OSD MENU SETTING …………………………………………………………………………… E9 MAINTENANCE ………………………………………………………………………………… E17 TROUBLE SHOOTING ……………………………………………………………………….. E18 SPECIFICATION ……………………………………………………………………………...
Dear Customer: Thank you for purchasing this LCD TV. When opening the box for the first time, please check whether all the accessories are present. Before connecting parts and power, please carefully read the user manual and always keep these instructions handy and close by your LCD TV. -/- - User manual X 1 Remote control X 1 Batteries X 2 AV cable X 1 Power cord X 1 Please check the accessories when open the package. If anything damaged or lacked, consult with your local dealer .
PRECAUTIONS CAUTION RISK OF ELECTRIC SHOCK DO NOT OPEN CAUTION: TO PREVENT THE RISK OF ELECTRIC SHOCK, DO NOT REMOVE COVER (OR BACK). NO USER-SERVICEABLE PARTS INSIDE. REFER SERVICING TO QUALIFIED SERVICE PERSONNEL. This symbol indicates that dangerous voltage constituting a risk of electric shock is present within this unit. This symbol indicates that there are important operating and maintenance instructions in the literature accompanying this unit.
CONNECTION EXAMPLES Antenna TV STB S-VIDEO SCART SCART RF(75 ) Rear of the TV main unit Camcorder S-VIDEO AV2 / AV1 IN AUDIO OUT VIDEO L Pr P r Pb S y n c M a s te r 6 8 8 R PC Y Pb DF PC AUDIO Y VGA HDMI HDMI Small Tips DVD Player • AC SWITCH • Power Supply • AC IN Obey the same voltage and frequency indication on the rating label of the main unit. E4 Do not connect the power cord of the AC adaptor to an AC outlet until all connections have been made.
CONTROLS MAIN UNIT VOL 1 2 CH 4 VOL CH 3 MENU SOURCE MENU SOURCE 5 6 7 8 9 Volume increase button + VOL ) Volume decrease button VOL -) CH ) Channel up button CH ) Channel down button Menu button MENU) 6. 7. 8. 9. b a 1. 2. 3. 4. 5. Input source select button SOURCE) Power/Standby button z) Remote sensor Power indicator REMOTE CONTROL Inserting Batteries Control Range Two “R03/AAA” batteries Remote sensor 30 30 Within approx.
Control buttons 1 2 3 22 4 21 20 5 6 7 19 18 -/- - 8 9 10 11 17 12 13 14 15 16 1. Power/Standby button (z) 2. Picture noise reduction button (NR.) 3. Sleep function button (SLEEP) 4. NICAM sound mode select button (I/II) 5. Information display button (INFO) 6. Picture frozen button (FREEZE) 7. Number buttons (0, 1~9) 8. Channel return button ( ) 9. Menu button (MENU) 10. Arrow buttons (o, a, p, b) 11. Con� rm button (ENTER) 12. Menu exit button (EXIT) 13. Volume control buttons (- VOLUME +) 14.
BASIC OPERATIONS Turn on/off the power Make sure all the necessary connections are correctly connected before turn on the power. When the AC power cord plugged into an AC outlet, the power indicator turns red and the unit is in the standby mode. Press [z], the power indicator turns blue, the main unit turns on completely. Press [z] agin to turn off the power. If not to use the main unit for a long time, unplug the AC power cord from the AC outlet.
Adjust the volume level Press [VOLUME +/-] to increase or decrease the volume level. Note: The factory setting of OSD (On Screen Display) language is “ English”, for the convenience of description, in this manual, all the OSD illustrations we use English ones as examples. NICAM Function Press [I/II] on the remote control. This operation do no effection to the channels without NICAM signal.
Using the Sleep Timer The sleep timer automatically switches off the power after a preset time has elapsed. Press [SLEEP] on the remote control repeatedly to select the desired sleep time period: Off v15 (Min) v 30 (Min) v 45 (Min) v 60 (Min) v90 (Min) v 120 (Min) v Off (The sleep timer starts when the setting is finished.) To check the remain sleep time Press [SLEEP] on the remote control, the remain sleep time appears on the screen for a few seconds. OSD Menu Setting Press [MENU], OSD main menu appears.
Picture menu Sound menu Press [MENU], Picture” menu screen appears. Press [MENU] then [p] until “Sound” menu screen appears. Press [a] to enter, and set the options as “Common procedure of operation” described. Press [a] to enter picture menu, and set the options as Common procedure of operation” described.
Function menu 3) Enter the password of 4 digits . ( The default setting is 0000”.) Press [MENU], then press [p] continually until Function” menu screen appears. If you forget the password... Function Language b Blue Back b TTX Language b English Off WEST Lock Reset Move Select Input 2008” to enter it. Avoid young kids know this password. a a a a a The sub-menu appears.
Tuning Lock: Confirm Password The channel tuning is disable when it is set to "On". –––– Exit TV on Source: iiii) Re-input the new password again. To set the default input source when you open the TV main unit. After the new password is setted, it returns to the upper level menu automatically . TV on Channel: To set the default TV channel number when you power on the TV. Max Volume: To set the maxinium volume value. Volume Lock: Keep the volume control status to be available or to not to released.
Channel menu Manual Tune (Available only when TV” is set as the input source.) Channel Search Store Press [MENU] then [p] till Channel menu screen appears. Move Select b b a 873 MHz a Off 0 Exit Channel Auto Tune Manual Tune Fine Tune Skip Color System b b Sound System b Channel Swap Move Select Fine Tune: a a a On a SECAM a D/K a a It will scan current programme within a frequency range accurately and store the result manually. Skip: Set the skip sign of current channel to On” or Off”.
Channel swap: PC menu Exchange the program information stored in two different channels. (E.g.: Channel 3 & 8) (Available only when PC” is set as the input source.) Move the cursor by pressing [o/p], and input the channel No. by pressing [b/a] . Press [MENU] then [p] till PC” menu screen appears. PC Swap b Channel 1 b Channel 2 Channel Swap Move Select 0 0 H Position V Position Clock Phase Auto a a a Exit 1). Change the number after channel 1 from"0" to "3". 2).
Advance menu PIP/POP: Press [MENU] then [p] till Advance” menu screen appears. Set the related options of PIP (Picturein-picture ) or POP (Picture-on-picture) mode. Press [a] to enter, and set the options as Common procedure of operation” described. Press [a] to enter, and set the options as Common procedure of operation” described. Advance Scale 3D NR Color Temp.
O: Available X Not Available PIP: For PIP only PIP/POP source con� guration Sub TV AV1 AV2 SVIDEO SCART YPBPR PC HDMI TV X X X X X O O O AV1 X X X X X O O O AV2 X X X X X O O O SVIDEO X X X X X O O O SCART X X X X X X X O YPBPR O O O O X X PIP PIP PC HDMI O O O O O O O O X O PIP PIP X PIP PIP X Main E16
MAINTENANCE Cleaning the LCD Panel The LCD panel should not be toughed with sharp objects. If dust and fingerprints is on the LCD panel surface, wipe them off with a clean soft cloth. Wipe in a straight motion from the center to the outside of the LCD panel. Never use chemicals such as record cleaning sprays, antistatic sprays or fluids, benzene or thinner to clean the LCD panel. Cleaning the Main Unit Clean the outside of the unit with a clean soft cloth moistened with luke-warm water.
TROUBLESHOOTING Symptom Possible cause Corrective active No Picture and sound. Power cord is not correctly connected with the main unit. Connected the power cord with the main unit. Power cord is not plugged into an AC outlet. Plug the power cord into an AC outlet. The wrong input source is selected. Select a correct input source. The input source is failed to connect with the TV. Make correct connections. No sound only. Volume control is set to minimum. Press the VOLUME+ button to increase the volume.
SPECIFICATION TF-L26B ATV Display Features Connections Display Type Active Area Aspect Ratio Panel Resolution Brightness Contrast Ratio Dot Pitch Maximum Color Response Time Input: TV Tuner (RF 75Ω) Composite Video Input (AV1/2) S-Video Input (S-VIDEO) HDMI Input (HDMI) Component Input (YPbPr) VGA Input (VGA) PC audio Input (PC AUDIO) SCART LCD 575.8 (H) X 323.8 (V) mm 16:9 1366 (H) X 768 (V) 450 cd/m2 800:1 0.1405 (H) X 0.4215 (V) mm 16.
Wenn Sie das Gerät aus irgendwelchen Gründen entsorgen müssen, beachten Sie bitte Folgendes: Ausgediente Elektroartikel gehören nicht in den Hausmüll. Bitte entsorgen Sie diese an den vorgeschriebenen Orten. Adressen zum Recycling erhalten Sie bei der zuständigen Behörde an Ihrem Standort.