DVR100
READ THIS FIRST be determined by turning the equipment off and on, the user is encouraged to try to correct the interference by one or more of the following measures: This audio system is made and tested to meet exacting safety standards. It meets both UL and FCC requirements. W AR N I N G : To reduce the risk of fire or shock hazard, do not expose this product to rain or moisture. • Reorient or relocate the receiving antenna. • Increase the separation between the equipment and receiver.
protection technology must be authorized by Macrovision Corporation, and is intended for home and other limited viewing uses only, unless otherwise authorized by Macrovision Corporation. Reverse engineering or disassembly is prohibited. This section lists important information that will help you properly use and enjoy your system. Read all the included safety and operating instructions before using your system. Follow them closely, and retain them for future reference. 1.
damage and will often require extensive work by a qualified technician to restore the product to normal operation. 14. Ventilation — Slots and openings in the cabinet provide ventilation, ensure reliable operation, and protect from overheating. Do not block or cover these openings, and do not place the product on a bed, sofa, rug, or other similar surface. Do not place the product in a built-in installation such as a bookcase or rack unless it provides proper ventilation as specified by the manufacturer.
FEATURES Dolby Digital, Dolby Pro Logic, Dolby Pro Logic II and DTS Surround Settings Lets you use the Home Theater Audio System for a movie-theater surround sound experience when viewing DVD's. Built-in, 3-Disc DVD/CD Changer Plays audio and video discs including CD, CD-R, MP3 AND DVD. Adjustable Speaker Size, Channel Level and Distance Lets you customize your setup for a true surround sound experience. Additional Component Connectors Lets you connect other audio/video components to the receiver.
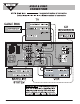
PREPARATION CONNECTING COMPONENTS DIGITAL OUT — To connect a Toslink optical cable if you have a digital audio component such as a MD,DAT or CD recorder. See "Connecting a Digital (Optical) Audio Component" on Page 8). Speaker Terminals — Use the color-coded wires (supplied) to connect each speaker to the appropriate terminal. Note: Be sure to connect the black wires to the black terminals, and the red wires to the other terminals. Connect AM and FM antennas here (see page 8).
Connecting a Cassette Deck Connecting an Auxiliary Audio Component Use audio cables (not supplied) to connect a cassette deck to the receiver. Connect red plugs to the right A UDIO jacks and white plugs to the left A UDIO jacks. Make sure you connect the cassette deck to both the TA P E IN and TA P E OUT sets of jacks.
PLACING THE SPEAKERS Connect the loop antenna’s wires to AM and GND. Place the antenna in a location (for example, on a shelf or window frame) that gives the best reception. 1. Place the front left and right speakers at equal distances from the TV. Keep the antenna as far away as possible from the entire system, speaker cords and the power cord to prevent unwanted noise. 2. Install the center speaker above or below the TV so the center channel’s sound is localized at the TV screen.
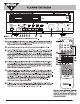
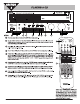
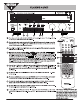
RECEIVER OPERATION A QUICK LOOK AT THE RECEIVER'S CONTROLS TUNING MODE In tuner mode, press to switch between preset and manual tuning (see “Switching Between Preset Stations and Manual Tuning” on Page 11). DIMMER – Press once to dim the display panel. Press again to return it to normal. SURROUND MODE DTS – Press to switch Press to switch surround modes between PRO LOGIC, PRO LOGIC II MOVIE, PRO LOGIC II MUSIC, THEATER, HALL and STADIUM. to 5.1 Channel DTS from stereo mode.
USING THE TUNER Auto Preset 1. Press POWER. The receiver defaults to the last selected function. 1. Press BAND to select AM or FM. 2. Rotate FUNCTION knob until the TUNER function appears. 2. Hold down MEMORY button for about 3 seconds. 3. Press BAND to select the desired band ( AM or FM ). 3. The tuner automatically begins scanning, and stores the 4. Press the TUNING MODE button on the front of the DVR100 first 30 strong signals it receives.
USING NIGHT MODE 4. Place a CD in the tray, then press the appropriate DISC button again to close the drawer. When watching DVD movies encoded in Dolby Digital Surround Sound, you can use Night Mode to compress large dynamic audio ranges, resulting in "quieter" explosions and other loud sounds in movies. The Night Mode feature adjusts the dynamic audio range so that there is less difference in the output of all sounds in a movie (explosions, music, dialogue and so on).
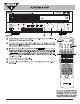
REMOTE CONTROL OPERATION A QUICK LOOK AT THE REMOTE CONTROL TEST TONE — Turns on or off the test tone function in DTS, DOLBY DIGITAL, or PRO LOGIC mode. The test tone is output from Front L speaker, Center speaker, Front R speaker, Surround R speaker, Surround L speaker, (optional subwoofer speaker when subwoofer is on). SPEAKER CONFIG/LEVEL/DELAY— Use to change speaker settings and adjust level and delay. VOLUME — Use to adjust volume. FUNCTIONS — Use to select the desired function.
SETTING UP THE SURROUND SOUND SYSTEM 3. Press SPEAKER LEVEL again and C 0dB (center) appears. To change the center speaker’s level, repeatedly press or until you reach the desired level ( -10 to +10dB ). If you purchased the DVR100 with mini or bookshelf speakers and a powered subwoofer, you do not have to set the speaker sizes. The DVR100 comes from the factory pre-set for use with small front, center and rear speakers and a powered subwoofer. 4.
Surround Effects C autions: • This remote control may not operate on all models of the brands shown in the “Manufacturer’s Codes” on Page 25. I mportant: The center and rear speakers only operate when the unit is set to a surround sound mode and the source material being played is recorded or broadcast in Dolby Digital, DTS or Dolby Pro Logic surround sound. • If batteries are removed from the battery compartment of the remote, replace the batteries within 30 minutes or all preset codes will be lost.
Using GUI to Set a CD to Repeat Play 1. Turn on the TV and switch it to the video input source you have selected for your DVR100 receiver. 2. Using the DVR100 remote control, press the DVD/CD function button. 3. Insert a CD into one of the three DVD/CD trays on the DVR100 receiver and press the play button for the tray you have put the CD in. 4. Press REPEAT on the remote control during CD playback. The TV screen displays the repeat mode setting. 5.
DV D P L A Y E R OP E R A T ION B A S IC OP E R A T ION • Keep your fingers well clear of the disc tray as it is closing. Keep children’s fingers away from the closing disc tray as there is a risk of personal injury. 1. Press the P OWE R button. The last selected function appears in the display. • If the inhibit icon " "appears on the TV screen when a button is pressed, it means the function is not available on the disc you are playing. 2.
Using GUI Menu Icons For DVD Mode Playing in Slow-Motion Press the remote’s SLOW – /+ during playback. To decrease the playback speed, repeatedly press SLOW – . As you press SLOW – the playback speed slows ( 1/2X, 1/4X, 1/8X). To reverse the playback direction, press SLOW +. GUI menu icons show disc information (for example, title or chapter number, elapsed playing time, audio/subtitle language, angle) and player information (for example, repeat play, play mode).
Using a Title Menu NOTES: • When the desired language is not shown even after pressing the button several times, it means the language is not available on the disc. Some DVDs may contain two or more titles. If the disc has a title menu recorded on it, you can use TITLE to select the movie title. • When the power is turned off or the DVD player is stopped, the subtitle language selected at the initial settings appears. N otes: • The details of operation might differ depending on the DVD.
Zooming In • If you change the level and enter a password, playback of all DVDs with ratings higher than your selection will be blocked, unless you enter the correct password again. For example: if you change the level to 5, the DVD player will not play discs with ratings of 6, 7, or 8 unless the correct password is entered from the remote control. Zoom allows you to zoom in and enlarge the picture on the screen to either 2 times (2X), 4 times (4X) or 16 times (16X) its normal size.
16:9 WIDE (Widescreen) — If you have a widescreen TV set, use this setting. The DVD plays in full size. (You must also set your widescreen TV to “full size”). SELECTING PROGRESSIVE SCAN MODE Note: To use Progressive Scan on the DVR100 you will need a digital TV (DTV). This unit is equipped with progressive Scan(P-Scan)Video Output. The P-Scan feature only works when connected to a digital TV with the correct 3-wire video cable.
TROUBLESHOOTING To determine any problem with your receiver, always check the most obvious possible causes first. If any problem still remains after your have checked the items below, consult your nearest TECHWOOD dealer. Incorrect operation is often mistaken for trouble and malfunctions. If you think that there is something wrong with this component, check the points below. Sometimes the trouble may lie in another component. Investigate the other components and electrical appliances being used.
Symptom Considerable noise in radio broadcasts. Cause Remedy Incorrect frequency. Tune in the correct frequency. The antenna is not connected. Connect the antenna. RF (AC-3) and/or digital cables are near the antenna terminals and wires. Route RF (AC-3) and digital cables away from the antenna terminals and wires. (For FM) The FM antenna is not fully extended or is poorly positioned. Fully extend the FM wire antenna, position for best reception, and secure to a wall. (For FM) The signal is weak.
CARE Modifying or tampering with the receiver’s internal components can cause a malfunction and might invalidate its warranty and void your FCC authorization to operate it. If your receiver is not performing as it should, take it to your local store for assistance. Keep the receiver dry; if it gets wet, wipe it dry immediately. Use and store the receiver only in normal temperature environments. Handle the receiver carefully; do not drop it.
Brand C odes Brand C odes MAGNAVOX 104, 106, 108, 119, 162, 169, 174, 175, 176, 177, 188, 189, 226, 230, 231, 232, 233, 234, 254, 283, 284 SANYO 104, 109, 148, 149, 180, 207, 208, 210, 262, 280 SCOTCH 106 MARANTS 162 SCOTT 104, 106, 112, 124, 135, 138, 146 MARANTZ 104, 106, 162 SEARS MEGATRON 106, 159 MEMOREX 101, 106, 182, 262 104, 106, 113, 119, 146, 148, 149, 151, 166, 172, 185, 209, 210, 262, 280, 281 MGA 104, 105, 106, 119, 122, 151, 179, 180, 182 SHARP 104, 106, 112, 129, 211,
Brand C odes Brand C odes KENW OOD 409, 410, 411, 416, 418, 456, 511, 523 413 KLH 461 BELL& HOWELL 411 KODAK 414, 421 CALIX 414 LG (GOLDSTAR) 409, 414, 418, 454, 506 CANDLE 413, 414, 423, 461 LLOYD 426 CANON 421 LOGIK 461 CARVER 462 LXI 414 CCE 461 MAGNAVOX 421, 462, 463, 504, 508, 524 CITIZEN 413, 414, 415, 416, 417, 418 MAGNIN 413 COLORTYME 409 MARANTZ COLT 461 409, 410, 411, 416, 418, 421, 458, 462 CRAIG 413, 414, 423, 461 MARTA 414 CURTIS-MATHES 409, 412,
Brand C odes Brand C odes PROSCAN 401, 412 VIDEOSONIC 413 PROTEC 461 WARDS PULSAR 504 QUARTER 411 413, 414, 415, 421, 423, 426, 429, 455, 456, 461, 496, 501, 502, 503, 507, 516, 531 QUARTZ 411 XR-1000 421, 426, 461 QUASAR 421, 525 YAMAHA 409, 410, 411, 418, 458, 511 RADIOSHACK/ REALISTIC 411, 413, 414, 421, 423, 426, 429, 449, 450, 496, 531 ZENITH 404, 498, 504, 519, 528 RADIX 414 RANDEX 414 RCA 401, 446, 482, 490, 525, C able C odes Brand 403, 448, 483, 491, 531 412, 413
Brand C odes Brand C odes PULSAR 726 PROSCAN 778 RADIOSHACK 770, 771, 779, 780 RCA 754, 755, 778 RCA 747, 749, 752 REALISTIC 763 REALISTIC 709, 749 SONY 772, 725, 727, 740 REGAL 722, 735 STS1 764 REGENCY 717 STS2 765 REMBRANDT 703 STS3 766 RUNCO 726 STS4 767 S.
ONE-YEAR LIMITED WARRANTY WHO PROVIDES WARRANTY This warranty is provided by W elton Sound Systems U.S.A. LTD. WHO IS PROTECTED This warranty is extended to the first original owner. NOTE: RENT-TO-OWN DEALERS ARE CONSIDERED TO BE THE FIRST ORI GINAL OWNER WHAT IS COVERED AND HOW LONG This warranty covers the electronics -including electronic parts, electronic circuit assembl ies and electronic mechanical assembli es - from date of origi nal purchase.
WELTON SOUND SYSTEMS, U.S.A. 11625 Columbia Center Drive Suite 100 Dallas, Texas 75229 (972) 243-5602 FAX: (972) 243-5958 weltonusa.