
User Guide


9
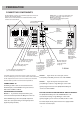
Connect the loop antenna’s wires to
AM
and
GND
. Place the
antenna in a location (for example, on a shelf or window
frame) that gives the best reception.
Keep the antenna as far away as possible from the entire
system, speaker cords and the power cord to prevent
unwanted noise.
AM Outdoor Antenna
If the supplied AM loop antenna does not deliver sufficient
reception, use an outdoor AM antenna (not supplied).
Use an insulated wire more than 15 feet (5 m) long. Strip one
end, and connect that end to
AM
.
String the antenna wire outdoors or indoors near a window.
For better reception, connect the
GND
terminal to a reliable
ground.
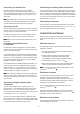
CONNECTING THE SPEAKERS
When connecting equipment, always make sure the power is
switched off and the power cord is disconnected from the wall
outlet.
N
NN
No
oo
ot
tt
te
ee
e:
::
: Use speakers with a nominal impedance of 6 ohms or
more.
Follow these steps to connect the speakers.
1. Press up (or down) on the speaker’s terminal and insert the
appropriate wire ends. Black wires to black terminals
and red wires to other terminals
N
NN
No
oo
ot
tt
te
ee
e:
::
: Be sure to connect each speaker to the appropriate
speaker terminal, connecting positive to positive (+ to +)
and negative to negative (– to –).
2. Connect the front speaker's wires to the receiver’s
SPEAKERS FRONT L
and
R
terminals.
Connect the surround speakers’ wires to the receiver’s
SPEAKERS REAR L
and
R
terminals.
Connect the center speaker’s wire to the receiver’s
SPEAKERS CENTER
terminal.
3. Plug the AC power cord into an AC wall socket.
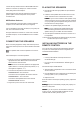
PLACING THE SPEAKERS
1. Place the front left and right speakers at equal distances
from the TV.
2. Install the center speaker above or below the TV so the
center channel’s sound is localized at the TV screen.
C
CC
Ca
aa
au
uu
ut
tt
ti
ii
io
oo
on
nn
n:
::
: If you choose to install the center speaker on top
of the TV, be sure to secure it to reduce the risk of damage
or injury resulting from the speaker falling from the TV in
the event of the TV being bumped.
3. Install the rear speakers slightly above ear level.
N
NN
No
oo
ot
tt
te
ee
e:
::
: Try not to install the rear speakers farther away
from the listening position than the front and center
speakers. Doing so can weaken the surround effect.
4. Place the optional subwoofer on the floor near the L or R
front speakers.
Caution: Be sure all speakers are installed securely to prevent
accidents and improve sound quality.
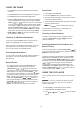
INSTALLING BATTERIES IN THE
REMOTE CONTROL
Your remote control requires two AAA batteries (supplied)
for power. For the best performance and longest life, we
recommend alkaline batteries.
C
CC
Ca
aa
au
uu
ut
tt
ti
ii
io
oo
on
nn
ns
ss
s:
::
:
• Use only fresh batteries of the required size and
recommended type.
• Do not mix old and new batteries or different types of
batteries.
Follow these steps to install batteries.
1. Slide the battery compartment cover in the direction of the
arrow to remove it.
2. Place the batteries in the compartment as indicated by the
polarity symbols (+ and –) marked inside.
3. Replace the cover.
When the remote control stops operating properly, replace the
batteries.
W
WW
Wa
aa
ar
rr
rn
nn
ni
ii
in
nn
ng
gg
g:
: :
: Dispose of old batteries promptly and properly. Do
not burn or bury them.
C
CC
Ca
aa
au
uu
ut
tt
ti
ii
io
oo
on
nn
n:
::
: If you do not plan to use the remote control for a
month or longer, remove the batteries. Batteries can leak
chemicals that can destroy electronic parts.