
User Guide


12
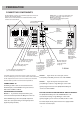
4. Place a CD in the tray, then press the appropriate
DISC button again to close the drawer.
NoteNote
Note
NoteNote
Note
::
: If you want to load more than one CD, you can
press another DISC button. The receiver closes the open
drawer and opens the drawer of the DISC button you
pressed. The disc number to be played flashes.
5. To play select
The disc icon (at the far left) begins to rotate.
To pause playback , press
PAUSE
. The disc icon flashes
rapidly. To resume playback, press
PAUSE
again or press
PLAY
.
To scan forward through a track, hold down
PRESET
for about 2 seconds. Repeat up to two times to
increase the fast-forward speed. To resume playback,
press
PLAY
.
::
: At the beginning or end of a track on an audio CD,
the scan speed returns to normal.
To scan backward through a track, hold down
PRESET
for about 2 seconds. Repeat up to two times to
increase the rewind speed. To resume playback, press
PLAY
.
To skip to the next track on the CD, press
PRESET
once.
To return to the beginning of the current track, press
PRESET
To return to the previous track, press
PRESET
twice.
To stop playback
, press
STOP
. The disc icon stops rotating,
and
appears. To resume playback, press the appr-
RESUME
iate play button . To
stop playback completely, press again.
Changing the Sound Mode
For an analog source(Tuner, SAT, TV, Tape, CD or AUX).
repeatedly press SURROUND MODE until the desired mode
(THEATER, HALL, STADIUM, PRO LOGIC, PRO LOGIC movie, or
PRO LOGIC music ) appears. Press STEREO to select stereo. Or,
repeatedly press SURROUND on the remote until the desired
mode appears.
::
If you are playing an MP-3 disc that has multiple folders
on it you must have your TV on and connected to the DVR100.
Use the on screen display on your TV and use the
buttons on the remote to navigate to the desired folder and
::
When the DVR100 finishes playing an audio CD, it
automatically plays the disc in the next drawer until the disc
in drawer 3 is finished. Playback will then stop.
USING NIGHT MODE
When watching DVD movies encoded in Dolby Digital
Surround Sound, you can use Night Mode to compress
large dynamic audio ranges, resulting in "quieter" expl-
osions and other loud sounds in movies. The Night Mode
feature adjusts the dynamic audio range so that there is
less difference in the output of all sounds in a movie
(explosions, music, dialogue and so on).
While in Dolby Digital or Dolby Digital Stereo mode, press
NIGHT MODE
to turn Night Mode on. Press NIGHT MODE
again to turn it off.
No
oo
ot
tt
te
ee
e:
::
: Night Mode is not available for movies using DTS mode.
USING THE SLEEP TIMER
You can set the sleep timer to turn off the receiver after a set
period of time.
Repeatedly press
SLEEP
10, 20, 30, 40, 50, 60, 70, 80
on the remote control to set the
(
, or 90
minutes).
DISC1, DISC2, DISC3
DISC1, DISC2, DISC3
STOP
N
NN
No
oo
ot
tt
te
ee
e:
If your DVD is encoded for 5.1 Dolby Digital sound, pressing
SURROUND changes the mode from Dolby Digital to Dolby
Digital Stereo. If the DVD is encoded for anything less than
5.1 Dolby Digital sound, the DVD plays in Dolby ProLogic
mode and pressing SURROUND changes Dolby ProLogic
to Dolby digital Stereo.
N
NN
No
oo
ot
tt
te
ee
e:
N
NN
No
oo
ot
tt
te
ee
e:
song title and then press play.
To adjust the tone with the receiver press the TONE button
on the DVR100 until TONE ON appears in the display.
Press the TONE button again and BAS 0dB will appear in the
display. While BAS 0dB is displayed use the or
buttons on the receiver to increase or decrease the bass
level. After you have set the bass level press the TONE button
again and TRE 0dB will appear in the display. While TRE 0dB
is displayed use the or buttons on the receiver to
increase or decrease the treble level. Press the TONE button again
until TONE ON appears in the display and wait until TONE ON
is no longer displayed. Your bass and treble levels are now set.
To adjust the tone with the remote press the TONE button
on the remote until TONE ON appears in the display. Press
the TONE button again and BAS 0dB will appear in the display.
While BAS 0dB is displayed use the or buttons on
the remote to increase or decrease the bass level. After you
have set the bass level press the TONE button again and
TRE 0dB will appear in the display. While TRE 0dB is disp-
layed use the or buttons on the remote to increase or
decrease the treble level. Press the TONE button again until
TONE ON appears in the display and wait until TONE ON
is no longer displayed. Your bass and treble levels are now set.
To set the bass and treble levels to 0dB press the tone button
on the receiver or on the remote until TONE OFF appears in the
display. Your bass and treble levels are now set at 0dB.
The receiver turns off when the selected time has expired.
HOW TO ADJUST THE TONE
sleep timer to the desired length of time