IG7600 Administration Manual Copyright © 2013 TECOM Co., Ltd. All Rights Reserved.
IG7600 Administration Manual Environment The equipment you have purchased must not be disposed of with household waste. You should return these to your distributor if they are to replace or dispose of them in an approved recycling centre. FCC Statement This equipment generates, uses, and can radiate radio frequency energy and, if not installed and used in accordance with the instructions in this manual, may cause interference to radio communications.
IG7600 Administration Manual WARNING! 1. Read these installation instructions carefully before connecting the equipment to its power adapter. 2. To reduce the risk of electric shock, do not remove the cover from the equipment or attempt to dismantle it. Opening or removing covers may expose you to dangerous voltage levels. Equally, incorrect reassembly could cause electric shock on re-use of the appliance. 3. Do not expose the equipment to fire, direct sunlight or excessive heat. 4.
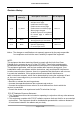
IG7600 Administration Manual Revision History Version 0.1.2 Primary Author(s) Icy, Ethan Description of Version 1 2 3 4 5 6 7 0.1.3 0.1.4 Ethan Ethan 1 1 2 3 Add IPCamera page. Add Aps Server page. Update NAT Traversal page. Update Access Control page. Update Restore to default page. Wizard page changed. All Web UI pictures are updated for wizard page is added to main.html. Modify based on Tommy/Leo/Jerrys’ comments. Modify figures to better one. Optimize typesetting. Fix some input errors.
IG7600 Administration Manual Table Of Contents 1. 2. 3. 4. Introduction ...................................................................................................................................................... 8 Getting to Know the IG7600 ........................................................................................................................ 10 2.1 Front Panel......................................................................................................................
IG7600 Administration Manual 5. 6. 4.14. Caller Blocking ............................................................................................................................ 17 4.15. CO Flash....................................................................................................................................... 17 4.16. Conference (3-way)...................................................................................................................... 17 4.17. COS Following......
IG7600 Administration Manual 6.5.3 MAC Filter...................................................................................................................................... 17 6.5.4 Wireless Bridge............................................................................................................................... 17 6.5.5 Advanced ........................................................................................................................................ 17 6.5.6 Station Info ..
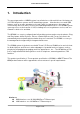
IG7600 Administration Manual 1. Introduction Tecom next generation of SOHO system is an all-wireless solution which has rich feature set of IP PBX telephone systems and IP networking systems. It has business essential PBX features such as an auto-attendant, voice mail, multi- line appearances, three way call conferencing, intercom, music on hold, call-forwarding and much more.
IG7600 Administration Manual CO Interface: 4 FXO (Loop Start, for PSTN) Analog Device Interface: 1 FXS (for analog Telephone or FAX) Built-in 802.
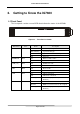
IG7600 Administration Manual 2. Getting to Know the IG7600 2.1 Front Panel The front panel contains several LEDs that indicate the status of the IG7600. Figure 2-1.
IG7600 Administration Manual 2.2 Rear Panel The rear panel contains the ports for the IG7600's data and power connections. Figure 2-2. Rear Panel of IG7600 Label WAN LAN Line (1-4) TEL Power Function RJ-45 connector: Connects the device to your cable modem, or to your ADSL Modem. It’s to connect to the remote network. RJ-45 connector: Connects the device to your PC's Ethernet port, or to the uplink port on your LAN's hub. RJ-11 connector: Connects the device to your PSTN lines.
IG7600 Administration Manual 3. IG7600 Voice General Features 3.1. 3-Way Conference IG7600 supports 3-way conference. Conference allows multiple speakers to participate in a joint telephone conversation. Each participant in a conference can speak and hear the other participants. IG7600 supports one conference room with at most 3 participants. The voice is mixed on IG7600. 3.2.
IG7600 Administration Manual Working, Holiday, and Temporary. In Working Service mode, play the welcome greeting messages depending on the system service time: Day, Night, Noon, and Holiday. Route the call to the appropriate destination (phone/virtual extension, UCD group, operator, single digit) with the dialing digit(s). Leave a message to a particular mailbox. Make an outside call via another trunkline (PSTN or SIP-Trunk). Enter Voicemail box.
IG7600 Administration Manual Enter voicemail through another phone extension • Management Menu Change the Greeting Mode: Working, Holiday, and Temporary. Record the Greeting Messages Record the process Messages Voice Messages Provide two languages service for the all voice files. Support G711-ulaw, G711-alaw, G729 three voice files. Administrators can record the all voice messages by themselves. Administrators can update, backup or delete the all voice messages from/to the PC.
IG7600 Administration Manual welcome message, these calls will be stored into Operator Queue. The Operator is First-In-First-Out to service these calls. For the incoming trunk calls at the waiting time, the calling party will be on Music-On-Hold state. A secondary (alternate) operator position may be designated for common sharing of incoming operator calls during peak traffic period. If operator doesn’t answer the operator call in Operator Reroute Time, the call is forwarded to Secondary Operator.
IG7600 Administration Manual A maximum 40 entries can be configured in the table. They are divided into Allowed Table or Denied Table based on “Table Type” setting of the entries. It follows “Priority” (“Allowed” / “Denied”) setting for the target phone number in the check. If it checks Denied Table first, the phone number will be rejected if it passes the Denied Table and it doesn’t pass the Allowed Table.
IG7600 Administration Manual - after doing “Del”. Destination defines the outbound call interface trunk 3.12. Caller ID Detection/Generation IG7600 provides the ability to detect the calling party identification provided by CO via PSTN lines or by Uplink Server via IP trunks. This data when received by the telephone carrier will be displayed on all ringing IP phones. IG7600 also provide Caller ID Generation to the Caller ID equipped Single Line Telephone. 3.13.
IG7600 Administration Manual - Display Name: used as the Caller Name when the “Destination” user makes the outgoing call. Trunk: the applied trunk(s) of this DID entry. If it’s “All”, this entry will be applied for the all IP Trunks. 3.17. Direct Inward System Access (DISA) The feature allows you to remotely access IG7600 lines to make the outside calls. The current PSTN/IP lines are all DISA lines.
IG7600 Administration Manual • • • • SIP Proxy, SIP Outbound Proxy, Registrar, and Outbound Registrar Auto Registration when Power-on or period Session Timer support Support IP address, domain name, user name, display name for SIP URL. 3.23. Message Waiting Indication (MWI) It’s a Voice Mail feature. When somebody leaves messages, the router will inform the phones, and phones’ LCD will display new voice mails information, and its lamp will flash accordingly. 3.24.
IG7600 Administration Manual 3.28. Service Mode IG7600 provide Day and Night settings for each weekday in service mode page. It will be applied in the following function: - Answering Position: Trunk incoming call may be forwarded to different extensions according to the settings. - Class of Service (COS): Phone extension may be assigned to have the different COS in the different time. - AA Greeting message in Working mode. 3.29.
IG7600 Administration Manual 3.33. UCD (Uniform Call Distribution) Group (or Hunt Group) IG7600 supports 4 UCD Groups. Each UCD Group can have up to 17 members. There are three kinds of UCD Group mode – All Ring, Linear, and Distributed. For All Ring mode, incoming Trunk calls ring all member extensions simultaneously. For Linear mode, incoming call is put into a queue and then distributed from the first extension. For Distributed mode, it is the same as Linear but selection of an extension is uniformed.
IG7600 Administration Manual 4. IG7600 Voice Extension Features IG7600 follows SIP standard to serve SIP phones. Basically, telephone features that meets SIP standard can be applied in IG7600. Smart Phone (IP305x) and IP20xx phone (IP2032/IP2061/IP2062) support many phone features. But for adding some traditional KTS features that are not defined definitely in SIP protocol, some specified information are transmitted between IG7600 and IP20xx/IP305x Phones.
IG7600 Administration Manual Page (All/Group) - Paged Page Answer Page Allow / Deny Phone Book Phone Lock/Unlock Plug and Play Reminder Tone Service Mode Switching Transfer Web Management Volume Control Yes Yes Yes Yes Yes Yes Yes Yes Yes Yes Yes No No No No Yes Yes Yes Yes Yes No Depends No No No Yes Yes Yes No ? Yes No Yes No No No Depends No No Depends No Depends Depends Depends NOTE: the word “Depends” means that the features depend on whether the phone provides. 4.1.
IG7600 Administration Manual 4.7. Call Fork IG7600 supports to ring another extension or an outside destination via IP Trunk simultaneously when the extension gets an incoming call. When the call is answered by one of the both parties, the call at the other party will stop ringing automatically. For the Call Fork destination, IG7600 supports to have the second Fork destination. If the first destination is non-existed or busy, make the forking call to the second Forking Destination.
IG7600 Administration Manual To disable, dial **25 + Ext No + * + Password These Call Forward features can also be set/cancelled in web page of IP20xx. 4.9. Call Hold Trunk and Intercom calls can be placed on hold at any extension. Any PSTN/IP line caller placed on hold will hear the Music On Hold. The held trunk can be resumed by other extensions by pushing Feature Key. For the Single Line phone, it’s to put a call on hold, press flash then hang up (optional).
IG7600 Administration Manual 4.15. CO Flash FXO Line is programmed setting that will determine what flash timing will be presented to the CO/PBX when the extension issues a Hook-Flash command while connected to a FXO Line. 4.16. Conference (3-way) IP20xx can establish a 3-way conference on the phone. IP3054 needs to use IG7600’s resource to establish the 3-way conference call. IG7600 supports 1 set of 3-way conference for IP3054. 4.17.
IG7600 Administration Manual 4.22. Feature Key Programming Feature Keys can be programmed by phone users. A feature key can be programmed for line appearance. To program a Feature Key, dial *70 + (Feature Key number: 01 – 04/28(*)) + (Feature Key Type; 00 - 08) + Number Feature Key Type: 00: Null; Number should be null. 01: Extension; Number can be an Extension or Virtual number. 02: Trunk; Number can be a PSTN, IP Trunk or Trunk Group number. 03: Call-Park; Number can be a Park number.
IG7600 Administration Manual after making a hotline call. Then dial the feature access code. To enable, dial *9* + (any Number) + * + Time //Time: 0~8 seconds; 0: immediately To disable: **9* 4.26. Live Recording (One Touch Record) The Live Recording feature can be activated by using the Live Recording feature key on your telephone. When activated during an active call, the Live Recording feature will record the conversation as a voicemail message.
IG7600 Administration Manual IG7600 provides 3 Paging Group. Each Group can have 16 extensions. 4.31. Paging Allow/Deny You can block one-way pages (internal, group, and all page) over the IP phone speaker by dialing the Page Deny code. To enable Paging Deny, dial *99 To disable Paging Deny, dial **99 4.32. Phone Book The IP20xx/IP305x provides users with a Phone Book, with each entry containing a user programmed Phone Number and User Name.
IG7600 Administration Manual 4.37. Transfer / Recall Transfer is used to deliver calls at your extension to another extension. It means that calls can be routed to IG7600’s system destinations: an extension or an outside phone number. When transferring a trunk call to another extension, if the call is not picked up within 30 seconds, the call will be recalled back to the transferring extension. IP20xx/IP305x Phone supports Blind Transfer, Unscreened Transfer, and Screened Transfer.
IG7600 Administration Manual 5. Quick Installation This Quick Installation helps you to install the product quickly and easily. For detailed instructions on installation, and further setup option, please refer to the configuration chapter. 5.1 Connecting the IG7600 (1) Place IG7600 in an optimum location. (2) Connect the included Category 5 Ethernet network cable to the IG7600’s LAN port or WAN port. Then connect the other end of the network cable to a switch or hub or directly your PC’s Ethernet port.
IG7600 Administration Manual Figure 5-1. Wan Settings (Static IP mode) The Dynamic Host Configuration Protocol (DHCP) is an Internet protocol for automating the configuration of computers that use TCP/IP. DHCP can be used to automatically assign IP addresses, to deliver TCP/IP stack configuration parameters such as the subnet mask and default router, and to provide other configuration information. This page shows the current existing WAN interface in this system is DHCP mode (Figure 5-22). Figure 5-2.
IG7600 Administration Manual Figure 5-3. Wan Settings (PPPoE mode) 5.2.2 LAN Setting This page (Figure 5-44) allows you giving LAN IP and Subnet Mask for LAN interface. You can also select to enable or disable DHCP Server and configure related settings for that mode. Figure 5-4. LAN Settings Copyright 2013 Tecom, Co. LTD.
IG7600 Administration Manual 5.2.3 Wireless Basic The page (Figure 5-55) allows you to configure basic feature of the wireless LAN interface. You can enable or disable the wireless LAN interface, hide the network from active scanning, set the wireless network name (also known as SSID), and restrict the channel set based on country requirement. Figure 5-5. Wireless Basic 5.2.4 Internet Time The page allows you to configure the NTP time server, so the IG7600 can have correct system time.
IG7600 Administration Manual Figure 5-7. Internet Time - Manually 5.2.8 Wizard Setup Finished When you click “Save & Reboot” Button at above page, the wizard setup will save your setting and the wizard setup will be finished. Then the system will reboot as shown below. Figure 5-8. Wizard Setup finished Congratulations! The wizard setup of the IG7600 is complete. For additional details, advanced configuration, or any other questions, refers to the next chapter. Copyright 2013 Tecom, Co. LTD.
IG7600 Administration Manual 6. Configuration 6.1 Setup Connect the IG7600 to PC. The default LAN IP of the IG7600 is 192.168.1.1. The default WAN IP of the IG7600 depends on upper router’s DHCP server. For web login, the default user name is “admin1234”, the default password is “123456”. For telnet login, the name/password is the same as web login. 6.2 Establish the Connection Enter the IP address of IG7600 from the Web Browser.
IG7600 Administration Manual Figure 6-2. Device Info - Summery Copyright 2013 Tecom, Co. LTD.
IG7600 Administration Manual 6.3 Device Info This information reflects the current Status of IG7600 connection. It includes the following topics: Summary Statistics Route ARP DHCP 6.3.1 Summary In the page (Figure 6-2) you can get the information reflects the current software version and connection status. It includes Device Info, Network Info and Date/Time.
IG7600 Administration Manual Figure 6-4. Device Info – Statistics – WAN 6.3.3 Route In this page you can get the IP route information of the device. (Figure 6-5) Figure 6-5. Device Info – Route 6.3.4 ARP This page shows an ARP table which maps IP network addresses to hardware addresses used by data link level protocol. (Figure 6-6) Copyright 2013 Tecom, Co. LTD.
IG7600 Administration Manual Figure 6-6. Device Info – ARP 6.3.5 DHCP This page shows a DHCP Leases table which shows the all used IP addresses under IG7600’s DHCP Server. (Figure 6-7) Figure 6-7. Device Info – DHCP Copyright 2013 Tecom, Co. LTD.
IG7600 Administration Manual 6.4 Advanced Setup Advanced Setup allows system administrator to configure the following topics: WAN LAN NAT - Virtual Servers - Port Triggering - DMZ Host Security - IP Filtering Outgoing Incoming Parental Control - Time Restriction - URL Filter Quality of Service - DSCP Marking - Bandwidth Control Routing - Static Route Dynamic DNS Upnp 6.4.1 WAN There are three modes that you can give WAN IP address to IG7600: Static IP mode, DHCP mode and PPPoE mode.
IG7600 Administration Manual The Dynamic Host Configuration Protocol (DHCP) is an Internet protocol for automating the configuration of computers that use TCP/IP. DHCP can be used to automatically assign IP addresses, to deliver TCP/IP stack configuration parameters such as the subnet mask and default router, and to provide other configuration information. This page shows the setting of WAN interface which is DHCP mode (Figure 6-9). Figure 6-9.
IG7600 Administration Manual 6.4.2 LAN It allows you to set LAN IP and Subnet Mask for LAN interface. A DSP IP address can be configured for FXO/FXS application. You can also enable or disable DHCP Server and configure related settings. The “Static IP Lease List” allows to program 32 entries to have the fixed IP address for the specified devices. If needed, it can also configure the second IP address and Subnet Mask for the LAN interface (Figure 6-11). Figure 6-11. Advanced – LAN 6.4.
IG7600 Administration Manual Figure 6-12. Advanced – NAT – Virtual Servers Figure 6-13. Advanced – NAT – Virtual Servers – Add 6.4.3.2 Port Triggering Some applications require that specific ports in the IG7600's firewall opened for access by the remote parties. Port Triggering dynamically opens up the "Open Ports" in the firewall when an application on the LAN initiates a TCP/UDP connection to a remote party using the "Trigger Ports".
IG7600 Administration Manual Figure 6-14. Advanced – NAT – Port Triggering Figure 6-15. Advanced – NAT – Port Triggering – Add 6.4.3.3 DMZ Host IG7600 will forward IP packets that do not belong to any of the applications configured in the Virtual Servers table to the DMZ host computer. Enter the computer's IP address and click "Save Settings" to activate the DMZ host. Clear the IP address field and click "Save Settings" to deactivate the DMZ host. (Figure 6-16) Copyright 2013 Tecom, Co. LTD.
IG7600 Administration Manual Figure 6-16. Advanced – NAT – DMZ 6.4.4 Security It supports IP Filtering Setup. It’s separated into two parts: Outgoing and Incoming. 6.4.4.1 IP Filtering - Outgoing It allows the administrator to create a filter rule to identify outgoing IP traffic by specifying a new filter name. At least one condition is needed. All of the specified conditions in this filter rule must be satisfied for the rule to take effect. (Figure 6-17,Figure 6-18) Figure 6-17.
IG7600 Administration Manual Figure 6-18. Advanced – Security – IP Filtering – Outgoing – Add 6.4.4.2 IP Filtering - Incoming It allows the administrator to create a filter rule to identify incoming IP traffic by specifying a new filter name. At least one condition is needed. All of the specified conditions in this filter rule must be satisfied for the rule to take effect.
IG7600 Administration Manual Figure 6-20. Advanced – Security – IP Filtering – Incoming – Add 6.4.5 Parental Control It’s separated into two parts: Time Restriction, and URL Filter. 6.4.5.1 Time Restriction The administrator can add time restriction to a special LAN device connected to IG7600. The “Browser's MAC Address” automatically displays the MAC address of the LAN device where the browser is running.
IG7600 Administration Manual Figure 6-22. Advanced – Parental Control – Time Restriction – Add 6.4.5.1 URL Filter The administrator can add 100 entries maximum to include/exclude the URL address and Port number. Choose “Include” means the user can only connect to the URL that you add. Choose “Exclude” means the user can not connect to the URL that you add. “Include” and “Exclude” are exclusive. The all entries are for the selected type. (Figure 6-23,Figure 6-24). Figure 6-23.
IG7600 Administration Manual Figure 6-24. Advanced – Parental Control – URL Filter – Add 6.4.6 Quality of Service It’s separated into two parts: DSCP Marking, and Bandwidth Control 6.4.6.1 DSCP Marking IP QoS is applied to the traffic from LAN to WAN; the traffic from WAN to LAN will not be applied.(Figure 6-25) If "Enable DSCP Mark” checkbox is selected, choose a default DSCP mark to automatically mark incoming traffic without reference to a particular classifier. Click "Save Settings" button to save it.
IG7600 Administration Manual 6.4.6.2 Bandwidth Control Bandwidth Control allows you to control WAN port's upstream bandwidth according to your settings, and it can ensure the highest priority IP packet traffic throughput. By default, all voice packets have been queued in the highest IP packets, and the others have been queued in the normal IP packets if they have not been set in the traffic class rule. Figure 6-26. Advanced – Quality of Service – Bandwidth Control 6.4.7 Routing 6.4.7.
IG7600 Administration Manual Figure 6-28. Advanced – Route – Static Route – Add 6.4.8 Dynamic DNS The Dynamic DNS service allows you to alias a register domain name to a dynamic IP address. It allows IG7600 to be more easily accessed from various locations on the Internet. Click “Add” or “Remove” to configure Dynamic DNS. (Figure 6-29) Figure 6-29. Advanced – Dynamic DNS Now IG7600 support for three DDNS provider, DynDNS.org and TZO and custom provider.
IG7600 Administration Manual Figure 6-30. Advanced – Dynamic DNS – DynDNS.org Figure 6-31. Advanced – Dynamic DNS – TZO Copyright 2013 Tecom, Co. LTD.
IG7600 Administration Manual Figure 6-32. Advanced – Dynamic DNS – Customer-Provider 6.4.9 Upnp It’s used to enable or disable the universal plug and play function. (Figure 6-33) Figure 6-33. Advanced – Upnp 6.5 Wireless Use the Wireless screen to configure the IG7600 for wireless access. It is separated into 7 parts: Basic - Primary - Additional Copyright 2013 Tecom, Co. LTD.
IG7600 Administration Manual Security MAC Filter Wireless Bridge Advanced Station Info Power Saving The configurable items for each part would be described in the following. 6.5.1 Basic It’s separated into two parts: Primary, and Additional. 6.5.1.1 Primary This page allows you to configure the basic features of the wireless LAN interface.
IG7600 Administration Manual Figure 6-35. Wireless – Basic – Additional Copyright 2013 Tecom, Co. LTD.
IG7600 Administration Manual 6.5.2 Security This page allows you to configure security features of the wireless LAN interface. It allows you to select your Security Mode: Manual and WPS. In WPS mode, it follows the Wi-Fi Protected Setup standard for easy and secure wireless network set up and connection. User can use Push-Button or PIN to configure the connection with IG7600. In Push-Button method, IG7600 and client must press the WPS button to establish connection.
IG7600 Administration Manual Figure 6-37. Wireless – Security – 1 Figure 6-38. Wireless – Security – 2 WEP Encryption: Selecting Disabled disables WEP data encryption. Selecting Enabled enables WEP data encryption and requires that a valid network key be set and selected unless 802.1X is enabled. WEP, short for Wired Equivalent Privacy, is a protocol for wireless LANs or local area networks. This WEP is defined in the 802.11 Standard.
IG7600 Administration Manual physical layer. WEP is designed to make up for the inherent security in wireless transmission as compared to wired transmission. Network Key: Set whether shared key authentication is required to associate. A valid network key must be set and selected if required. 6.5.3 MAC Filter Figure 6-39. Wireless – MAC Filter This page allows users to Add/Remove hosts with the specified MAC addresses that are able or unable to access the wireless network.
IG7600 Administration Manual 6.5.4 Wireless Bridge This page allows you to configure wireless bridge features of the wireless LAN interface. You can select Wireless Bridge (also known as Wireless Distribution System) to connect to other wireless bridge device, but the access point functionality will be disabled. Selecting Access Point enables access point functionality. Wireless bridge functionality will still be available and wireless stations will be able to associate to the AP.
IG7600 Administration Manual Control Sideband: Specify if the extension channel should be in the “Upper” or “Lower” sideband. 802.11n Rate: Set the Physical Layer rate. These rates are only applicable when the”802.11n/EWC” is configured as “Auto”. 802.11n Protection: In “Auto” mode, the wireless devices use RTS/CTS to improve 802.11n performance in mixed 802.11g/802.11b networks. Turn protection off to maximize 802.11n throughput under most conditions. Do not disable 802.
IG7600 Administration Manual Figure 6-42. Wireless – Advanced RTS Threshold: This value should remain at its default setting of 2347. The range is 0~2347 bytes. Should you encounter inconsistent data flow, only minor modifications are recommended. If a network packet is smaller than the packet RTS threshold size, the RTS/CTS mechanism will not be enabled. The IAD sends Request of Send (RTS) frames to a particular receiving station and negotiates the sending of a data frame.
IG7600 Administration Manual WMM (Wi-Fi Multimedia): Feature that improves the experience for audio, video and voice applications over a Wi-Fi network. WMM No Acknowledgement: When the “WMM No Acknowledgement" is enabled, the receiver will not acknowledge received packets during wireless packet transmit. It is suitable in the environment where communication quality is good and interference is weak. It can improve transmission efficiency. WMM APSD: WMM Automatic Power Save Delivery.
IG7600 Administration Manual 6.6 Voice Use the Voice screen to configure the IG7600’s voice related parameters.
IG7600 Administration Manual Figure 6-45. Voice – Phone – Phone Extension – 1 Figure 6-46. Voice – Phone – Phone Extension – 2 SIP Authentication: It provides 16 IP phones or Smart phones to register. Phone Number: The phone number is a station number. If it conflicts with the setting in Numbering Plan, it fails to add or make the change. Its value range is limited by Start Extension Number and End Extension Number settings in Numbering Plan page. Password: The user password of this phone.
IG7600 Administration Manual Pickup Group: The field assigns the extension to a specific pickup group. Each extension can be assigned to one pickup group only. Four pickup groups are available. FXS Phone: It shows the FXS phone number. It’s programmed in Numbering Plan. - Display Name: The FXS user’s Calling Name. - Day COS: The FXS’s Class of Service for day mode operation. - Night COS: The FXS’s Class of Service for night mode operation.
IG7600 Administration Manual Figure 6-47. Voice – Phone – Extension Linekey When there are IP phones registered to IG7600, you can configure their linekey setting. In Extension List, press “Configure” to configure linekey of the specified phone. Use Default Settings: Use default IG7600 linekey setting for the IP phone. Figure 6-48. Voice – Phone – Extension Linekey-Configure 6.6.2 Trunk Use the Trunk screen to configure the PSTN/IP Trunk function related parameters.
IG7600 Administration Manual 6.6.2.1 IP Trunk This page allows you to configure the Proxy and Register server of IP Trunks, up to 4 lines of IP Trunk are supported. (Figure 6-49,Figure 6-50) Figure 6-49. Voice – Trunk – IP Trunk – 1 Figure 6-50. Voice – Trunk – IP Trunk – 2 Copyright 2013 Tecom, Co. LTD.
IG7600 Administration Manual Subscriber Information: Phone Number: It’s the assigned phone number from uplink server. Auth ID: The Account ID of registration to uplink server. It’s used for Digest Authentication. Auth Password: The Password of registration to uplink server. It’s used for Digest Authentication. SIP Proxy: The position of uplink SIP proxy server. IP address and domain name are all supported. SIP Proxy Port: The SIP signal port of uplink registrar server.
IG7600 Administration Manual If there is no any dialed number after the setting time, the number will be sent out immediately. Its range is form 2 to 9 seconds. Pause Time: The pause time of alphabet “p” in the process of call dialing Session Timeout: It means the longest communication time for IP trunks, zero means no restriction. RPort: When client is behind a NAT, the rport and received filed can allow SIP proxy to append the public IP address and port of NAT and transfer SIP message correctly.
IG7600 Administration Manual 6.6.2.2 Trunk Group This page allows you to configure the virtual Trunk Group. Up to 4 Trunk Groups are supported. (Figure 6-52,Figure 6-53) Trunk Group & Label Name: This item allows you to assign physical Trunk to virtual Trunk Group. For six PSTN lines and eight IP lines you can choose from Group1 to Group 4. Label Name: This item allows you to configure a specified string as incoming Caller ID name.
IG7600 Administration Manual Figure 6-53. Voice – Trunk – Trunk Group – 2 6.6.2.3 Answering Position Figure 6-54. Voice – Trunk – Answering Positions This page allows you to configure an answering position for each Trunk line's incoming call including PSTN trunk and IP Trunk. You can choose Auto Attendant, Operator, UCD Group or manually configure the target extension phone number on Day/Night basis. (Figure 6-54) Choose Auto Attendant, you can configure an AA Menu number.
IG7600 Administration Manual Choose Operator, the incoming trunk call will be redirected to Operator. 6.6.2.4 Call Routing This page allows you to configure the call routing table. A maximum 40 entries are allowed. Each entry is a routing rule for outgoing call. From/To define the number range, Min/Max define the match length, Del/Insert can change the target number, Destination to define the outbound call interface. (Figure 6-55) Figure 6-55. Voice – Trunk – Call Routing Table – 1 6.6.2.
IG7600 Administration Manual Figure 6-56. Voice – Trunk – Call Restriction If the TrunkAccess value is set to Y, the call will follow the restriction setting only when seizing line and make a call. If the TrunkAccess value is set to N, the call will follow the restriction only when dialing a number directly. If the TrunkAccess value is set to YN, it’s suitable for both operations.
IG7600 Administration Manual Figure 6-57. Voice – Trunk – Emergency Dial 6.6.3 System Use the System screen to configure the System function related parameters. It is separated into five parts: Numbering Plan Service Mode Transmission SMDR UCD Call Log Copyright 2013 Tecom, Co. LTD.
IG7600 Administration Manual 6.6.3.1 Numbering Plan Figure 6-58. Voice – System – Numbering Plan This page allows you to configure extension number range. You can also define some special service numbers in the table. (Figure 6-58) Start extension: It’s the start phone number of system internal extension. All valid extension number can’t be smaller than it. End extension: It’s the end phone number of system internal extension. All valid extension number can’t be greater than it.
IG7600 Administration Manual Figure 6-59. Voice – System – Numbering Plan – Operator Configuration Operator day: It’s the system operator number during day. If dial Operator speed-dial number, this extension will be called during day. Operator Night: It’s the system operator number during night. If dial Operator speed-dial number, this extension will be called during night.