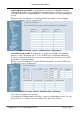
IG7600 Administration Manual Start Paging Group number: 3 paging groups are defined in IG7600. If dialing a Paging Group number, the call will page to predefined internal IP phones. It can also select the Range like All Paging Number. The maximum phones for each paging group are 16. While pressing “Configuration” in “Start Paging Group number”, it shows Paging Group Configuration screen. (Figure 6-60) Figure 6-60.
IG7600 Administration Manual For other items, if “Timer Enable” is YES, the incoming call will be transferred to another UCD Group’s member every “No Answer Time”. If NO, the call will ignore “No Answer Time” and finally reroute to “Reroute Destination” after “Reroute Time”. “Reroute Destination” can be an Auto Attendant Menu, an extension, a virtual extension, or phone extension’s mailbox. “UCD Group Name” is shown on the phone when receiving the UCD Group call.
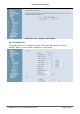
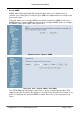
IG7600 Administration Manual Figure 6-63. Voice – System – Service Mode 6.6.3.3 Transmission This page allows you to configure the Audio, FXS, and FXO settings. Click “Save Settings” button to save the new configuration. (Figure 6-64) Copyright 2013 Tecom, Co. LTD.
IG7600 Administration Manual Figure 6-64. Voice – System – Transmission Audio: It is used to set many Audio-related options. It will be applied to the all FXS and PSTN lines. Country: It may be used to determine not only the Caller ID detection/transmission method but also ring/tone cadence/frequency. RTP Packet Size: 10/20/30/40/50/60 ms. Codec G.711 u-law, G.711 a-law, G.726-16, G.726-24, G.726-32, G.726-40, G.729: IG7600 supports different audio priority.
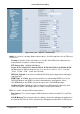
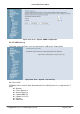
IG7600 Administration Manual There are four choices: NONE, DTMF Before Ring, DTMF After Ring, FSK Before Ring, FSK After Ring. Inter-digit Timeout: Its range is from 2 to 9 seconds. FXS Hotline: Enable/Disable FXS Hotline Number: FXS dialing number in Hotline application. FXS Hotline Delay Ti me: At idle state, FXS lifts the handset or press the Speaker button. A call is built to the Hotline Number either immediately or after the delay time. FXO: It is used to set many central office line options.
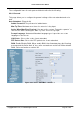
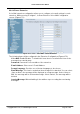
IG7600 Administration Manual 6.6.3.4 SMDR SMDR (Station Message Detail Recording) will take down user’s dialing record. It contains every calling period. From the log of SMDR, the administrator can charge some fees from the user. This page allows you to view the SMDR record and configure the SMDR. Click “View SMDR” button to view the SMDR record, and click “Configure SMDR” button to configure the SMDR. (Figure 6-65,Figure 6-66, Figure 6-67) Figure 6-65. Voice – System – SMDR Figure 6-66.
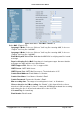
IG7600 Administration Manual Figure 6-67. Voice – System –SMDR Configuration 6.6.3.5 UCD Call Log This page shows the Call Log for incoming call to UCD group. (Figure 6-68) Figure 6-68. Voice – System – UCD Call Log 6.6.4 Voice Mail IG7600 provides a built-in Auto Attendant and Voice Mail System. It is separated into 7 parts: General Phone Extension Virtual Extension Update MOH File Update Voice File Holiday Advanced Copyright 2013 Tecom, Co. LTD.
IG7600 Administration Manual The configurable items for each part would be described in the following. 6.6.4.1 General This page allows you to configure the general settings of the auto attendant and voice mail. Auto Attendant: (Figure 6-69) Admin Password: The password of administrator. Max Try Time: Maximum error times for extension’s key input. Action When Max Error Reached: You can set the system “Forward to operator” or “Disconnect” when reaching the “Max Try Time” errors for key input.
IG7600 Administration Manual Figure 6-70. Voice – Voice Mail – General – 2 Voice Mail: (Figure 6-70), Language 1 Mode: If chooses “Chinese” it will say like “morning 9:00”, if chooses “English” it will say like “9:00 AM”. Language 2 Mode: If chooses “Chinese” it will say like “morning 9:00”, if chooses “English” it will say like “9:00 AM”. Email Notify with Voice Files: Add attached WAV file in notifying email for leaved message. Days for Keeping Voice Mail: Keep days for leaving messages.
IG7600 Administration Manual 6.6.4.2 Phone Extension Voice Mail extension configuration allows you to configure voice mail settings for each extension. While pressing “Configure”, it shows Extension Voice Mail Configuration screen. (Figure 6-71) Figure 6-71. Voice – Voice Mail – Phone Extension The following items will be configured in the Extension Configuration (Figure 6-72): Voice Mail: Enable/Disable. To disable this item, there is not allowed to listen to the message from outside party.
IG7600 Administration Manual Figure 6-72. Voice – Voice Mail – Phone Extension – Extension Configuration 6.6.4.3 Virtual Extension IG7600 provides 50 Virtual Mailboxes. These Virtual Mailboxes can be used by the members not works in the office, or as a secondary mailbox (Figure 6-73). When selecting “Configuration”, it also has an Extension Configuration page to be configured (Figure 6-72) Copyright 2013 Tecom, Co. LTD.
IG7600 Administration Manual Figure 6-73. Voice – Voice Mail – Virtual Extension 6.6.4.4 Update MOH File The Music On Hold (MOH) could be uploaded from the Local PC side. Click the “Browse” to locate the new MOH file in the PC. Then, click “Update File” to process the file upload. NOTE: The device do not allow “stereo” MOH format, please upload a MOH file with “mono” format. (Figure 6-74) Figure 6-74. Voice – Voice Mail – Update MOH File 6.6.4.
IG7600 Administration Manual 6.6.4.6 Holiday This page allows you to configure the holiday or special off-duty days. You can click the buttons under the table to choose pages. (Figure 6-76) Figure 6-76. Voice – Voice Mail – Holiday 6.6.4.7 Advanced This page allows you to browse, upload or download voice files through IG7600’s ftp server. (Figure 6-77) Figure 6-77. Voice – Voice Mail – Advanced 6.6.5 NAT Traversal If IG is put behind a Router, you need to configure this page to enable NAT Traversal.
IG7600 Administration Manual Figure 6-78. Voice – NAT Traversal – 1 Figure 6-79. Voice – NAT Traversal - 2 The following items will be configured in the NAT Traversal page: NAT Traversal Enable: Enable/Disable. IG can work properly if it’s pub behind NAT only when it’s enabled. STUN Server: A STUN server located at Internet. TURN Server: A TURN server located at Internet. Username: Most TURN server needs username/password to authenticate.
IG7600 Administration Manual UPNP Port-Mapping Enable: To enable/disable UPNP client. Router Private Address: If you choose “Auto” UPNP client will detect Router’s private IP address by itself. If you choose “Manual” you should input Router’s private IP address by yourself. Router Public Address: It records Router’s public IP address detected by STUN. External Registration SIP Port: Port that will be opened on Router for SIP port.
IG7600 Administration Manual 6.6.6.1 Remote Maintenance Figure 6-80. Voice – Registered Phone The following items will be configured in the Remote Maintenance page: Remote Maintenance: Enable/Disable. When it’s enabled, IG will write necessary information to maintenance log. Destination Email: If it’s set, maintenance log file will be sent to this Email address automatically if user presses “*64” accordingly.
IG7600 Administration Manual Figure 6-81. Voice – Registered Phone Copyright 2013 Tecom, Co. LTD.
IG7600 Administration Manual 6.7 Management The system administrator can do the following functions to manage the configurations, events, and software update of the IG7600. Settings - Backup - Update - Restore Default System Log TR-069 Client Time Settings - Internet Time - Daylight Saving Time Access Control - Service Port - Services - IP Addresses - Password PTC System Capacity Update Software Reboot 6.7.
IG7600 Administration Manual Figure 6-83. Management – Settings – Update 6.7.1.3 Restore Default You can choose restore Voice Files or Default Settings or Restor All in the drop-down menu. Click “Restore” to restore selected default settings. This would be helpful when the voice files or settings are messed up. After IG7600 returns to factory default settings, the wizard setup is invoked automatically when the administrator accesses to IG7600’s web server. (Figure 6-84) Figure 6-84.
IG7600 Administration Manual Figure 6-85. Management – System Log Figure 6-86. Management –System Log –Configure System Log 6.7.3 TR-069 Client WAN Management Protocol (TR-069) allows an Auto-Configuration Server (ACS) to perform auto-configuration, provision, collection, and diagnostics to this device. Firmware upgrade or vendor configuration file backup can be done remotely on ACS server. Select the desired values and click "Save Settings" to configure the TR-069 client options.
IG7600 Administration Manual Figure 6-87. Management – TR-069 Client 6.7.4 Time Setting This item allows you to configure system’s time and the Daylight Saving Time. 6.7.4.1 Internet Time This page allows you to configure the Internet time setting. You can choose the “Automatically synchronize with internet time servers”. So the IG7600 can synchronize its system time with NTP time server automatically (Figure 6-88).
IG7600 Administration Manual Figure 6-89. Management – Time Setting – Internet Time – Manually 6.7.4.2 Daylight Saving Time This page allows you to configure the Daylight Saving Time (DST) which supports auto adjustment for daylight saving time. Click “Save Settings” button that you can save the new configuration. Click “Cancel Changes” button that you can cancel the changes. (Figure 6-90,Figure 6-91) Figure 6-90. Management – Time Settings – Daylight Saving Time Figure 6-91.
IG7600 Administration Manual Default International DST Rule: Default DST Rule obey international standard rule. Manual DST Rule: Define your own DST Rule. Start Time of DST: The date and time to start daylight saving. If “Weekday” is 0, it means the date to start daylight saving is at exactly the given date. If “Weekday” is not 0, the DST starts on the “Weekday” on or after the given date. End Time of DST: The date and time to end daylight saving.
IG7600 Administration Manual Figure 6-93. Management – Access Control –Services 6.7.5.3 IP Addresses If the Access Control mode is enabled, permits access to local management services from IP addresses contained in the Access Control List. If disabling the mode, it will not validate IP addresses for incoming packets. WAN Only and WAN And LAN in Access Control Interface entry are for you to choose the rule excecuted on which side of your IG. Make sure you can connet to IG if you choose WAN and LAN mode.
IG7600 Administration Manual to run diagnostics. The User can access the IG7600, view configuration settings and statistics, as well as, update the router’s software. Use the password field to enter up to 16 characters. Note: Password cannot contain a space. (Figure 6-95) Figure 6-95. Management – Access Control – Password 6.7.6 PTC IG7600 can connect to a PTS for upgrade IG7600 firmware, IG7600 configuration and IP20xx Phone firmware.
IG7600 Administration Manual Figure 6-97. Management – IP Camera click add to add a new entry Figure 6-98. Management – IP Camera-Add 6.7.8 Update Software The new released software could be upgraded from the Local PC side or remotely. Click the “Browse” to locate the new software image file in the PC. Then, click “Update Software” to process the software update. NOTE: The upgrade process takes about 5 minutes to complete, and your IG7600 will reboot. (Figure 6-99) Copyright 2013 Tecom, Co. LTD.
IG7600 Administration Manual Figure 6-99. Management – Update Software 6.7.9 APNS Certificate APNS Certificate page is for you to update your apns certificate file for IG. you can use either Manual Mode or Auto Mode to update your certificate file. When you use Auto mode ask for the server URL from your Internet service provider. You should update the certificate file before your certification is expired. or your ios device will not get push notifications any more. Figure 6-100.
IG7600 Administration Manual 6.7.10 Reboot Figure 6-101. Management – Save/Reboot Click “Reboot” to reboot the IG7600. The IG7600 would automatically save the configuration before reboot, so that modified settings would take effect after reboot. (Figure 6-101) Copyright 2013 Tecom, Co. LTD.
IG7600 Administration Manual 6.8 Diagnostics This page provides the following information to users: (Figure 6-102) The network connection information on the net. The status of IG7600's PSTN Line. The status of IG7600’s IP Trunk Line. The status of IG7600’s AA Line. The status of IG7600’s FXS.
IG7600 Administration Manual 6.9 Logout Press “Logout”, you can logout the IG7600 web configuration page. Copyright 2013 Tecom, Co. LTD.
IG7600 Administration Manual Appendix 1: Product Summary TCP/IP Protocols IP Protocol (791) ARP (RFC 826) / RARP (RFC 903) ICMP (RFC792) TCP (RFC 793) UDP (RFC 768) SNTP DNS HTTP Telnet IP Address Assignment Static Dynamic Subnet Mask PPPoE Client (RFC 2516) Primary and Secondary DNS DHCP Server (RFC 2131-2132) DHCP Client (RFC 2132) Dynamic DNS Routing RIP v1/v2 Static routing DHCP Server/Relay/Client DNS Relay NAT/NAPT NAT Traversal / Far End NAT Trave
IG7600 Administration Manual Real Time Protocol (RTP ; RFC 1889) MD5 (RFC3261 HTTP) digest authentication G.168 Echo Cancellation Voice Codec: G.711u, G.711a, G726-16, G726-24, G726-32 and G.726-40 (G.729a optional) Support FAX/modem tone detection and auto-fallback to G.711 T.38 Digital Audio Codec: G.711 a-law/µ-law 64Kbps, G.729 SIP Call Offer /Answer: Codec auto capacity exchange Echo Cancellation: G.
IG7600 Administration Manual The status of FXS Language Support English (North America) – default LED Status LED Name POWER WIRELESS LINE (1-6) TEL LAN WAN Color Red/Blue Blue Blue Blue Blue Red/Blue Status Description Red On Firmware updating Blue Flashing System booting up Blue On System initialized and running Off Power off On Wireless LAN is active Off Wireless LAN is idle Off PSTN Line is idle On PSTN Line is active Off Phone is idle On Phone is active On LAN is connecte
IG7600 Administration Manual Appendix 2: Feature Access Codes The Feature Access Codes are applied in IP2032/2061/2062 Phones, IP305x Smart Phones and FXS phone only. It’s to activate/cancel some IG7600 user-specified functions. These Feature Access Codes are used when the phone is at idle state. Direct Call Forward Forward all of the calls without regard to the extension status. (Type: 0 – ICM, 1 – Outside, 2 – Both) To Activate *21 + Type + Ext/VAA/UCD No.
IG7600 Administration Manual (Type: 0 – ICM, 1 – Outside, 2 – Both) To Activate *25 + Type + Ext No + * + Password To Cancel **25 + Ext No + * + Password Call Fork When extension gets an incoming call, the extension gets ringing. It rings another extension or rings an outside destination simultaneously.
IG7600 Administration Manual *621 + Admin. Password To Cancel *622 + Admin. Password Remote Maintenance Simple Save *63 + Admin. Password Remote Maintenance *64 + Action Type [+ Log Level] + * + Admin. Password “Action Type”:1 – Enable ; 2 – Disable ;3 – Save and send the tar ball file through email. “Log Level”: 0 – Error ;1 – Warning ;2 – Info ;3 – Debug Reset Feature Buttons Reset all feature buttons to IG7600’s setting.
IG7600 Administration Manual 1: Day Mode 2: Night Mode 3: Time Mode) Agent Log On/Off It can control the status in an UCD group. To Activate (Log On) *91 To Cancel (Log Off) **91 Phone Lock/Unlock You can use the Lock feature to prevent unauthorized trunk calls from being made from extension.
IG7600 Administration Manual Appendix 3: Auto Attendant and Voicemail System The IG7600 Auto Attendant can greatly enhance business productivity by providing either a full-time automated attendant to handle all incoming system calls or part-time automated attendant to handle overflow traffic. The Voice Mail Module provides up to 16 hours recording time that are shared by all extensions. The system can handle four simultaneous calls Appendix 3.1 Functions Appendix 3.1.
IG7600 Administration Manual phone number. AA will use the extension’s COS (Class Of Service) to check the phone number in Call Restriction Table. Then, the phone number will be dialed out via Call Routing Table. The DISA function is disabled by default. D. DTMF Digit Receiving AA supports to receive DTMF digits by using RFC2833, In-Band DTMF and SIP-INFO. E. Route the Call to the Appropriate Destination When AA answers the call, the caller can dial one or more digits to the destination.
IG7600 Administration Manual be saved 1 - 30 days or infinite. When entering the VM box to hear the leaving messages, it will play the total in the message folder first. If it plays “99”, it means it has 99 or more messages in the folder. When the mailbox has no room to store the new messages, VM will play a warning message, then release the call. E. Email Notification When a new message is left, VM supports to send a notification via email.
IG7600 Administration Manual “4”: forward the message to other mailboxes “5”: listen the previous message “*”: it plays the instruction message (10516.vox) If the VM user dials an unadapted number (“0/6/7/8/9”), it will play the instruction message (10516.vox). H. Forward Messages to Other Mailboxes When listening to the leaving messages, the VM user can press “4” (10516.vox) to transfer the message to other mailboxes. It will ask the user to input the Destination (10501.vox).
IG7600 Administration Manual - Press “2” to select Holiday mode. Press “3” to select Temporary mode. B. Record the Greeting Messages Press “1” or “2” after entering Management Menu (19011.vox). It selects the language type in the recording. Then press “1” ~ “5” to select the Greeting type (“1” is for Day message; “2” is for Night message; “3” is for Lunch message; “4” is for Holiday message; “5” is for Temporary message.). C. Record the process Message Press “3” after entering Management Menu (19011.
IG7600 Administration Manual a. All prompt/greeting files are saved in vox folder in PCMU or PCMA or G729 format. You can record your prompt in wav format first and then convert to the selected format. b. Login IG7600 embedded FTP server: ftp://IG7600_IP address (Or in IG7600-Web, select “Voice” – “Voicemail” – “Advanced”, then press “Browser Voicemail file” button.). c. Save the new prompt to vox folder with the same file number to replace the old prompt.
IG7600 Administration Manual 10206 That extension does not answer, press star (*) to wait a The transferred destination doesn’t answer the moment, for automatic retry. call in 30 seconds. AA provides some choices for the user. 10207 To leave a message, press pound (#). Same as 10205 or 10206, another choice. 10210 You may also dial another extension now, or press zero for Same as 10205 or 10206, another choice the attendant.
IG7600 Administration Manual 10517 10518 10519 10520 10521 10522 10523 10524 10526 10527 10528 To listen to the previous message, press five. To exit and return to the previous menu, press pound. There are no more messages. It’s played if it has played the all messages. To confirm deletion, press star (*). To cancel, press pound (#). First message. It’s played if user order playback previous message when it has played the first message.
IG7600 Administration Manual 19013 To listen to the recording, press 1. It’s for recording voice files. To rerecord it, press 2. To exit and return to the previous menu, press pound (#). 19015 There are no recordings. The voice message is not yet recorded. 19020 To use the day greeting, press one. Used to select the greeting message To use the holiday greeting, press two. To use the temporary greeting, press three.
IG7600 Administration Manual 10712 thirteenth 10713 fourteenth 10714 fifteenth 10715 sixteenth 10716 seventeenth 10717 eighteenth 10718 nineteenth 10719 twentieth 10720 21th 10721 22th 10722 23th 10723 24th 10724 25th 10725 26th 10726 27th 10727 28th 10728 29th 10729 30th 10730 31th 10760 January 10761 February 10762 March 10763 April 10764 May 10765 June 10766 July 10767 August 10768 September 10769 October 10770 November 10771 December Appendi
IG7600 Administration Manual Appendix 3.3 Flowchart Appendix 3.3.
IG7600 Administration Manual Appendix 3.3.1.1 Make an Outside Call 11 No Input number? Yes 10502 Sorry, no such a mailbox number, please try again Not exist No Error Times=3 10501 Please input mailbox number Exist Yes 10104+10306 Please check your number and dial again. Thanks for your using, good bye.
IG7600 Administration Manual Appendix 3.3.2 Subscriber Voicemail Flowchart 2 No Error Times=Max Try Time Yes Yes 10201 Your call is in transferring, No 1B Extension is existed 19073+10210 The extension number that you entered is not installed in this system.
IG7600 Administration Manual Appendix 3.3.2.
IG7600 Administration Manual Appendix 3.3.3 Mailbox Administer Flowchart 3 No No Input number? Not exist Error Times=3 Yes Yes Exist 10104+10306 Please check your number and dial again. Thanks for your using, good bye.
IG7600 Administration Manual Appendix 3.3.3.1 Listening message 31 Leaving messages ? No Yes 10511 + 10512 You have ? messages Playing all voice messages and the recording time in turns.
IG7600 Administration Manual Appendix 3.3.3.2 Delete all Messages Copyright 2013 Tecom, Co. LTD.
IG7600 Administration Manual Appendix 3.3.3.3 Recording Personal Greeting 33 10531 To listen to your greeting, press one To record new greeting, press two To delete the current greeting, press three When finish, press the pound (#) User input 1 No 2 Is personal greeting recorded? 10532 You have no greeting recorded Yes Playing Greeting 10533 Please record greeting after the beep.
IG7600 Administration Manual Appendix 3.3.3.4 Changing Mailbox Password 34 10526 Please input new four digits number password 2 10527+10528 The new password you entered is xxxx To confirm the new input, press one To reenter, press two To cancel and return to the previous menu, press the pound (#) # 1 10529 Your password has been changed 3B Copyright 2013 Tecom, Co. LTD.
IG7600 Administration Manual Appendix 3.3.3.5 Record your name 35 10233 Please record your name after the beep. When finish, press the #. Recording 10534 Your recording is finished 3B Copyright 2013 Tecom, Co. LTD.
IG7600 Administration Manual Appendix 3.3.3.6 Leave a Message to Other Extension(s) Copyright 2013 Tecom, Co. LTD.
IG7600 Administration Manual Appendix 3.3.4 System Administrator’s Voicemail Flowchart 4 19001 Please input the administrator password 10505 The password is incorrect, please try again Yes No Error Times=3 No Is password correct? 4A Yes 10506 The password is incorrect, please check it and try later 19011 To change the greeting mode, press 0 To record the first language greeting, press one To record the second language greeting, press Two Add a Virtual mailbox, press 3.
IG7600 Administration Manual Appendix 3.3.4.1 Change the Greeting Mode Note: At Temporary Greeting mode, it plays Temporary Greeting message. If the file is non-existed, it follows Working mode to play the Greeting messages. Copyright 2013 Tecom, Co. LTD.
IG7600 Administration Manual Appendix 3.3.4.
IG7600 Administration Manual Appendix 3.3.4.6 Recording Process Voice Files 45 19200 P le a s e in p u t fiv e d ig its n u m b e r v o ic e c o d e . T o c a n c e l th e in p u t, p le a s e p re s s th e p o u n d (# ) ‘ #’ ? Yes Is No 4A 19201+10528 2 or # T h e v o ic e c o d e th a t y o u e n te re d is x x x x x T o c o n firm th e n e w in p u t, p re s s o n e . T o re e n te r, p re s s tw o .
IG7600 Administration Manual Appendix 4: APS APS is the remote Management for IG7600. The APS system consists of 2 components: APS and PTC. APS is a Windows application that allows you to manage the system (Firmware and configuration update for IG7600 and firmware update for IP phones registered to the IG7600). PTC is a client software that is embedded in the IG7600. Appendix 4.1 Install APS on Windows APS is a program that can be executed on MS Windows.
IG7600 Administration Manual a. Press Open button to select available firmware of IG7600 on your PC. b. Press Upload button to load available firmware to APS. After the loading is finished, you can see the following window: Copyright 2013 Tecom, Co. LTD.
IG7600 Administration Manual Copyright 2013 Tecom, Co. LTD.
IG7600 Administration Manual Appendix 4.3 Show all IG7600 managed Press Refresh button on the main window as following: All available IG7600 managed will be shown as following: If you click on any one of them, all IP Phones that registered on it will be shown as following: Copyright 2013 Tecom, Co. LTD.
IG7600 Administration Manual a. If you press this new window, the window will be closed. b. If choose one searching type in down list, and put searching keys on text box, then press search button, the devices which meet the keys will be displayed. Copyright 2013 Tecom, Co. LTD.
IG7600 Administration Manual Copyright 2013 Tecom, Co. LTD.
IG7600 Administration Manual Appendix 4.4 Upgrading IG7600 Firmware Select the IG7600 that you want to upgrade. Press Action->IG7600 Firmware Update, then you can choose the firmware to upgrade to this IG7600. After you press Update button, the upgrading procedure begins, and the status of IG7600 will become “waiting” or “loading” before the upgrading procedure finishes. Copyright 2013 Tecom, Co. LTD.
IG7600 Administration Manual Copyright 2013 Tecom, Co. LTD.
IG7600 Administration Manual Appendix 4.5 IG7600 Configure File Update Press Action->IG7600 Configure File Update. You can upgrade more than one IG7600 at one time. Copyright 2013 Tecom, Co. LTD.
IG7600 Administration Manual Appendix 4.6 Managing IP Phone Firmware Press Firmware Manage->IPPhone Firmware Manager Press Open button to choose available IP Phone firmwares on PC and press Upload button to load it to APS. Copyright 2013 Tecom, Co. LTD.
IG7600 Administration Manual Copyright 2013 Tecom, Co. LTD.
IG7600 Administration Manual Appendix 4.7 Upgrading IP Phone Firmware Choose one IP Phone Firmware file and press Update button to load it to IG7600. After the IP Phone firmware is uploaded to IG7600, all IP Phones with that model that register to this IG7600 will be upgraded with this firmware within 30 minutes (IG7600 will notify every IP Phone after a delay with a random time between 0 to 30 minutes). Copyright 2013 Tecom, Co. LTD.
IG7600 Administration Manual Appendix 4.8 Reset IP Phone to Default Press Action->Reset IPPhone to Default. Then all IP Phones that register to this IG7600 will be reset to default. Copyright 2013 Tecom, Co. LTD.
IG7600 Administration Manual Appendix 4.9 Configuration Manager Press Get Cfg File button on the main window, then the configuration file on the specific IG7600 is downloaded to your PC. Press Configuration Manage button, then you can edit this configuration file. After you modify the configuration and save it, you can send it back to this IG7600, then this IG7600 will use this file as its configuration file and reboot itself to let it take effect. Copyright 2013 Tecom, Co. LTD.
IG7600 Administration Manual Copyright 2013 Tecom, Co. LTD.
IG7600 Administration Manual Appendix 4.10 Show Update Log Press Tools->Log A window showing all the log for operations will display. Copyright 2013 Tecom, Co. LTD.
IG7600 Administration Manual Appendix 4.11 About Show APS version info here. Copyright 2013 Tecom, Co. LTD.