DIGITAL LED/LCD TELEVISION WITH DIRECT LED LIGHTING MODEL: LED32CHRDWHBD
Contents Safety Information • About this manual / Safety Information ������������������������������������������������������������������������ 1 • Product disposal ����������������������������������������������������������������������������������������������������������� 1 • Safety precautions ������������������������������������������������������������������������������������������������������� 1 • Handling the LED/LCD screen ����������������������������������������������������������������������������������
Safety Precautions Preface Safety Information 2
Safety Precautions Safety Information 3
Safety Precautions Safety Information 4
Safety Precautions Safety Information (If the TV set is plugged in, a slight current still flows, even if the power button is in the OFF postion).
Safety Precautions Important Information If a television is not positioned in a sufficiently stable location, it can be potentially hazardous due to falling. Many injuries, particularly to children, can be avoided by taking simple precautions such as: • Using cabinets or stands recommended by the manufacturer of the television. • Only using furniture that can safely support the television. • Ensuring the television is not overhanging the edge of the supporting furniture.
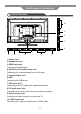
Use Guidance Information Device Overview VOL+ VOLCH+ CHMENU SOURCE POWER 3 1,2 1. Remote Sensor Do not block this sensor or the remote control will not work. 2. Standby Indicator Indicates whether the unit is ON or in STANDBY (OFF) mode. 3. The functions of the buttons are described as bellows: POWER: Press to turn the unit on or off. SOURCE: Press to select the input source of the TV. MENU: Press to display the OSD menu, press again to exit the menu. CH+/-: Press to scan through channels.
Use Guidance Information Device Overview 10 9 8 7 6 1 2 3 4 5 1. Power Cord 2. Headphone Jack 3. HDMI Input Jack Connecting of HDMI signal 4. AV (Video), R/L (Audio) Input Jack Connecting for composite signal input in AV mode. 5. Coaxial Output Jack 6. USB Connecting for USB device. 7. VGA Input Jack Connecting to the PC output jack a personal computer. 8. PC Audio Input Jack Connected to the audio output jack on a personal computer. 9.
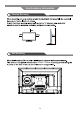
Use Guidance Information Desktop Mounting Wall Mounting 200mm x 100mm 9
Use Guidance Information Connecting an Antenna 10
Use Guidance Information Remote control POWER Turn on/off TV from standby. / AUTO Eject the disc in DVD mode. Auto adjust in PC mode. 0-9 Choose channel directly. DTV Switch to DTV source. ASPECT Change the picture size. AUDIO Change audio language in TV mode. VOL+/Adjust volume. DISPLAY Show info bar. LCD MENU Open the TV OSD menu. INPUT Open the input source menu. PMODE Change the picture mode. SMODE Change the sound mode. mode. SLEEP Set sleep timer to turn off TV. Mute/Unmute the volume.
Use Guidance Information Remote control TV/RADIO Switch the TV or RADIO mode. D.SUB / SUBTITLE Change subtitles in TV and DVD mode. D.MENU / INDEX Skip to Root menu in DVD mode. Index function in teletext mode. TITLE / SIZE Skip to title in DVD mode. Size function in teletext mode. D.DISP / REVEAL Change language / audio tracks in DVD and TV modes. Reveal function in teletext mode. GOTO / SUBPAGE Open goto function in DVD mode. Subpage function in teletext mode. = Start recording to PVR in DTV mode.
Operation First Installation If this is the first time you are turning on the TV and there are no programs in the TV memory, the "Auto Installation" menu will appear on the screen. These are 5 setups as follow: Setup 1 Press ▼/▲ button to select inital brightness setting. Press OK button or GREEN button to enter Setup 2 menu. Press EXIT button to exit Auto Installation menu.
Other Auto Installation Next Page - Setup 2 -New Zealand Move Country: OK Previous Page Move First Australia Enter Exit Exit Ukraine Singapore Other Next Page Operation Australia Exit Auto OK Installation Enter Exit - Setup 2 - New Zealand Installation Singapore Ukraine Country: Previous Page Move Next Page Auto Installation - Setup OK Enter3 - Language: Other Exit Exit Australia German New Zealand English Singapore Previous Page Auto Installation Next Page - Setup 3 - Move OK
Operation Picture Menu Press MENU button on the TV or on the remote control to display the main menu. 1. Press ▲/▼ button to select PICTURE in the main menu. 2. Press ► or OK button and then press ▲/▼ button to select the option that you want to adjust in the PICTURE menu. 3. Press ► or OK button to enter sub-menu and then press ▲/▼ or ◄/► button to adjust. 4. After finishing your adjustment, press the MENU button to return to the previous menu or press the EXIT button to exit the main menu.
Operation Picture Menu Sharpness Press ◄/► button to adjust the sharpness of your TV. The suitable sharpness can make the picture look more clearer. Colour Press ◄/► button to adjust the colour saturation. NOTE: This option is invalid in PC mode, and it will be shown in gray. Tint Press ◄/► button to adjust the tone of colour when system is in NTSC. Colour temperature Press ▼/▲ button to adjust the optimum colour temperature mode, according to your preference (Standard, Cool, Warm).
Operation Sound Menu Press MENU button on the TV or on the remote control to display the main menu. 1. Press ▲/▼ button to select SOUND in the main menu. 2. Press ► or OK button and then press ▲/▼ button to select the option that you want to adjust in the SOUND menu. 3. Press ► or OK button to enter sub-menu and then press ▲/▼ or ◄/► button to adjust. 4. After finishing your adjustment, press the MENU button to return to the previous menu or press the EXIT button to exit the main menu.
Sound Menu Surround Press ▲/▼ button to turn On or Off the surround. AVL Press ▲/▼ button to turn On or Off the AVL (Audio Volume Leveler). SPDIF Press ▲/▼ button to select (Off, PCM, Auto).
Operation Channel Menu Press MENU button on the TV or on the remote control to display the main menu. 1. Press ▲/▼ button to select CHANNEL in the main menu. 2. Press ► or OK button and then press ▲/▼ button to select the option that you want to adjust in the CHANNEL menu. 3. Press ► or OK button to enter sub-menu. 4. After finishing your adjustment, press the MENU button to return to the previous menu or press the EXIT button to exit the main menu.
Operation Channel Menu Message Do you want to delete the selected items? OK Cancel Press ◄/► button to choose OK or Cancel. Press OK button to confirm. TV Successfully updated... Favorite Manager Press ▲/▼/◄/► button to select Program. Channel - Favorite Manager NO. Program Name 0001 Fav1 Fav2 Fav3 √ √ √ √ √ √ √ √ √ √ √ 0002 0003 0004 0005 0006 0007 Move CH+- Favorite1 Page + - OK Favorite2 Exit Fav4 Favorite3 Return Type Favorite4 Menu Press RED button to set to Fav1 list.
Operation Channel Menu Country Press ▲/▼ button to select appropriate country, and press OK or ◄/► button to confirm. Auto Search Channel-Auto Search Picture All ENTER DTV ENTER ATV ENTER Sound Channel Feature Setup Move OK Enter Exit Exit Menu Return Press ▲/▼ button to select Search All, DTV, ATV, then press OK button or ► button to enter. Message Are you sure? OK Cancel Message will appear for confirmation. Press ◄/► button to choose OK or Cancel. Press OK button to Confirm.
Operation Channel Menu When auto search finish, the save successful menu will appear for few seconds. DTV Manual Search Press OK button or ► button to enter.
Operation Channel Menu Search Press ▲/▼ button to select Search, then press OK button or ► button to enter, and then press ◄/► to scan the channel. Search 48.25MHz Adjust Menu Return Fine Tune Press ▲/▼ button to select Fine Tune, then press OK button or ► button to enter. Fine Tune 48.25MHz Adjust Menu Return Press ◄/► button to adjust programe frequency, press MENU button to return to the previous menu.
Operation Feature Menu Press MENU button on the TV or on the remote control to display the main menu. 1. Press ▲/▼ button to select FEATURE in the main menu. 2. Press ► or OK button and then press ▲/▼ button to select the option that you want to adjust in the FEATURE menu. 3. Press ► or OK button to enter sub-menu. 4. After finishing your adjustment, press the MENU button to return to the previous menu or press the EXIT button to exit the main menu.
Operation Feature Menu Parental Guidance Press OK or ► button to enter the sub menu. Then press ▲/▼ button to select Rate (No Block, Block R and above, Block AV and above, Block MA and above, Block M and above, Block PG and above, Block G and above, Block All). Then press OK or ► button to confirm. Change Pin Code Press OK button or ► button to enter, and Change Pin Code menu will appear.
Operation Feature Menu Hotel Lock Press ▲/▼ button to select Hotel Lock, then press ◄/► button to select On or Off. Channel Lock Press ▲/▼ button to select Channel Lock, then press ◄/► button to select On or Off. Picture Lock Press ▲/▼ button to select Picture Lock, then press ◄/► button to select On or Off. Sound Lock Press ▲/▼ button to select Sound Lock, then press ◄/► button to select On or Off. Feature Lock Press ▲/▼ button to select Feature Lock, then press ◄/► button to select On or Off.
Operation Feature Menu Max Volume Press ▲/▼ button to select Max Volume, then press ◄/► button to adjust the value. After set the Max Volume, the volume can't be adjusted above the max volume. Default Volume Press ▲/▼ button to select Default Volume, then press ◄/► button to adjust the value. Clear Lock Press ▲/▼ button to select Clear Lock, then press OK button to reset all settings of hotel menu to default settings.
Operation Feature Menu Preferred Subtitle Press ▲/▼ button to select Preferred Subtitle, press OK button or ► button to enter the sub-menu. Then press ▲/▼ button to select, then press OK button or ► button to confirm. Preferred Audio Press ▲/▼ button to select Preferred Audio, press OK button or ► button to enter the sub-menu. then press ▲/▼ button to select, then press OK button or ► button to confirm.
Operation Feature Menu PVR/Timeshift Press OK button or ► button to enter. Feature - PVR/Timeshift √ 1) √ 2) Partition Select Picture ENTER Auto Timeshift Off Timeshift Buffer Auto Timer ENTER Record List ENTER Recorder Start ENTER Sound Channel Feature Setup Move OK Enter Exit Exit Menu Return Partition Select Press ▲/▼ button to select Partition Select, then press OK button or ► button to enter. Press RED button to Format Partition. Press GREEN button to Set Default Partition.
Operation Feature Menu Timer Press ▲/▼ button to select Timer, then press OK button or ► button to enter. Timer 01/11/2011 06:51:13 CH No. Channel 0803 SZTVM04 .01 Start Duration Date Mode 09:08:00 00:08 15/09/2011 Once 02 03 04 05 06 07 08 09 Del Del All Move Add Exit Edit Exit Menu Return Press ▲/▼ button to select channel. Press RED button to delete selected channel. Message will appear for confirmation. Press ◄/► button to select OK or Cancel. Press OK button to confirm.
Operation Feature Menu Recorder (When the PVR format support) Press OK button or ► button to enter and press ▲/▼ button to select On or Off. Press MENU button to save the settings, press EXIT button to exit. Type Press ▲/▼ button to select Type, then press OK button or ► button to enter and press ▲/▼ button to select DTV or Radio. Channel Press ▲/▼ button to select Channel, then press OK button or ► button to enter and press ▲/▼ button to select channel which you want to add to the timer list.
Operation Feature Menu Record List 0001 SZTVM04 2011/09/15 09:06:00_09:11:59 Delete Menu Return Move OK Enter Press ▲/▼ button to select recorded program from the list. Press RED button to Delete selected program. Message will appear for confirmation. Press ◄/► button to select OK or Cancel. Press OK button to confirm. Press OK button to playback selected program. Record Start Press ▲/▼ button to select Record Start, press OK button or ► button to enter. Message will appear for confirmation.
Operation Setup Menu Press MENU button on the TV or on the remote control to display the main menu. 1. Press ▲/▼ button to select SETUP in the main menu. 2. Press ► or OK button and then press ▲/▼ button to select the option that you want to adjust in the SETUP menu. 3. Press ► or OK button to enter sub-menu. 4. After finishing your adjustment, press the MENU button to return to the previous menu or press the EXIT button to exit the main menu.
Operation Setup Menu AUTO Adjust Press ▲/▼ button to select the AUTO Adjust, press OK button to Auto Adjust. This option can set the above setting well automaticly. H Position Press ▲/▼ button to select the H Position, you can adjust the horizon position of the picture by pressing ◄/► button. V Position Press ▲/▼ button to select the V Position, you can adjust the vertical position of the picture by pressing ◄/► button. PHASE Press ▲/▼ button to select the PHASE, press ◄/► button to adjust the picture.
Operation Setup Menu Password - Else confirmation message will appear: Message Do you want to reset Database to default? OK Cancel Press ◄/► button to choose OK or Cancel. Press OK button to confirm. Resetting message and OK message will appear once reset.
Operation Personal Video Recorder Mode (PVR) Note: You should insert the portable hard drive or USB before you start to record. Recorder When watching DTV programme, you can press=button on the remote control to record the current program. An confirmation menu will apperar for your confirmation. Press ◄/► button to select Yes or No. Press OK button to confirm. RECORNDING If you want to stop RECORDING, press ■ button on you remote control. Then an confirmation menu will appear for your confirmation.
Operation Media Player Mode Press INPUT button and ▲/▼/OK button to select the MEDIA in the Source menu. Press ◄/► buttons to select media type you want to play, then press OK to confirm your selected. Media types: Photo, Music, Movie, e-Book. Press ▲/▼ button to select device. Then press OK button or ► button to enter. Photo player Photo /udska1 /udska2 001/002 Move CH+- Page+/- OK Enter Exit Exit The user can play Photo files via the Photo Player.
Operation Media Player Mode Music player Music /udska1 /udska2 001/002 Move CH+- Page+/- OK Enter Exit Exit The user can play MUSIC files via the Music player ln left interface you can press ▲/▼ and OK button to select your desired music file or press GREEN button to select all music files and press ►; to play. While the Music is displaying, you can press ◄/► button to select function icon in control menu on the screen, then press OK button to excute. Press EXIT button to return to previous menu.
Operation Media Player Mode While the Movie is displaying, you can press OK button to bring up the on screen control menu. Press ◄/► button to select function, then press OK button to excute. Press EXIT button to return to previous menu. Tips: You can also use the ►; / ◄◄ /►► / 9 / : / ■ button on the remote control. e-Book player e-Book /udska1 /udska2 001/002 Move CH+- Page+/- OK Enter Exit Exit The user can play electronic book files via the E-Book.
Operation Media Player Format Type Container AVI MOVIE Type PHOTO Video Decoder Max Resolution MPEG-4 ASP;H.264;DivX;Xvid WMV 9 / VC - 1 1920 x 1080 MPEG-4 SP CIF (352 x 288) QCIF (176 x 144) MJPEG 1280 x 720 MPEG 1/2 MPEG-1 Video MPEG-2 Video 1920 x 1080 MPEG4 MPEG-2 Video;MPEG-4 ASP; H.264;Xvid;MJPEG;H.264 1920 x 1080 WMV WMV 9 / VC-1 1920 x 1080 Real Media RV30 / RV40 1920 x 1080 Flash Sorenson H.263; H.264 1920 x 1080 QuickTime MPEG-4 ASP; H.
Operation DVD Operation BASIC OPERATIONS TURN ON AND OFF THE DVD FUNCTION Turn on the LCD TV and then press the INPUT button repeatedly to select DVD mode. INSERT DISC TO DVD Insert the disc to the disc slot, the player will load the disc automatically. There will have an on screen indication "CLOSE" then "READ". After loading the disc content, it will switch to play mode automatically. If the disc is already placed inside, the disc will be read automatically.
Operation DVD Operation ZOOM Press the ZOOM button to zoom in the picture. There are 6 zoom modes, press the ZOOM button to toggle between different zoom modes in sequent. (zoom2 - zoom3 - zoom4 ) In zoom2-4, you may use the ▲/▼/◄/►buttons to pan the picture for your favorite portion. SUBTITLE SELECTION ( DVD) 1. While a DVD is playing, press the SUBTITLE button to display the current the language setting, as shown in the example. 2.
Operation DVD Operation . About two seconds later, playback continues from the new angle you selected. . If no button is pressed within 10 seconds, playback continues without changing the current angle. NOTE This function can only be used for discs on which scenes shot from multiple angles have been recorded. MP3/JPEG PLAYBACK After loading the MP3/JPEG disc, it will start to scan for the stored MP3/JPEG folders.
Operation DVD Operation FAST FORWARD /FAST REVERSE 1. Press the ◄◄ or ►► button when a disc is playing. Each time the◄◄ or ►► button is pressed, the speed of fast scan changes in the following sequence. FORWARD X 2 ---> FORWARD X 4 ---> FORWARD X 8 ---> FORWARD X 16---> FORWARD X 32 --->PLAY BACKWARD X 2---> BACKWARD X 4---> BACKWARD X 8 ---> BACKWARDX 16---> BACKWARD X 32 --->PLAY 2. Press the ►;button to play when you reach the desired point to resume playback at normal speed. SUBTITLE SELECTION ( DVD) 1.
Operation DVD Operation Customizing the GENERAL SETUP Settings Press the SETUP button to enter setup menu. 1. Use the ◄/► button select GENERAL SETUP option. 2. Use the ▲/▼ button to highlight and individual GENERAL SETUP option. Dolby -- General Setup Page -TV Display OSD Lang Screen Saver Last Memory 16:9 Eng On Off 4:3 Pan Scan 4:3 Letter Box Wide Set TV Display mode TV Display Cycles among TV Type modes:4:3 pan scan, 4:3 letter box, 16:9. OSD Lang You can choose the OSD Language .
Operation DVD Operation Customizing the AUDIO SETUP Settings Press the SETUP button to enter setup menu. 1. Use the ◄/► button select AUDIO SETUP option. 2. Use the ▲/▼ button to highlight and individual AUDIO SETUP option. Dolby -- Audio Setup Page -Speaker Setup Go To Speaker Setup Page Speaker Setup A disc recorded multi channel soundtrack, the output signal will be incorporated to left and right or stereo channel.
Operation DVD Operation Customizing the Dolby Digital SETUP Settings Press the SETUP button to enter setup menu. 1. Use the ◄/► button select Dolby Digital SETUP option. 2. Use the ▲/▼ button to highlight and individual Dolby Digital SETUP option. Dolby -- Dolby Digital Setup -Dynamic Set DRC To Full Dynamic This option is used to set the compression ratio in order to control the sound (Volume) contrast.
Operation DVD Operation Customizing the PREFERENCE SETUP Settings Press the SETUP button to enter setup menu. 1. Use the ◄/► button select PREFERENCE SETUP option. 2. Use the ▲/▼ button to highlight and individual PREFERENCE SETUP option. Dolby -- Prererence Page -TV Type Audio Subtitle Disc Menu Parental Password Default PAL Eng Eng Eng PAL Multi NTSC Set TV Standard TV Type Cycles among TV Type modes: PAL, Multi, NTSC. Audio You can choose the Audio Language.
Operation DVD Operation Disc Care About Disc Terms Title Generally, pictures or music compressed on a DVD are divided into several sections "title". Chapter The smaller section unit of picture or music in a DVD under the title, usually one title is comprised of one or more chapters and each of them is numbered for easy searching, but some discs may not have a recording chapter. Track A segment of picture or music on a CD. Each track is numbered for searching.
Maintenance and Service Troubleshooting 50
Maintenance and Service Specifications Model LED Edge Backlight LCD Panel 32" LEDTV Panel Size 31.5" Brightness 250 Contrast Ratio 1200:1 Max. Resolution Input Connector Output Connector 1366 x 768 VIDEO 1 YPbPr 1 AUDIO(L/R) 1 PC /AUDIO 1 HDMI 3 RF 1 USB 1 HEADPHONE 1 COAX 1 Power Source AC~ 230V Power Consumptior 55W Mounting Bracket (VESA) 200mm x 100mm Screw size M4 Note: This manual is for your reference only.