Notice 12L Inox.qxd 14/11/2001 09:36 Page 1 S.A. SEB 21260 SELONGEY CEDEX, R.C. DIJON B 302 412 226 RÉF.
Notice 12L Inox.
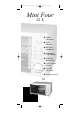
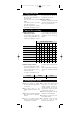
Notice 12L Inox.qxd 12/11/2001 14:46 Page 3 Schéma descriptif F Grille à 3 positions Mini Four 12 L n. n. C 40 m i n. C 15 m i n. n. C 16 m i 60 2 2 C 25 m i C 55 m i 2 2 n. C 20 m i 40 60 75 40 n. 2 60 n.
Notice 12L Inox.qxd 12/11/2001 14:46 Page 4 Utiliser votre four n Surveiller de temps en temps votre cuisson. Mise en route et cuisson Choisir le plat qui convient pour votre préparation. Placer la grille à la hauteur souhaitée. Disposer le plat avec les aliments dans le four et fermer la porte. Régler le thermostat à la température désirée en tournant le bouton. Le four chauffe. n Fin de cuisson A la fin de la cuisson, arrêter votre four en ramenant le bouton thermostat sur la position arrêt (0).
Notice 12L Inox.qxd 12/11/2001 14:46 Page 5 Consignes de sécurité Prenez le temps de lire • Afin d’éviter les chocs électriques, ne plongez pas le fil électrique, la prise de toutes les instructions et courant ou l’appareil dans l’eau ou un reportez-vous au «guide de autre liquide. l’utilisateur».
Notice 12L Inox.qxd 12/11/2001 14:46 Page 6 Descriptive diagram UK 3-position grill Mini Four 12 L n. n. C 40 m i n. C 15 m i n. n. C 16 m i 60 2 2 C 25 m i C 55 m i 2 2 n. C 20 m i 40 60 75 40 n. 2 60 n.
Notice 12L Inox.qxd 12/11/2001 14:46 Page 7 Using your oven n Starting-up and cooking Choose the dish appropriate for your preparation. Place the grill at the required height. Put the dish of food to cook in the oven and close the door. Adjust the thermostat to the right temperature by turning the button. The oven heats up. Watch the cooking from time to time. n End of cooking At the end of cooking time, turn off the oven by turning the thermostat button to 0, and disconnect.
Notice 12L Inox.qxd 12/11/2001 14:46 Page 8 Safety instructions Please take the time to read • In order to avoid electric shocks, keep the electric wire, plug or appliance the instructions thoroughly away from water or any other liquid. and refer to the «User’s Guide». • If certain parts of the product happen • This appliance is in compliance with to ignite, never try to extinguish using the safety rules and conditions in force, water.
Notice 12L Inox.qxd 12/11/2001 14:46 Page 9 Wiring Instructions (for U.K. only) n WARNING : All appliances must be earthed Important : The wires in this lead are coloured in accordance with the following codes : Green and Yellow : Earth Green and Brown yellow or or Brown : Live green Red Blue : Neutral E N n L Fit correct fuse Blue or black Use cable gripper Connect the Green/Yellow wire to the terminal in the plug marked «E» or by the earth symbol or coloured Green or coloured Green and Yellow.
Notice 12L Inox.qxd 12/11/2001 14:46 Page 10 Schematische Darstellung D Rost, 3-fach verstellbar Mini Four 12 L n. n. C 40 m i n. C 15 m i n. n. C 16 m i 60 2 2 C 25 m i C 55 m i 2 2 n. C 20 m i 40 60 75 40 n. 2 60 n.
Notice 12L Inox.qxd 12/11/2001 14:46 Page 11 Gebrauch n Einschalten und Backvorgang Wählen Sie die Schüssel, die sich für Ihre Zubereitung am besten eignet. Rost auf die gewünschte Stufe stellen. Schüssel mit den Nahrungsmitteln in den Ofen schieben und Tür schließen Thermostat durch Drehen des Knopfes auf die gewünschte Temperatur stellen. Der Ofen heizt sich auf. Von Zeit zu Zeit Backvorgang prüfen.
Notice 12L Inox.qxd 12/11/2001 14:46 Page 12 Wichtige Vorsichtsmaßnahmen Nehmen Sie sich die Zeit alle Anweisungen zu lesen und schlagen Sie in Ihrem «Benutzerhandbuch» nach. • Dieses Gerät ist mit den geltenden Sicherheitsvorschriften und -bedingungen sowie mit den folgenden Richtlinien konform : - EWG-Richtlinie 89/336 (elektromagnetische Verträglichkeit) abgeändert durch die EWG-Richtlinien 92/31 und 93/68, - EWG-Richtlinie 73/23 (Niederspannung) abgeändert durch die EWGRichtlinie 93/68.
Notice 12L Inox.qxd 12/11/2001 14:46 Page 13 Schema descrittivo I Griglia a 3 posizioni Mini Four 12 L n. n. C 40 m i n. C 15 m i n. n. C 16 m i 60 2 2 C 25 m i C 55 m i 2 2 n. C 20 m i 40 60 75 40 n. 2 60 n.
Notice 12L Inox.qxd n 12/11/2001 14:46 Page 14 Mettere in funzione regolando il termostato sulla posizione 280°C. Installare il vostro apparecchio Poggiate il vostro forno su un piano di lavoro stabile. Fate in modo che l'aria possa circolare liberamente intorno all'apparecchio. Srotolate completamente il cordone di alimentazione. Collegatelo ad una presa di corrente.
Notice 12L Inox.qxd 12/11/2001 14:46 Page 15 Pulire il vostro forno n n n n Prima di procedere ad una operazione di manutenzione o alla pulizia, togliete la spina e lasciate raffreddare l’apparecchio. Non utilizzate mai acqua sullo sportello fin tanto che è ancora caldo. Pulite lo sportello e le pareti metalliche interne con dell'acqua e detersivo. Asciugate. Per la pulizia, non utilizzate prodotti aggressivi (in particolare a base di soda), né le spugne che graffiano.
Notice 12L Inox.qxd 12/11/2001 14:46 Page 16 Belangrijkste onderdelen NL Grillrooster met 3 hoogtestanden Mini Four 12 L n. n. C 40 m i n. C 15 m i n. n. C 16 m i 60 2 2 C 25 m i C 55 m i 2 2 n. C 20 m i 40 60 75 40 n. 2 60 n.
Notice 12L Inox.qxd 12/11/2001 daadwerkelijk doet. Neem de oven en de accessoires met een vochtig doekje af en droog ze na. n 14:46 Page 17 oven de allereerste keer leeg (zonder rooster) en met gesloten ovendeur gedurende ca. 15 min. aan te laten staan om de «nieuwe» geur te doen verdwijnen. Zet de oven aan door de thermostaatknop op 280°C in te stellen. Het allereerste gebruik Plaats de oven op een stabiel werkvlak waar u hem niet meer hoeft te verplaatsen tijdens het gebruik.
Notice 12L Inox.qxd 12/11/2001 14:46 Page 18 Schoonmaken n Haal vóór elke schoonmaak- en onderhoudsbeurt de stekker uit het stopcontact en laat het apparaat voldoende afkoelen. n Geen (koud) water tegen de glazen ovendeur aan laten komen als deze nog heet is. n Maak de ovendeur en de metalen binnenwanden schoon met warm water en een vloeibaar schoonmaakmiddel. Wrijf alles daarna droog.
Notice 12L Inox.qxd 12/11/2001 14:46 Page 19 Veiligheidsvoorschriften gebruik indien nodig ovenhandschoenen. Lees aandachtig alle voorschriften en raadpleeg de • Om elektrische schokken te vermijden, «gebruiksaanwijzing». het snoer, het stopcontact of het • Dit apparaat voldoet aan de geldende apparaat buiten contact van water of veiligheidsnormen en aan de volgende een andere vloeistof houden.
Notice 12L Inox.qxd 12/11/2001 14:46 Page 20 Descripción del aparato E Rejilla con 3 posiciones Mini Four 12 L n. n. C 40 m i n. C 15 m i n. n. C 16 m i 60 2 2 C 25 m i C 55 m i 2 2 n. C 20 m i 40 60 75 40 n. 2 60 n.
Notice 12L Inox.qxd 12/11/2001 14:46 Page 21 Utilización n Vigile de vez en cuando la cocción. Puesta en marcha y cocción Escoja la fuente o plato adecuada a su preparación. Coloque la rejilla a la altura deseada. Coloque la fuente con los alimentos dentro del horno y cierre la puerta. Ajuste el termostato a la temperatura deseada girando el botón. El horno empieza a calentar. n Fin de la cocción Al finalizar la cocción, vuelva a situar el botón del termostato en posición paro (0).
Notice 12L Inox.qxd 12/11/2001 14:46 Page 22 Normas de seguridad Lea atentamente las instrucciones. tiradores. Utilice guantes si es necesario. • Este aparato cumple con la normativa • Para evitar choques eléctricos, no sumerja el cable eléctrico, la toma de en vigor y condiciones de seguridad, corriente o el aparato en agua u otro así como las siguientes Directivas : líquido.
Notice 12L Inox.qxd 12/11/2001 14:46 Page 23 Esquema descritivo P Grelha com 3 posições Mini Four 12 L n. n. C 40 m i n. C 15 m i n. n. C 16 m i 60 2 2 C 25 m i C 55 m i 2 2 n. C 20 m i 40 60 75 40 n. 2 60 n.
Notice 12L Inox.qxd 12/11/2001 14:46 Page 24 Utilize o seu forno n começa a aquecer. Verifique de vez em quando a sua cozedura. Colocação em funcionamento/cozedura Escolher o recipiente que convém para o seu cozinhado. Coloque a grelha à altura desejada. Coloque o recipiente com os alimentos no forno e feche a porta. Regule o termostato à temperatura desejada girando o botão. O forno n Fim de cozedura No fim da cozedura, desligue o forno pondo o botão termostato na posição parar (0). Desligue.
Notice 12L Inox.qxd 12/11/2001 14:46 Page 25 Instruções de segurança É melhor ler todas as instru- • De forma a evitar choques eléctricos, não mergulhe o fio eléctrico, a ficha ou ções e consultar o seu «guia o aparelho em água ou outro líquido. do utilizador». • Este aparelho está em conformidade • Se algumas partes do aparelho se inflamarem, nunca tente apagar com com as regras e condições de àgua abafar as chama com um pano segurança em vigor assim como com húmido.
Notice 12L Inox.qxd 12/11/2001 14:46 Page 26 Beskrivelse Dan Ovnrist med 3 positioner Mini Four 12 L n. n. 40 C 40 m i n. 60 C 15 m i n. n. C 25 m i C 55 m i C 16 m i 2 2 60 75 40 2 2 n. C 20 m i n. 2 C 70 60 n.
Notice 12L Inox.qxd 12/11/2001 14:46 Page 27 Brug af ovnen n knappen. Ovnen begynder at varme. Overvåg tilberedningen fra tid til anden. Tænde og bruge ovnen Vælg altid fade og bageforme, der passer til den pågældende tilberedning. Sæt ovnristen ind i den ønskede højde i ovnen. Stil fadet med madretten ind i ovnen, og luk ovndøren.
Notice 12L Inox.qxd 12/11/2001 14:46 Page 28 Sikkerhedsregler Brug den nødvendige tid til • Ovnens ledning, stik eller selve apparatet må aldrig neddyppes i vand at læse brugsanvisningen, eller i en anden væske, da det kan og følg dens instruktioner. medføre elektrisk stød. • Dette apparat er fremstillet i overensstemmelse med gældende sikkerheds- • Hvis det skulle ske, at ovnen begynder regler og -forhold samt følgende at brænde, må ilden aldrig slukkes ved direktiver : hjælp af vand.