FR EN KO VI MS ZH TH
FR DESCRIPTION DE L’APPAREIL A B C Bloc moteur Sélecteur de vitesse Ensemble blender : - c1 Bloc lames - c2 Joint d’étanchéité - c3 Bol blender gradué - c4 Couvercle - c5 Bouchon doseur D Moulin à fines herbes (*accessoire selon modèle) E - d1 Joint d’étanchéité - d2 Bloc lames fines herbes Moulin à épices (*accessoire selon modèle) F - e1 Joint d’étanchéité - e2 Bloc lames épices Bol moulin à fines herbes et moulin à épices Les accessoires contenus dans le modèle que vous venez d’acheter, sont rep
• Les lames sont très coupantes : manipulez-les avec précaution pour ne pas vous blesser. • N’utilisez jamais le blender ou ses accessoires sans ingrédients et ne versez jamais de liquides bouillants dans le bol. • Utilisez toujours le bol blender avec son couvercle (c4). • Versez toujours les ingrédients liquides en premier dans le bol avant d’ajouter des ingrédients solides, sans dépasser le niveau maximal.
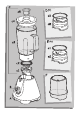
• Placez l’ensemble (c1+c2) sur le fond du bol (c3). Verrouillez-le en tournant le bloc lames d’un quart de tour dans le sens inverse des aiguilles d’une montre. (Fig.2) • Introduisez les ingrédients dans le bol assemblé sans dépasser le niveau maximal indiqué : * 1,25L pour les mélanges épais * 1L pour les préparations liquides • Verrouillez le couvercle (c4) sur le bol Placez le bouchon doseur (c5) dans son logement situé sur le couvercle. • Placez l’ensemble bol blender (C) sur le bloc moteur (A).
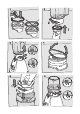
5- Branchez l’appareil et tournez le sélecteur de vitesses (B) sur la position désirée ou donnez quelques impulsions vers «pulse».Tenir le bol (F) pendant le fonctionnement. Pour arrêter l’appareil, ramenez le sélecteur de vitesses (B) sur la position “0”. 6- Déverrouillez l’accessoire en le tournant d’un quart de tour dans le sens inverse des aiguilles d’une montre, jusqu’à ce que le cadenas rouge (ouvert) apparaisse. Retirez l'accessoire assemblé (D, E) du bloc moteur.
• Ne plongez jamais le bloc moteur (A) sous l’eau courante. • Pour faciliter le nettoyage, pensez à laver les éléments amovibles à l’eau chaude savonneuse immédiatement après l’utilisation. • Le bol (C) et les accessoires (D, E) peuvent être nettoyés au lave-vaisselle dans le panier supérieur avec le programme «ECO» ou «PEU SALE». • Pour faciliter le nettoyage du bol blender (C), déverrouillez le bloc lames (c1) en le tournant d’un quart de tour dans le sens inverse des aiguilles d’une montre.
Votre blender ne fonctionne toujours pas ? Adressez-vous à un centre service agréé (voir liste dans livret service). Vous pouvez personnaliser votre blender et vous procurer auprès de votre revendeur habituel ou d’un centre agréé les accessoires suivants : Accessoire Moulin fines herbes (D), l’accessoire Moulin à épices (E), ou un bol blender (C) supplémentaire. RECYCLAGE • Elimination des matériaux d’emballage et de l’appareil.
EN DESCRIPTION OF THE APPLIANCE A B C Motor unit Speed selector Blender unit: - c1 Blade unit - c2 Gasket - c3 Graduated blender jug - c4 Lid - c5 Measuring cup D Herb chopper (*accessory depending on model) E - d1 Gasket - d2 Herb chopper blade unit Spice grinder (*accessory depending on model) F - e1 Gasket - e2 Spice blade unit Herb chopper and Spice grinder bowl The accessories contained in the model you have bought are represented on the label on the top of the packaging.
• Always pour the liquid ingredients into the jug first, before adding the solid ingredients, without exceeding the maximum level. • Never place your fingers or any other object in the blender when the appliance is running. • Do not use the bowls as containers for freezing, cooking or sterilisation. • Do not use the blender for more than 3 minutes continuously. • Place the blender on a flat, stable, heat-resistant, clean and dry worktop. • Do not let long hair, scarves, ties, etc.
• Introduce the ingredients into the assembled jug without exceeding the maximum level indicated: * 1.25L for thick mixtures * 1L for liquid preparations. • Lock the lid (c4) on the jug. Place the measuring cup (c5) in its recess on the lid. • Place the blender jug assembly (C) on the motor unit (A). The red lock (open is aligned in the slot on the motor unit. (Fig. 3 - position 1) • Then rotate the blender jug (C) through a quarter turn until the green lock (closed) appears. (Fig. 3 position 2).
(open) appears. Remove the assembled accessory (D, E) from the motor unit. Turn it over on the worktop before unlocking the blade unit (d2, e2) from the bowl (F) in the reverse order of the assembly. The blades are very sharp: handle them with caution to avoid injury. You can then collect the preparation in the bowl. * The colour of the bowl may change after blending certain very hard ingredients: (cloves, cinnamon, etc.). Quantities (max.
WHAT TO DO IF YOUR APPLIANCE DOES NOT WORK ? Problems Causes Solutions The plug is not fitted correctly into the socket . Plug the appliance into a socket and switch on. The jug or accessory is not correctly positioned or locked on the motor unit. Check that the jug or accessories are correctly positioned and locked onto the motor unit as shown in the figure in the manual. The product is not placed on a flat, stable, heat-resistant surface. Place the product on a flat surface.
RECYCLING • Disposal of the appliance and its packaging materials. The packaging is comprised exclusively of materials that present no danger for the environment and which may therefore be disposed of in accordance with the recycling measures in force in your area. For disposing of the device itself, please contact the appropriate service of your local authority. • End of life electrical and electronic products: Your appliance is expected to last for many years.
13
14
15
16
17
18
VI 19
20
21
22
23
24
MS PENERANGAN A B C Unit motor Pemilih kelajuan Unit pengisar: - c1 Unit bilah - c2 Gasket - c3 Jug pengisar bersenggat - c4 Tudung - c5 Cawan penyukat D Pencencang herba (*aksesori bergantung pada model) E - d1 Gasket - d2 Unit bilah pengisar Pengisar rempah (*aksesori bergantung pada model) F - e1 Gasket - e2 Unit bilah rempah Pencencang herba dan Mangkuk pengisar rempah Aksesori yang terdapat dalam model akan ditunjukkan pada bahagian atas bungkusan.
• Untuk keselamatan anda, gunakan hanya aksesori dan bahagian ganti yang sepadan dengan perkakas anda, dijual oleh pusat perkhidmatan yang diluluskan. • Bilah sangat tajam: gunakannya dengan berhati-hati untuk mengelakkan kecederaan. • Jangan gunakan pengisar atau aksesorinya tanpa bahan dan jangan tuang cecair yang mendidih ke dalam jug. • Sentiasa gunakan jag pengisar dengan penutup (c4). • Sentiasa tuang bahan cecair ke dalam jug dahulu sebelum menambah bahan pepejal, tanpa melebihi paras maksimum.
• Letakkan pemasangan (c1+c2) pada tapak jug (c3). Kuncinya dengan memutar unit bilah melalui putaran sukuan dalam arah melawan jam. (Rjh. 2). • Masukkan bahan ke dalam jug yang dipasang tanpa melebihi paras maksimum yang ditunjukkan: * 1.25L untuk campuran tebal * 1L untuk persediaan cecair. • Letakkan i penutup (c4) pada jug . Letakkan cawan penyukat (c5) dalam relungnya pada penutup. • Letakkan pemasangan jug pengisar (C) pada unit diselarikan dalam motor (A). Kunci merah (buka slot pada unit motor.
perkakas, putar pemilih kelajuan (B) kembali ke kedudukan “0”. 6- Buka kunci aksesori dengan memutarnya melalui putaran sukuan dalam arah melawan jam, sehingga kunci merah (buka) muncul. Tanggalkan aksesori yang dipasang (D, E) dari unit motor. Putar pada tempat kerja sebelum membuka kunci unit bilah (d2, e2) dari mangkuk (F) dalam susunan terbalik bagi pemasangan. Bilah sangat tajam: gunakannya dengan berhati-hati untuk mengelakkan kecederaan. Kemundian, anda boleh mengambil penyediaan dalam mangkuk.
• Untuk pencucian mudah, pastikan anda membasuh bahagian yang boleh ditanggalkan dalam air dan sedikit cecair pencucian serta-merta selepas menggunakannya. • Jug (C) dan aksesori (D, E) boleh dicuci dalam pencuci pinggan-mangkuk dalam bakul atas dengan program "ECO" atau "LIGHTLY SOILED". • Untuk mencuci jug pengisar (C) dengan mudah, buka kunci unit bilah (c1) dengan memutarnya melalui putaran sukuan dalam arah melawan arah jam.
Pengisar anda masih tidak berfungsi? Hubungi pusat perkhidmatan yang diluluskan (lihat senarai dalam buku kecil perkhidmatan). Anda boleh menyesuaikan pengisar anda dan mendapatkan aksesori lain dari pengedar biasa anda atau dari pusat perkhidmatan yang diluluskan. Aksesori pencencang herba (D), Aksesori pengisar rempah (E), atau jag pengisar tambahan (C). MENGITAR SEMULA • Pembuangan perkakas dan bahan pembungkusannya.
ZH 31
32
33
34
35
36
37
38
39
40
41
42
FR p. 1-6 EN p. 7 - 12 KO p. 13 - 18 VI p. 19 - 24 MS p. 25 - 30 ZH p. 31 - 36 TH p. 37 - 42 Réf.