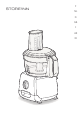
F STORE'INN NL D GB I AR IR
p. 5 - 12 NL p. 13 - 20 D p. 21 - 28 GB p. 29 - 36 I p. 37 - 44 AR p. 45 - 52 IR p.
b1 h1 c h2 d b2 h b e h3 A b3 D C a2 a1 f G l H a E a3 g k j1 j3 i j j2
3 1 2 4 fig.1b fig.1a 2 4 1 3 fig.2a fig.2c fig.2b 5 5 4 4 3 3 1 2 1 1 2 3 2 fig.3 fig.4a fig.4b 1 max 4 5 3 2 1 2 fig.5a fig.5b fig.
6 4 5 3 1 2 fig.7 fig.
Les accessoires, contenus dans le modèle que vous venez d’acheter, sont représentés sur l’étiquette située sur le dessus de l’emballage. Conseils de sécurité • Lisez attentivement le mode d’emploi avant la première utilisation de votre appareil : une utilisation non conforme au mode d’emploi dégagerait le fabricant de toute responsabilité. • Vérifiez que la tension d’alimentation de votre appareil correspond bien à celle de votre installation électrique. • Toute erreur de branchement annule la garantie.
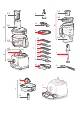
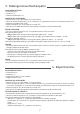
F Description a b Bloc moteur a1 : Sortie lente bloc moteur a2 : Sortie rapide bloc moteur a3 : Sélecteur de vitesses : position Pulse (marche intermittente)-0-1-2 c ACCESSOIRES SELON MODÈLE : d Couteau multifonctions e Disque émulsionneur f Cartouches coupe - légumes A : Râpé fin D : Tranché fin C : Râpé gros G : Reibekuchen/parmesan H : Tranché épais E : Coupe-frites g Support cartouches h Bol mixer h1 : Bouchon doseur h2 : Couvercle h3 : Bol i j k l Ensemble bol hachoir b1 : Poussoir doseur b2 : C
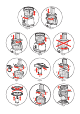
F 3 : Mélanger/mixer/hacher/pétrir ACCESSOIRES UTILISÉS : • Ensemble bol (b). • Entraîneur (c). • Couteau multifonctions (d). MONTAGE DES ACCESSOIRES : • Posez le bol (b3) sur le bloc moteur (a) et verrouillez-le. • Glissez le couteau multifonctions (d) sur l’entraîneur (c), et positionnez le tout sur la sortie bloc moteur (a1). • Mettez les ingrédients dans le bol. • Placez le couvercle (b2) et verrouillez-le sur le bol (b3).
F 5 : Emulsionner / battre / fouetter ACCESSOIRES UTILISÉS : • Ensemble bol (b). • Entraîneur (c). • Disque émulsionneur (e). MONTAGE DES ACCESSOIRES : • Posez le bol (b3) sur le bloc moteur (a) et verrouillez-le. • Glissez dans le bon sens et verrouillez le disque émulsionneur (e) sur l’entraîneur (c), et positionnez le tout sur la sortie bloc moteur (a1). • Mettez les ingrédients dans le bol. • Placez le couvercle (b2) et verrouillez-le sur le bol (b3).
F 7 : Presser les agrumes (selon modèle) ACCESSOIRES UTILISÉS : • Ensemble presse-agrumes (j). • Bol (b3). MONTAGE DES ACCESSOIRES : • Posez le bol (b3) sur le bloc moteur (a) et verrouillez-le. • Glissez l’entraîneur (j2) sur la sortie bloc moteur (a1). • Posez le panier (j3) sur le bol et verrouillez le. • Posez le cône (j1) sur la cheminée du panier (j3). • Pour retirer l’ensemble presse-agrumes : déverrouillez le panier (j3) puis le bol et vous pourrez alors enlever l’ensemble du bloc moteur.
F Rangement • Ne rangez pas votre robot dans un environnement humide. • Utilisez le tiroir de rangement (i) pour stocker le couteau multifonction (d) et jusqu’à 4 cartouches coupelégumes (f). Si votre appareil ne fonctionne pas que faire ? • Si votre appareil ne fonctionne pas, vérifiez : - le branchement de votre appareil. - le verrouillage de chaque accessoire. • Votre appareil ne fonctionne toujours pas? Adressez-vous à un centre service agréé (voir liste dans le livret Service).
F Quelques recettes de base Pâte à pain blanc 375g de farine – 225g d’eau tiède – 1 sachet de levure de boulanger – 5g de sel. Dans le bol du robot muni du couteau multifonction, mettez la farine, le sel, la levure de boulanger. Faites fonctionner à vitesse 2, et dès les premières secondes, versez l’eau tiède par la cheminée du couvercle. Dès que la pâte forme une boule (environ 30s), arrêtez le robot. Laissez lever la pâte dans un endroit chaud, jusqu’à ce que la pâte ait doublé de volume.
F Gâteau aux épices 150g farine – 70g de beurre mou– 70g de sucre – 3 œufs – 50ml de lait – 2 cuillères à café de levure chimique – 1 cuillère à café de cannelle – 1 cuillère à café de gingembre – 1 cuillère à café de muscade râpée – 1 zeste d’orange râpée – 1 pincée de poivre. Dans le bol du robot muni du couteau multifonction, mettez tous les ingrédients. Sélectionnez la vitesse 2 et faites fonctionner pendant 50s. Mettez dans un moule beurré et fariné, et faites cuire 50min à Th 6 (180°C).
De accessoires die bij het model horen dat u zojuist gekocht heeft, worden op het etiket op de bovenzijde van de verpakking weergegeven. NL Veiligheidsadviezen • Lees deze gebruiksaanwijzing zorgvuldig door voordat u het apparaat in gebruik neemt: indien het apparaat niet overeenkomstig de handleiding gebruikt wordt, kan de fabrikant geen enkele aansprakelijkheid aanvaarden. • Controleer of de netspanning, aangegeven op uw apparaat, overeenkomt met de netspanning bij u thuis.
Beschrijving NL a b Motorblo a1 : Langzame uitgang motorblok a2 : Snelle uitgang motorblok a3 : Snelheidsregelaar met Pulsestand (afwisselende werking)-0-1-2 c ACCESSOIRES, AFHANKELIJK VAN HET MODEL: d Sikkelmes e Emulgeerschijf f Accessoires A : Fijn raspen D : Fijn snijden C : Grof raspen G : Fijn raspen/Parmezaanse kaas H : Dik snijden E : Fritessnijder g Accessoirehouder h Blender h1 : Doseerdop h2 : Deksel h3 : Kom i j k l Mengkom b1 : Vulstop/doseerdop b2 : Deksel met vulschacht b3 : Kom Aandr
• Ontgrendel de kom door deze met de klok mee te draaien. • Pas op dit moment kunt u de kom optillen en uit het motorblok verwijderen. 3 : Mengen/mixen/hakken/kneden NL GEBRUIKTE ACCESSOIRES: • Mengkom compleet (b). - Aandrijfas (c). - Sikkelmes (d). MONTAGE VAN DE ACCESSOIRES: • Plaats de mengkom (b3) op het motorblok (a) en vergrendel deze. • Schuif het sikkelmes (d) op de aandrijfas (c) en plaats het geheel op de uitgang van het motorblok (a1). • Doe de ingrediënten in de mengkom.
5 : Emulgeren / kloppen / stijfslaan NL GEBRUIKTE ACCESSOIRES: • Mengkom compleet (b). • Aandrijfas (c). • Emulgeerschijf (e). MONTAGE VAN DE ACCESSOIRES: • Plaats de mengkom (b3) op het motorblok (a) en vergrendel deze. • Schuif de emulgeerschijf (e) in de goede richting op de aandrijfas (c) en plaats het geheel op de uitgang van het motorblok (a1). • Doe de ingrediënten in de mengkom. • Plaats het deksel (b2) en vergrendel het op de kom (b3).
U kunt: • fijn gemixte soepen, lichtgebonden soepen, room, compote, milkshake en cocktails bereiden. • elk soort beslag mengen (pannenkoeken, beignets, clafoutis, far (Bretonse koek)). GEBRUIKTE ACCESSOIRES: • Citruspers (j). • Mengkom (b3). 7 : Citrusvruchten uitpersen (afhankelijk van het model) MONTAGE VAN DE ACCESSOIRES: • Plaats de mengkom (b3) op het motorblok (a) en vergrendel deze. • Schuif de aandrijfas (j2) op de uitgang van het motorblok (a1).
Opbergen NL • Uw keukenmachine niet in een vochtige omgeving opbergen. • Gebruik de opberglade (i) om het sikkelmes (d) en maximaal 4 accessoires (f) op te bergen. Wat te doen indien het apparaat niet functioneert? • Controleer, indien het apparaat niet functioneert: - de aansluiting van uw apparaat. - de vergrendeling van ieder accessoire. Werkt uw apparaat nog steeds niet? Neem contact op met een erkende servicedienst (zie de lijst in het serviceboekje).
Enkele basisrecepten Wit brooddeeg NL 375 g bloem – 225 g lauw water – 1 zakje bakkersgist – 5 g zout. Doe in de mengkom van de keukenmachine, voorzien van het sikkelmes, het meel, het zout en het bakkersgist. Laten werken op stand 2 en tijdens de eerste seconden meteen het lauwe water via de vulschacht van het deksel toevoegen. Schakel de keukenmachine uit zodra het deeg tot een bal gevormd is (ca. 30 sec). Laat het deeg rijzen op een warme plaats, totdat het volume hiervan verdubbeld is.
Kruidkoek NL 150 g meel – 70 g de zachte boter in stukjes – 70 g suiker – 3 eieren – 50 ml melk – 2 theelepels bakpoeder – 1 theelepel kaneel – 1 theelepel gember – 1 theelepel geraspte nootmuskaat – 1 geraspte sinaasappelschil – 1 snufje peper. Doe alle ingrediënten in de mengkom van de keukenmachine, voorzien van het sikkelmes. Selecteer stand 2 en laat de keukenmachine 50 sec werken. Doe het deeg in een beboterde en met meel bestrooide bakvorm en bak het in 50 min gaar op 180°C.
Vielen Dank, dass Sie sich für ein Tefal Gerät entschieden haben. Die zu dem von ihnen erworbenen Modell gehörigen Zubehörteile sind auf dem Etikett auf der Oberseite der Verpackung angegeben. Sicherheitshinweise • Lesen Sie die Gebrauchsanweisung vor der ersten Inbetriebnahme des Geräts aufmerksam durch: bei unsachgemäßem Gebrauch entgegen der Gebrauchsanweisung übernimmt der Hersteller keine Haftung und die Garantie erlischt.
Beschreibung a D b Motorblock a1 : Langsamer Antrieb des Motorblocks a2 : Schneller Antrieb des Motorblocks a3 : Geschwindigkeitswähler: Position Pulse (Intervallbetrieb)-0-1-2 c ZUBEHÖR JE NACH MODELL: d Multifunktionsmesser e Emulgierscheibe f Scheiben-Einsätze A : Fein Raspeln D : Fein Schneiden C : Grob Raspeln G : Reibekuchen-Einsatz H : Dick Schneiden E : Pommes Frites-Einsatz g Scheibenhalter h Mixaufsatz h1 : Stopfer mit Dosierverschluss h2 : Deckel h3 : Mixbecher i j k l Schüssel-Einheit b1
2 : ABNEHMEN DER SCHÜSSEL UND DES DECKELS • Entriegeln Sie den Deckel durch Drehen im Uhrzeigersinn aus dem Griff der Schüssel. Nun kann der Deckel angehoben und abgenommen werden. • Entriegeln Sie die Schüssel durch Drehen im Uhrzeigersinn. • Jetzt erst kann die Schüssel vom Motorblock abgenommen werden. 3 : MISCHEN / MIXEN / HACKEN / KNETEN VERWENDETE ZUBEHÖRTEILE: • Schüssel-Einheit (b). • Mitnehmer (c). • Multifunktionsmesser (d).
- Zum Abnehmen der Schüssel-Deckel-Einheit: - Entriegeln Sie erst den Deckel und dann die Schüssel. D INBETRIEBNAHME UND TIPPS: • Stellen Sie den Geschwindigkeitswählknopf (a3) zum Schneiden auf Position 1 und zum Raspeln auf • Geben Sie die Zutaten in den Einfüllstutzen und schieben Sie sie mit dem Stopfer (b1) weiter. Mit den verschiedenen Scheiben können folgende Funktionen erfüllt werden (je nach Modell): . Grob Raspeln (C) / Fein Raspeln (A): Knollensellerie, Kartoffeln, Karotten, Käse usw. .
(h1) vom Deckel ab und geben die Zutaten durch die Einfüllöffnung bei; achten Sie dabei darauf, den auf dem Mixaufsatz angegebenen Höchststand nicht zu überschreiten. Maximale Betriebsdauer: 3 Min. Tipps: • Wenn sich beim Mischen Zutaten an den Wänden des Mixaufsatzes absetzen, schalten Sie das Gerät aus und stecken Sie es aus. Nehmen Sie die Mixaufsatz-Einheit vom Gehäuse des Geräts ab. Lösen Sie die anhaftenden Zutaten mit einem Spatel und lassen Sie sie in den Mixaufsatz zurückfallen.
Reinigung D • Stecken Sie das Gerät aus. • Es erleichtert die Reinigung, wenn Sie die Zubehörteile gleich nach ihrer Benutzung kurz abspülen. • Waschen Sie die Zubehörteile und trocknen Sie sie ab: sie sind spülmaschinengeeignet. • Giessen Sie heißes Wasser mit etwas Flüssigseife in den Mixaufsatz (h3). - Setzen Sie den Deckel (h2) mit dem Messverschluss (h1) auf. Drücken Sie mehrmals die Pulse Taste. Stecken Sie das Gerät aus. Spülen Sie den Mixaufsatz ab.
C: Grob Raspeln H: Dick Schneiden G: Reibekuchen/Parmesan E: Pommes Frites - Mahlwerk - Mixaufsatz - Stößel - Zitruspresse D Rezepte Weißbrotteig 375g Mehl - 225g lauwarmes Wasser – 1 Päckchen Bäckerhefe – 5g Salz. Geben Sie Mehl, Salz und Bäckerhefe in die mit dem Multifunktionsmesser bestückte Schüssel des Geräts. Setzen Sie das Gerät auf Geschwindigkeitsstufe 2 in Betrieb und geben Sie nach ein paar Sekunden durch den Einfüllstutzen des Deckels das lauwarme Wasser zu.
Rührteig D 150g Mehl - 150g weiche, in Stücke geschnittene Butter - 150g Zucker – 3 ganze Eier – 1/2 Päckchen Backpulver – eine Prise Salz. Geben Sie alle Zutaten in die mit dem Multifunktionsmesser bestückte Schüssel des Geräts. Setzen Sie das Gerät 1 Minute 30 Sekunden lang auf Geschwindigkeitsstufe 2 in Betrieb. Heizen Sie den Ofen auf 180° vor. Geben Sie den Teig in eine Kuchenform und backen Sie sie 10 Minuten.
The accessories contained in the model that you have purchased are shown on the label on the side of the packaging. Safety guidelines • Read carefully the instructions before using your appliance for the first time: the manufacturer may not be held responsible for any use that does not comply with the instructions. • Check that the supply voltage of your appliance is the same as that of your electrical supply. • This product has been designed for domestic use only.
Description a GB b Motor unit a1 : Motor unit slow speed a2 : Motor unit fast speed a3 : Speed selector: Pulse position (intermittent operation) -0-1-2 c ACCESSORIES DEPENDING ON MODEL: d Multi-purpose blade e Emulsifying disk f Vegetable cutter inserts A : Fine grater D : Fine slicer C : Coarse grater G : Pamesan grater H : Thick slicer E : Chip cutter g Insert supports for vegetable cutter inserts h Blender jug h1 : Measuring cap h2 : Lid h3 : Bowl i j k l Chopping bowl assembly b1 : Food pusher w
3 : Mixing/chopping/kneading ACCESSORIES USED: • Bowl assembly (b). • Drive pin (c). • Multi-purpose blade (d). FITTING THE ACCESSORIES: • Fit the bowl (b3) onto the motor unit (a) and lock it in place. • Slide the multi-purpose blade (d) onto the drive pin (c), and position this assembly on the motor unit drive (a1). • Place the ingredients in the bowl. • Fit the lid (b2) and lock it onto the bowl (b3). • To remove the bowl-lid assembly: release the lid then release the bowl.
5 : Emulsifying/beating/whisking ACCESSORIES USED: • Bowl assembly (b). • Drive pin (c). • Emulsifying disk (e). GB FITTING THE ACCESSORIES: • Fit the bowl (b3) onto the motor unit (a) and lock it in place. • Slide and lock the emulsifying disk (e) the right way up onto the drive pin (c), and fit the assembly onto the motor unit drive (a1). • Place the ingredients in the bowl. • Fit the lid (b2) and lock it onto the bowl (b3). • To remove the bowl-lid assembly: release the lid then release the bowl.
7 : Juice fruits (depending on model) ACCESSORIES USED: • Fruit juicer assembly (j). • Bowl (b3). FITTING THE ACCESSORIES: • Fit the bowl (b3) onto the motor unit (a) and lock it in place. • Slide the drive pin (j2) onto the motor unit drive (a1). • Place the basket (j3) onto the bowl and lock it in place. • Fit the cone (j1) onto the basket funnel (j3). • To remove the fruit juicer assembly: release the basket (j3) then the bowl and you can then remove the assembly from the motor unit.
Storage • Do not store your food processor in a damp place. • Use the storage drawer (i) to store the multi-purpose blade (d) and up to 4 vegetable-cutter inserts (f). If your appliance will not operate, what should you do? GB • If your appliance will not operate, check: - that your appliance is plugged in correctly. - that each accessory is locked in place correctly. • If your appliance will still not operate, contact an approved centre service (see list in the Service manual).
A few basic recipes White bread dough 375g white bread making flour – 225ml warm water – 1 sachet of baker’s yeast – 5g salt. In the food processor bowl equipped with the multi-purpose blade, add the flour, salt and yeast. Operate at speed 2, and in the first few seconds, add the warm water through the lid funnel. As soon as the dough forms a ball (after about 30secs), stop the food processor. Leave the dough to rise in a warm place, until it has doubled in volume.
Pound cake 150g plain flour – 150g softened butter – 150g caster sugar – 3 whole eggs – ½ sachet or 1½ tsp baking powder – 1 pinch of salt In the food processor bowl equipped with the multi-purpose blade, add all of the ingredients. Operate at speed 2 for 1 min 30 secs. Preheat the oven to French Electric oven Th.6 (180°). Place the preparation in a cake tin, then cook for about 40 min.
Gli accessori inclusi nel modello che avete acquistato sono raffigurati sull’etichetta situata sulla parte superiore della confezione. Consigli di sicurezza • Prima di utilizzare l’apparecchio, leggete attentamente le istruzioni d’uso: un utilizzo non conforme alle norme d’uso, manleverà il costruttore da qualsiasi responsabilità. • Verificate che la tensione dell’apparecchio corrisponda a quella del vostro impianto elettrico. • Qualsiasi errore di collegamento elettrico annulla il diritto alla garanzia.
Descrizione a I b Blocco motore a1 : Uscita lenta blocco motore a2 : Uscita rapida blocco motore a3 : Selettore di velocità: Pulse (funzionamento intermittente)-0-1-2 c ACCESSORI A SECONDA DEL MODELLO: d Lama multiuso e Disco emulsionatore f Lame tagliaverdura A : Per tritare finemente D : Per affettare finemente C : Per tritare grossolanamente G : Reibekuchen/ Parmigiano H : Per tritare spesso E : Per le patate da friggere g Porta lame h Vaschetta del frullatore h1 : Tappo dosatore h2 : Coperchio h3 :
• Sbloccate il coperchio girandolo in senso orario per liberarlo dal manico del recipiente. Una volta sbloccato, potete sollevarlo e rimuoverlo. • Sbloccate il recipiente girandolo in senso orario. • Una volta sbloccato, potete sollevarlo e rimuoverlo dal blocco motore. 3 : Mescolare/frullare/tritare/impastare ACCESSORI UTILIZZATI: • Set recipiente (b). • Adattatore (c). • Lama multiuso (d). MONTAGGIO DEGLI ACCESSORI: • Montate il recipiente (b3) sul blocco motore (a) e bloccatelo.
Utilizzate le lame (a seconda del modello): . per grattugiare grossolanamente (C) / per grattugiare finemente (A): sedano-rapa, patate, carote, formaggio... . per affettare spesso (H) / per affettare finemente (D): patate, cipolle, cetrioli, barbabietole, mele, carote, cavoli... . affetta-patate (E): patate fritte… . lama reibekuchen/Parmigiano (G): parmigiano, noce di cocco… 5 : Emulsionare/sbattere/ montare I ACCESSORI UTILIZZATI: • Set recipiente (b). • Adattatore (c). • Disco emulsionatore (e).
Avvertenze: • Nel caso alcuni ingredienti restino incollati alle pareti del recipiente durante la preparazione, arrestate l’apparecchio e scollegate la spina. Rimuovete l’impasto dalle pareti e posizionatelo sulla lama aiutandovi con la spatola. Non mettete mai le mani o le dita all’interno del recipiente o vicino alla lama. • Il pestello (l) vi consente di omogeneizzare e pigiare l’impasto (in particolar modo gli impasti più densi) nella vaschetta del frullatore.
Pulizia I • Scollegate l’apparecchio. • Per una pulizia più agevole, sciacquate rapidamente gli accessori dopo l’uso. • Lavate e asciugate gli accessori: possono essere lavati in lavastoviglie. • Versate acqua calda con alcune gocce di sapone liquido all’interno della vaschetta del frullatore (h3). Chiudete il coperchio (h2), munito di tappo dosatore (h1). Fate funzionare per alcuni istanti. Scollegate l’apparecchio. Sciacquate il recipiente.
A: per grattugiare finemente D: per tagliare finemente C: per grattugiare grosso H: per tagliare spesso G: per il parmigiano E: per tagliare le patate da friggere - Tritatutto - Vaschetta del frullatore - Pestello - Spremiagrumi Alcune ricette di base Impasto per pane bianco I 375g di farina – 225g di acqua tiepida – 1 bustina di lievito – 5g di sale. Mettete la farina, il sale e il lievito all’interno del recipiente munito di lama multiuso.