
Operation Manual


6
• Before using for the first time, wash all accessory parts in soapy water (except for the attachment (E): see § Cleaning)
Rinse and dry.
• Place the appliance on a flat, clean and dry surface. Make sure that the selector button (A1) is in "0" position and
plug in your appliance.
• You have several options for starting your appliance:
- Intermittent operation (pulse): Turn the selector button (A1) to the "pulse" position. Using a succession of pulses
can give you better control when preparing certain foods.
- Continuous operation: Turn the selector button (A1) to the desired position from "1" to "max" depending on the
food you are preparing. You can change it as required during preparation.
• To stop the appliance, turn the button (A1) to "0".
Important: The appliance will start only if the cover (A5) and the head (A3) are locked. The appliance will stop
immediately if you unlock the cover (A5) and/or the head (A3) during operation. Lock the cover and/or the
head, turn the control button (A1) to the "0" position, and then start the appliance normally by selecting the
desired speed.
Your appliance comes with a microprocessor that controls and analyses the operating power. If the load becomes
too high, your appliance will stop automatically. To restart your appliance, turn the rotary button (A1) to the "0"
position and remove some of your ingredients. Allow your appliance to cool down for a few minutes. You can then
select the desired speed to complete your preparation.
BEFORE FIRST USE
Thank you for choosing this appliance, which is intended exclusively for the preparation of food and is for indoor,
domestic use only.
The paragraph numbering corresponds to the numbers in the diagrams.
EN
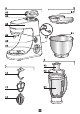
A - Motor unit
A1 Electronic speed selector
A2 Multi-function head release button (A3)
A3 Multi-function head
A4 High speed outlet (blender jug / juice extractor / grinder)
A5 Safety cover
A6 Mixer accessories outlet (kneader, balloon whisk, mixer)
A7 Power cord storage
B - Bowl assembly
B1 Stainless steel bowl
B2 Lid
C - Mixer accessories
C1 Kneader
C2 Mixer
C3 Balloon whisk
D - Blender jug (depending on model)
D1 Jug
D2 Lid
D3 Measuring cup
E - Attachment holder (depending on model)
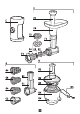
F - Mincer head (depending on model)
F1 Metal body
F2 Feed screw
F3 Blade
F4 Large-hole screen
F5 Small-hole screen
F6 Nut
F7 Pusher
F8 Tray
G - Vegetable slicer (depending on model)
G1 Drum body
G2 Pusher
G3 Slicer drum
G4 Coarse grater drum
G5 Fine grater drum
G6 Potato shredder drum
H - Juice extractor (depending on model)
H1 Pusher
H2 Lid
H3 Rotary filter
H4 Juice collector
H5 Pouring spout
H6 Locking lever
DESCRIPTION