TRT-3493-12 User Guide Rugged Tablet
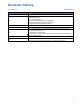
Revision History Current Rev: 5.2 Revision 1.0 2.0 3.0 4.0 5.0 5.1 5.2 Date: 03.16.2022 New Release 1.) New added 1pc Tablet Main Battery shipping along with Docking Station 2.) Win10 OS revision 3.) LTE category update 4.) Barcode Scanner SwiftDecoder supplement 5.) Battery Hot-swappable features supplement 6.) MIL-STD-810G Test Compliance update 1.) Update main battery description 1.) new added battery charger 1.) Revised CPU module no. from N4200E to N4200 (Intel change model no.) 2.
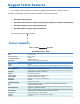
Rugged Tablet Features This chapter briefly describes the features of Rugged Tablet-TRT-3493-12 which has three products repsectively as well as purchased individually as optional peripherals. • TRT-3493-12 Tablet (system) • TRT-3493-12 Docking Station (optional peripheral) (including one standalone Tablet Battery) • TRT-3493-12 Extension Cover (optional peripheral) • TRT-3493-12 Battery Charger (optional peripheral) Summarize the major features below.
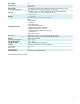
Microphone LED Indicator Main Battery Hot-Swappable Battery I/O Port Keypad Fully Rugged Feature Dimension Weight Operating Temperature Storage Temperature Storage Humidity Security Certification Hand-strap Shoulder-strap Power Adapter Yes Charging LED Power LED 19.532Whr Removable lithium battery with latch lock (2570mAh, 7.6V)* Yes, 2.66Whr back-up battery (700mAh*1, 3.8V, 1S1P) 1 x USB 3.
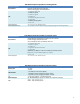
DOCKING STATION Key Features I/O Power Adapter Tablet Main Battery EXTENSION COVER Key Features I/O Power Adapter EXTENSION COVER Battery Slot LED indicator I/O Power Adapter SKU TRT-3493-12 optional peripheral- Docking Station Desktop Cradle with Power Charging. Battery Charging Bay and I/O Expansion 1 x Powered 24V USB 1 x USB 3.0 Type-A 2 x USB 2.0 Type-A 1 x HDMI 1.
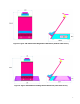
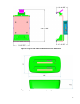
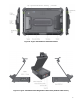
TRT-3493-12 Dimensions and I/O Placement Figure shows the dimension and I/O placement of Tablet, Docking Station and Extension Cover.
Figure2: Teguar TRT-3493-12 Docking Station Dimension (without Cable Cover) Figure3: Teguar TRT-3493-12 Docking Station Dimension (with Cable Cover) 7
Figure4: Teguar TRT-3493-12 Extension Cover Dimension Figure5: Teguar TRT-3493-12 Battery Charger Dimension 8
Figure6: Teguar TRT-3493-12 Tablet Placement Figure7: Teguar TRT-3493-12 Docking Station Placement (without Cable Cover) 9
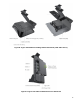
Figure8: Teguar TRT-3493-12 Docking Station Placement (with Cable Cover) Figure9: Teguar TRT-3493-12 Extension Cover Placement 10
Figure10: Teguar TRT-3493-12 Battery chager Placement 11
Quick Start Guide This chapter briefly describes the how to install Shoulder-strap and Cable Cover along with Docking Station as well as Capacitive Function Key on front panel side.
Step3: Make strap go through the hole of Rear Cover and tighten well Step4: Repeat same way as Step2 and Step3 on the other side (as following circle) Step4: Complete 13
Cable Cover Quick Installation Guide Cable Cover installation SOP as follows: Step1: Place Docking Station this way in front of you on the desk Step2: Put down the front side of Docking Station on the desk 14
Step3: Assemble Cable Cover Step4: Assemble Bottom Plate Step5: Screw on Bottom Plate with 4 screws 15
Battery charger Quick Installation Guide Step1: Use TRT-3493-12’s adapter to access the DC jack of the battery charger Step2: Insert Battery to charge 16
Capacitive Function Key Default key function in F1, F2 and F3 are: F1: Rotation Lock F2: Power Key F3: Windows Home Key However, any other requirements of usage would be considered as “support by request” from customized BIOS. Please refer usage list as below Table1-1, Table1-2 and Table1-3 for detail.
Table1-2: Capacitive Function Key Usage List 18
Table1-3: Capacitive Function Key Usage List 19
Managing System Power This chapter briefly describes the guideline on external power supply, battery pack as well as Safety Notice. AC Adapter Two AC adapters are designed for use with Tablet and peripheral respectively. Tablet & Battery Charger : 19V/65W Docking Station & Extension Cover : 24V/180W Connecting the AC adapter to another device could damage the adapter. The AC power cord supplied with Tablet is for use in the country where you purchased it.
Battery Pack The battery pack is hot-swappable design as well as the internal power source for Tablet. It is rechargeable by using the AC adapter. Hot-swappable features Main Battery (2570mAh) supports hot-swappable and back-up battery(700mAh, nonremovable) can provide provisional(30sec to 45sec) power to remain system awake until new main battery(2570mAh) reload.
Initializing the Battery Pack Users need to initialize a new battery pack before using it at the 1st time or when the actual operating time of the battery pack is much less than expected. Initializing would be the prcoess of fully charging, discharging, and then charging. It may take several hours to be completed. Note: All battery pack on tablet system would be default as shutdown mode and AC-ON would be necessary to initialize the battery pack when first out of box.
Solving Battery Problems The battery does not charge (Battery Charge indicator does not light orange). Make sure that the AC adapter is properly connected. Make sure that the battery is not too hot or cold. Allow time for the battery pack to return to room temperature. If the battery doesn't charge after it has been stored in very low temperatures, try disconnecting and reconnecting the AC adapter to solve the problem. Make sure that the battery pack is installed correctly.
Safety Notices About the Battery Caution Texts Concerning Lithium Batteries ENGLISH CAUTION: Danger of explosion if battery is incorrectly replaced. Replace only with the same or equivalent type recommended by the equipment manufacturer. Discard used batteries according to manufacturer's instructions. Français ATTENTION : Danger d'explosion si la pile n'est pas remplacée correctement. Remplacez uniquement par le même type ou un type équivalent recommandé par le fabricant de l'équipement.
This device complies with Part 15 of the FCC Rules. Operation is subject to the following two conditions: (1) This device may not cause harmful interference, and (2) This device must accept any interference received, including interference that may cause undesired operation. BIOS Specification 1.
BIOS Setup option name Main BIOS Information BIOS Vendor BIOS Version Build Date and Time Processor Information Processor Type MRC Version TXE FW Memory Information Total Memory Memory Solt0 Memory Solt1 Memory Speed SATA Devices SATA Port 1 Serial ATA Port 2 Serial ATA Port 3 Serial ATA Port 4 System Date System Time Type Page Header Information string Information string Information string Line separator Header Information string Information string Information string Line separator Header Board Infromati
2.
BIOS Setup option name Advanced LAN 1 LAN 2 LAN 3 MSATA Wireless LAN RF Restore AC Power Loss DeepSx Power Policies OS Selection SCC SD Card Support (D27:F0) HD-Audio Support DVMT Pre-Allocated DVMT Total Gfx Mem Type Page Select item Select item Select item Select item Select item Select item Wake On LAN ► NIC Configuration Link Speed Wake On LAN ► Battery Warning Support Low Battery Warning / / / / / Enabled Enabled Enabled Enabled Enabled Yes Yes Yes Yes Yes Depend Yes [Disabled] / Enabled [Windows
BIOS Setup option name Type Advanced ► NCT6683D Super IO Configuration Super IO Chip ► Serial Port 1 Configuration Serial Port Device Settings Page Serial Port Mode Information string NCT6683D Select item Board Infromation Line separator [Enabled] / Disabled IO=3F8h; IRQ=4 Select item ► Serial Port 2 Configuration Serial Port Device Settings Serial Port Mode ► Serial Port 3 Configuration Serial Port Device Settings ► Serial Port 4 Configuration Serial Port Device Settings ► Hardware Monitor Pc He
3.
BIOS Setup option name Type Security Password Description Page Yes Information string Yes Setup Administrator Password User Password ► Secure Boot System Mode Secure Boot Secure Boot Customization Line separator Input value Input value Line separator [Default] / Select Value xxxx xxxx Board Information Line separator xxxx Select item Disabled / [Enabled] Line separator Select item Line separator Show Yes Yes Yes Yes Yes Yes Yes Yes Yes [Standard] / Customer Yes Yes Help string If On
BIOS Setup option name Type Security ► Key Management Page Factory Key Provision ► Restore Factory Keys ► Reset To Setup Mode ► Export Secure Boot variables Secure Boot variables | Size | Keys | Key Source ► Platform Key(PK) [Default] / Select Value Enables experienced users to modify Secure Boot variables without full authentication. Provision factory default keys on next re-boot only Depend when System in Setup Mode Depend Force System to User Mode.
4.
BIOS Setup option name Type Boot Boot Configuration Setup Prompt Timeout Page Information string Bootup NumLock State FIXED BOOT ORDER Priorities Boot Optoin #1 Boot Optoin #2 Boot Optoin #3 Boot Optoin #2 Boot Optoin #3 Boot Optoin #4 Boot Optoin #5 Boot Optoin #6 Boot Optoin #9 ► UEFI Hard Disk Drive BBS Priorities Help string Yes 3 Yes Select item Line separator Information string Select item Select item Select item Select item Select item Select item Select item Select item Select item Line sepa
5. SAVE & EXIT BIOS Setup option name Save & Exit Save Options Save Changes and Reset Discard Changes and Reset Restore Defaults Type [Default] / Select Value Show Page Information string Dialog Dialog [Yes] / No [Yes] / No Yes Yes Dialog [Yes] / No Yes Help string Yes Reset the system after saving the changes. Reset system setup without saving any changes. Restore/Load Default values for all the setup options.