Hoja de Características Folha de Caracteristicas Feature List Feuille de Caractéristiques Datenblatt DHA-718 DHA-888 142
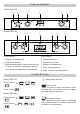
Frontal de Mandos Modelo DHA-718 3 2 1 4 3 4 8 7 Modelo DHA-888 1 2 7 5 Cavidad superior Cavidad inferior 1 Selector de temperaturas. 4 Reloj electrónico. 2 Selector de funciones. 5 Selector de funciones. 3 Piloto de calentamiento. Indica la transmisión de calor al alimento y se apaga al alcanzar la temperatura seleccionada. 6 Selector de temperaturas. 6 7 Piloto calentamiento. 8 Turbo + selector de temperaturas.
Grill Gratinado y asado superficial. Permite el dorado de la capa exterior sin afectar al interior del alimento. Indicado para piezas planas como bistec, costillas, pescado, tostadas. MaxiGrill con Turbina Permite el asado uniforme al mismo tiempo que dora super ficialmente. Ideal para parrilladas. Especial para piezas con gran volumen como aves, caza,... Se recomienda colocar la pieza de carne sobre la parrilla del horno y la bandeja por debajo, para el escurrido de jugos o grasa.
2 Seleccione la duración del cocinado, pulsando los botones “+” o “-”. 3 A continuación el símbolo A se iluminará indicando que el horno se apagará de forma automática. 4 La pantalla del reloj muestra la hora actual y el símbolo está encendido. 5 Seleccione una función y una temperatura de cocinado. 6 Transcurrido el tiempo programado el horno se desconectará, el símbolo se apagará, sonará una señal acústica y el símbolo A empezará a parpadear.
Pulsando el botón MODE puede ver la función programada en la pantalla del reloj. En ese momento puede modificarla pulsando los botones “+” o “-”. Si desea borrar una programación de cocinado automático con su reloj basta con pulsar a la vez los botones “+” y “-”. Para borrar la función Avisador, primero debe seleccionar esta función en la pantalla del reloj. Modelo DHA-888 Puesta en Hora del Reloj Electrónico Al conectar su horno, observará que en el reloj aparece parpadeando la indicación 00:00.
5 Transcurrida la duración del cocinado, el horno se desconectará, sonará una señal acústica y el símbolo parpadeará. 6 Pulse cualquier tecla para detener la señal acústica, encendiéndose el horno de nuevo. 7 Ponga los mandos en posición para apagar el horno. En cualquier momento usted puede visualizar el tiempo restante de cocinado, pulsando las teclas ó hasta que el símbolo parpadee y pulsando luego la tecla . En ese momento usted puede modificar el tiempo seleccionado pulsando las teclas ó .
ESPAÑOL Si usted desea modificar la hora de finalización, pulse las teclas ó hasta que se ilumine el símbolo y pulse la tecla . En ese momento usted puede modificar la hora seleccionada pulsando las teclas ó . A continuación escuchará 2 beep seguidos como confirmación del cambio. Atención En caso de un corte de suministro eléctrico, se borrará toda la programación de su reloj electrónico y aparecerá parpadeando la indicación 00:00 en el reloj. Deberá ponerlo en hora y programarlo de nuevo.
Painel de Comandos Modelo DHA-718 3 2 1 4 3 4 8 7 Modelo DHA-888 1 2 7 5 Forno superior Forno inferior 1 Selector de temperatura. 4 Relógio electrónico. 2 Selector de funções. 5 Selector de funções. 3 Piloto de aquecimento. Indica a transmissão de calor ao alimento e desliga-se quando o forno alcança a temperatura seleccionada. 6 Selector de temperatura. 6 7 Piloto de aquecimento. 8 Turbo + selector de temperatura.
Grill Gratina e assa super ficialmente. Permite alourar a camada exterior sem afectar o interior do alimento. Indicado para pedaços planos como filetes, costelas, peixe, tostas. MaxiGrill com Turbina Permite assar de modo uniforme ao mesmo tempo que aloura superficialmente. Ideal para churrascos. Especial para pedaços com grande volume como aves, caça,... Recomendase colocar a porção de carne sobre a grelha do forno com a bandeja por baixo, para recolher os molhos ou gorduras.
2 Seleccione a duração do cozinhado, premindo os botões “+” ou “-”. 3 A seguir o símbolo A iluminar-se-á a indicar que o forno se desligará de forma automática. 4 O visor do relógio mostra a hora actual e o símbolo está aceso. 5 Seleccione uma função e uma temperatura de cozinhado. 6 Decorrido o tempo programado o forno desligar-se-á, o símbolo apagar-se-á, soará um sinal acústico e o símbolo A começará a piscar. 7 Prima qualquer botão para parar o sinal acústico, ligando-se o forno de novo.
Premindo o botão MODE pode ver a função programada no visor do relógio. Nesse momento pode modificá-la premindo os botões “+” ou “-”. Se deseja apagar uma programação de cozinhado automático com o seu relógio, basta premir ao mesmo tempo os botões “+” e “-”. Para apagar a função Alarme, primeiro deve seleccionar esta função no visor do relógio. Modelo DHA-888 Acerto do Relógio Electrónico Ao ligar o forno, observará que, no relógio, aparece a piscar a indicação 00:00.
5 Decorrida a duração do cozinhado, o forno desligar-se-á, soará um sinal acústico e o símbolo piscará. 6 Prima qualquer tecla para parar o sinal acústico, ligando-se o forno de novo. 7 Coloque os comandos na posição para desligar o forno. seguir ouvirá 2 beeps seguidos, como confirmação da alteração. A qualquer momento, pode visualizar o tempo restante de cozinhado, premindo as teclas ou até o símbolo piscar, e premindo de seguida a tecla .
Pega para a Extracção das Bandejas A pega para e extracção das bandejas utiliza-se quando é necessário deslocar a bandeja para verificar o estado do cozinhado. Ver figuras. Para manusear a bandeja fora do forno é necessário utilizar luvas protectoras. Gancho curto Posição para a bandeja de pastelaria. O gancho curto coloca-se por cima da bandeja. Gancho longo Posição para a bandeja profunda. O gancho longo coloca-se por cima da bandeja.
Control Panel Model DHA-718 3 2 1 4 3 4 8 7 Model DHA-888 1 2 7 5 Top cavity Main cavity 1 Temperature selector. 4 Electronic clock. 2 Function selector. 5 Function selector. 3 Heating indicator light. Indicates that the heat is going to the food and it goes out when the set temperature is reached. 6 Temperature selector. 6 7 Heating indicator light. 8 Fan oven + temperature selector.
Grill For preparing dishes with superficial roasting. It allows the outer layer to be browned without affecting the inside of the food. Ideal for flat food, such as steaks, ribs, fish, toast. MaxiGrill with fan Allows uniform roasting at the same time as surface browning. Ideal for grills. Special for large volume pieces, such as poultry game etc. It is recommended to put the item on a rack with a tray beneath to collect the stock and juices.
2 Select the duration, pressing the “+” or “-” buttons. 3 Subsequently, the symbol A that was flashing will light, indicating that the oven will switch itself off automatically. 4 The display will then show the current time. 5 Select a temperature and cooking function. 6 When the set time has elapsed the oven will disconnect, the symbol will switch off, an acoustic interval signal will sound and the symbol A will begin to flash. 7 Press any button to switch off the acoustic signal, reconnecting the oven.
Setting the Time on the Electronic Clock When the oven is connected to the power supply, the indication 00:00 flash on the display. Press or to set the time on the clock. The clock beeps twice to confirm the selected time. If you wish to modify the time, press or until the current time flash on the screen. Press . Then press or to modify the time. The clock beeps twice to confirm the modification. Manual Operation The oven is ready to be used when the clock has been set.
pressing or . The clock beeps twice to confirm the change. If you wish the remaining time to be displayed until the end of the set period of time, press or until symbol flashes and then press OK and keep it pressed in. Symbol flashes. Keep pressed in again to return to the real time. Setting the End Cooking Time 1 Press Press or . until symbol lights up. 2 Select the time you wish the cooking process to finish at by pressing or .
Tray Handle The tray handle is used when you need to remove the tray to check the food. See figures. To lift the tray out of the oven, you need to use gloves to protect yourself. Cake tray handle position. You must put the short hook over the tray. Long hook Roasting tray handle position. You must put the long hook over the tray.
Panneau Frontal de Commande Modèle DHA-718 3 2 1 4 3 4 8 7 Modèle DHA-888 1 2 7 5 Four superieure Four inferieure 1 Sélecteur de température. 4 Horloge électronique. 2 Sélecteur de fonctions. 5 Sélecteur de fonctions. 3 Voyant lumineux de chauffage. Il indique que la chaleur est transmise à l'aliment et s'éteint quand la température choisie est atteinte. 6 Sélecteur de température. 6 7 Voyant luminaux de chauffage. 8 Turbo + sélecteur de température.
MaxiGrill Permet de gratiner des surfaces plus grandes qu'avec le Grill avec une puissance pour gratiner supérieure, qui permet ainsi de dorer l'aliment de façon plus rapide. Grill Pour gratiner et rôtir superficiellement. Permet de dorer la couche extérieure sans affecter l'intérieur de l'aliment. Indiqué pour les pièces plates telles que les beefsteaks, les côtelettes, les poissons, les toasts. MaxiGrill avec turbine Permet en même temps de rôtir de façon uniforme et de dorer superficiellement.
1 Appuyez sur le bouton MODE jusqu'à ce que l'indication “dur” et la durée de cuisson clignotent à l'écran de l'horloge. Le symbole A clignote. Vous pouvez utiliser cette fonction même si vous êtes déjà en train d’utiliser le four. Pour ce faire, suivez les instructions indiquées à l’exception du point 5. 2 Sélectionnez la durée de cuisson à l’aide du bouton “+” or “-”. Programmation de la Durée et de la Fin de Cuisson Cette fonction permet de programmer la durée et l’heure de fin de cuisson.
Attention Si vous appuyez sur le bouton MODE, vous pouvez afficher la fonction programmée à l’écran de l’horloge. Vous pouvez alors la modifier en appuyant sur le bouton “+” ou “-”. Si vous souhaitez supprimer une programmation de cuisson automatique, il vous suffit d’appuyer à la fois sur les boutons “+” et “-”. Pour effacer la fonction Sonnerie, vous devez d’abord sélectionner cette fonction à l’écran de l’horloge.
Programmation de la Durée de Cuisson 1 Appuyez sur la touche ou jusqu’à ce que le symbole s’allume. Appuyez ensuite sur la touche . 2 Sélectionnez la durée en appuyant sur les touches ou . 3 Vous entendrez alors 2 bips consécutifs, l’heure actuelle sera affichée et le symbole s’allumera, indiquant que votre four s’éteindra de façon automatique. 4 Sélectionnez une fonction et une température de cuisson.
8 Le four restera déconnecté, et les symboles et seront allumés. Votre four est alors programmé. 9 Lorsque l’heure de début de cuisson est atteinte, le four se mettra en marche et la cuisson se fera pendant le temps sélectionné. Attention En cas de coupure de l’alimentation électrique, toute la programmation de votre horloge électronique sera effacée et l’indication 00:00 clignotera dans l’horloge. Vous devrez la mettre à l’heure et la programmer à nouveau.and symbols and flash.
Bedienfeld Modell DHA-718 3 2 1 4 3 4 8 7 Modell DHA-888 1 2 7 5 Übere Herd Untere Herd 1 Temperaturregler. 4 Elektronische Schaltuhr. 2 Funktionswahl. 5 Funktionswahl. 3 Kontrolleuchte Heizen zeigt die Einschaltung der Heizelemente an und verlischt, wenn die eingestellte Temperatur erreicht ist. 6 Temperaturregler. 6 7 Funktionswahl. 8 Turbo + Temperaturregler.
MaxiGrill Grillen auf größerer Ober fläche und mit größerer Leistung als mit dem Grill, hierdurch erfolgt ein schnelleres Bräunen der Speisen. Grill Gratinieren und Anbräunen. Gestattet das Anbräunen der Außenschicht, ohne das Innere der Nahrungsmittel zu beeinflussen. Geeignet für flache Stücke wie Beefsteak, Rippchen, Fisch, Toastbrot. MaxiGrill mit Umluft Gestattet gleichzeitig ein gleichmäßiges Garen und Anbräunen der Oberfläche. Ideal zum Grillen. Besonders für große Stücke wie Geflügel, Wild usw.
Programmierung der Garzeiten Gestattet das Garen während der eingestellten Zeit, anschließend wird der Herd automatisch abgeschaltet. 1 Betätigen Sie die Taste MODE bis auf dem Display der Uhr die Anzeige "dur" und die Garzeit blinkend angezeigt werden. Das Symbol A blinkt jetzt. 2 Stellen Sie die gewünschte Dauer des Garvorgangs mit den Tasten “+” oder “-”ein. 3 Anschließend leuchtet das Symbol A auf und zeigt an, dass der Herd automatisch ausgeschaltet wird.
Achtung Durch Betätigen der Taste MODE können Sie die programmierte Funktion auf dem Display der Uhr anzeigen. Jetzt können Sie diese mit den Tasten “+” oder “-” verändern. Wenn Sie einen programmierten automatischen Garvorgang löschen möchten, betätigen Sie die beiden Tasten “+” und “-” gleichzeitig. Zum Löschen der Funktion des akustischen Signalgebers müssen Sie diesen vorher auf dem Display der Uhr auswählen.
Sie können die Restzeit anzeigen, indem Sie die Taste oder so oft betätigen, bis das Symbol blinkt, anschließend bestätigen Sie mit der Taste . Jetzt können Sie die gewählte Restzeit mit den Tasten oder verändern. Nach Abschluss der Einstellung werden die Änderungen mit zwei kurzen Signaltönen bestätigt. Wenn Sie eine dauernde Anzeige der Restzeit wünschen, indem Sie die Taste oder so oft betätigen, bis das Symbol blinkt und betätigen Sie die Taste etwas länger. Das Symbol blinkt.
11 Betätigen Sie eine beliebige Taste zum Abstellen des Signaltons, hierdurch wird der Herd erneut eingeschaltet. 12 Zum Abschalten des Herds bringen Sie alle Bedienelemente in Stellung . Wenn Sie während des Gar vorgangs die Endzeit verändern möchten, betätigen Sie die Taste oder bis das Symbol aufleuchtet und bestätigen Sie mit der Taste . Jetzt können Sie die gewählte Endzeit mit den Tasten oder verändern. Nach Abschluss der Einstellung werden die Änderungen mit zwei kurzen Signaltönen bestätigt.
Tray Handle The tray handle is used when you need to move the tray to check the cook. See figures. To handle the tray out the oven, you need to use gloves to protect yourselve. Short hook Cake tray handle position. You must put the short hook over the tray. 32 Long hook Roasting tray handle position. You must put the long hook over the tray.
FICHA / FICHA / BROCHURE / FICHE / DATENBLATT Fabricante Fabricante Manufacturer Fabricant Hersteller Modelo Modelo Model Modèle Modell Clase de eficiencia energética, en una escala que abarca de A (más eficiente) a G (menos eficiente). Classe de eficiência energética, numa escala de A (eficiente) a G (ineficiente). Energy efficiency class on a scale of A (more efficient) to G (less efficient). Classement selon son efficacité énergétique sur une échelle allant de A (économe) à G (peu économe).
COUNTRY CITY Australia Austria Belgium Bulgaria Chile China (Pop. Rep.) Victoria Wien Zellik Sofia Santiago de Chile Shanghai COMPANY TEKA AUSTRALIA Pty. Ltd. KÜPPERSBUSCH GesmbH B.V.B.A. KÜPPERSBUSCH S.P.R.L. TEKA BULGARIA EOOD. TEKA CHILE, S.A. TEKA INTERNATIONAL TRADING (Shanghai) Czech Republic Liben TEKA CZ S.R.O. Ecuador Guayaquil TEKA ECUADOR, S.A. France Cergy Pontoise TEKA FRANCE S.A.S. Germany Haiger TEKA KÜCHENTECHNIK GmbH Greece Athens TEKA HELLAS A.E.