3172534-001 EPIFA.
3172534-001 EPIFA.
172534-001 EPIFA.QXD:- 19/4/12 16:47 Página 3 Frontal de Mandos 2 3 ESPAÑOL 1 1 Selector de funciones. 2 Reloj electrónico. 3 Selector de temperaturas. Funciones del Horno Desconexión del horno Convencional Se usa en bizcochos y tartas en los que el calor recibido debe ser uniforme y para que consigan una textura esponjosa. Convencional con Turbina Adecuado para asados y pastelería.
3172534-001 EPIFA.QXD:- 19/4/12 16:47 Página 4 Nota Descongelación Esta función es apropiada para descongelaciones suaves de alimentos. En especial aquellos que son consumidos sin calentar, por ejemplo cremas, pastas, tartas, pasteles, etc. La lámpara permanece encendida en cualquier función de cocinado, excepto en la función de limpieza.
19/4/12 16:47 Página 5 NOTA Su reloj posee el modo de iluminación nocturna, de forma que disminuirá la intensidad de luz de la pantalla entre las 00:00 y las 6:00 horas. • Durante el cocinado observará que el símbolo se ilumina para indicar la transmisión de calor al alimento. • Este símbolo se apaga cuando se alcanza la temperatura seleccionada. • Para apagar el horno, ponga los mandos en posición . Funcionamiento Manual • Tras poner el reloj en hora, su horno está listo para cocinar.
3172534-001 EPIFA.QXD:- 19/4/12 16:47 Página 6 4. Seleccione una función y una temperatura de cocinado. 5. Transcurrida la duración del cocinado, el horno se desconectará, sonará una señal acústica y el símbolo AUTO parpadeará rápidamente. 6. Toque cualquier sensor para detener la señal acústica y apagar el símbolo AUTO, encendiéndose el horno de nuevo. 7. Ponga los mandos en posición gar el horno.
19/4/12 16:47 13.Ponga los mandos en posición apagar el horno. Página 7 para Si mientras cocina el horno desea modificar el tiempo restante de cocinado, toque con el dedo el sensor hasta que el símbolo AUTO parpadee rápidamente. A continuación toque los sensores + ó – para modificar el tiempo. Función Seguridad niños Si mientras cocina con el horno activa esta función, sólo bloqueará la manipulación del reloj electrónico.
3172534-001 EPIFA.QXD:- 19/4/12 16:47 Página 8 2. Con el horno frío, vierta lentamente 250 ml de agua en la parte inferior de la cavidad del horno. El ciclo de limpieza se realiza a baja temperatura. Cuando termina, puede retirar con un paño húmedo los restos de suciedad del interior sin riesgos de quemaduras. No obstante, los tiempos de enfriamiento pueden variar según la temperatura ambiente. Asegúrese antes de tocar directamente la superficie interior del horno, de que la temperatura es adecuada.
3172534-001 EPIFA.QXD:- 19/4/12 16:47 Página 9 Uso del Grill Abatible ESPAÑOL Para limpiar la parte superior del horno, • Espere a que el horno esté frío. • Empuje con ambas manos la varilla de la resistencia de Grill (A), hasta soltarla de la sujeción superior. A • Gire la resistencia y limpie la parte superior del horno. • Finalmente vuelva a colocar la resistencia de Grill en su posición inicial. Cambio de la lámpara del horno ATENCIÓN • Sustituya la lámpara.
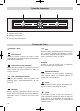
3172534-001 EPIFA.QXD:- 19/4/12 16:47 Página 10 Painel de Comandos 1 2 3 1 Selector de funções. 2 Relógio electrónico. 3 Selector de temperatura. Funções do Forno Desligar o forno Convencional Usado em bolos e tartes nos quais o calor recebido deve ser uniforme para que adquiram uma textura esponjosa. Convencional com Ventilador Adequado para assados e pastelaria. O ventilador reparte de forma uniforme o calor no interior do forno. Grill e Resistência Inferior Especial para assados.
3172534-001 EPIFA.QXD:- 19/4/12 16:47 Página 11 Descongelação Esta função realiza-se através de um sistema de ar quente em 2 níveis. Nível LO para peixes, pastelaria e pão. Nível HI (com mais temperatura no interior do forno) para carnes em geral. Nota A lâmpada permanece acesa em qualquer função de cozinhado, excepto na função de limpeza.
3172534-001 EPIFA.QXD:- 19/4/12 16:47 Página 12 NOTA O relógio possui o modo de iluminação nocturna, de forma que diminuirá a intensidade da luz do visor entre as 00:00 e as 6:00 horas. • Este símbolo apaga-se quando é alcançada a temperatura seleccionada. • Para apagar o forno, coloque os comandos na posição . ATENÇÃO Funcionamento Manual • Após acertar a hora do relógio, o seu forno está pronto para cozinhar. Seleccione uma função de cozinhado e uma temperatura.
19/4/12 16:47 Página 13 3. Posteriormente, soarão 2 beep seguidos, o símbolo AUTO piscará lentamente e será mostrado no visor o tempo restante até que o forno se desligue de forma automática. 4. Seleccione uma função e uma temperatura de cozinhado. 5. Decorrida a duração do cozinhado, o forno desligar-se-á, soará um sinal sonoro e o símbolo AUTO piscará rapidamente. 6. Toque em qualquer sensor para parar o sinal sonoro e apagar o símbolo AUTO, acendendo-se o forno novamente. 7.
3172534-001 EPIFA.QXD:- 19/4/12 16:47 Página 14 12.Toque em qualquer sensor para parar o sinal sonoro e apagar o símbolo AUTO, acendendo-se o forno novamente. Se enquanto cozinha com o forno, activar esta função, só bloqueará a manipulação do relógio electrónico. 13.Coloque os comandos na posição desligar o forno. Estando activada a segurança para crianças, caso se toque em qualquer sensor do relógio, visualizar-se-á SAFE no visor. O relógio está bloqueado.
3172534-001 EPIFA.QXD:- 19/4/12 16:47 Página 15 2. Com o forno frio, deite lentamente 250 ml de água na parte inferior da cavidade do forno. O ciclo de limpeza é realizado a baixa temperatura. Quando termina, pode retirar com um pano húmido os restos de sujidade do interior sem riscos de queimaduras. Não obstante, os tempos de arrefecimento podem variar segundo a temperatura ambiente. Assegure-se, antes de tocar directamente na superfície interior do forno, que a temperatura é adequada.
3172534-001 EPIFA.QXD:- 19/4/12 16:47 Página 16 Resistência do Grill Rebatível Para limpar a parte superior do forno, • Espere que o forno esteja frio. • Empurre com ambas as mãos a vareta da resistência de Grill (A), até a soltar da fixação superior. A • Gire a resistência e limpe a parte superior do forno. • Por fim volte a colocar a resistência do Grill na posição inicial. Troca da lâmpada do forno ATENÇÃO • Substitua a lâmpada.
3172534-001 EPIFA.QXD:- 19/4/12 16:47 Página 17 Control Panel 1 2 3 1 Function selector. 2 Electronic clock. 3 Temperature selector. Switch off oven Conventional It is used for sponges and cakes where the heat received must be uniform to achieve a spongy texture. Conventional with fan Appropriate for roasts and cakes. The fan spreads the heat uniformly inside the oven. Grill and Lower element Special for roasts. It can be used for any piece, whatever its size.
3172534-001 EPIFA.QXD:- 19/4/12 16:47 Página 18 Defrosting This function uses a two-level hot air system. LO is for fish, cakes, pastries and bread. HI (higher temperature inside the oven) is for meats in general. Note The light remains on when performing any cook-ing function, except when cleaning. TEKA HYDROCLEAN® Cleaning function After using this cleaning cycle, any traces of grease or dirt that were stuck to the walls of the oven can easily be wiped clean with a damp cloth.
3172534-001 EPIFA.QXD:- 19/4/12 16:47 Página 19 Manual Operation • After setting the clock, the oven is ready for use. Select a cooking function and temperature. • During cooking, symbol will light up to indicate that heat is being transmitted to the food. • This symbol turns itself off when the selected temperature has been reached. • Set the controls to to turn off the oven. CAUTION After cooking, you will notice that the oven cooling system is still on.
3172534-001 EPIFA.QXD:- 19/4/12 16:47 Página 20 You can change the remaining cooking time at any time by touching sensor with your fingertip until the AUTO symbol starts to flash quickly. Now touch the + or – sensor to change the time. NOTE You cannot see the current time on the display when the cooking time is set. 4. Touch sensor until the AUTO symbol starts to flash quickly. The display will show the current time and the programmed cooking time. 5.
3172534-001 EPIFA.QXD:- 19/4/12 16:47 Página 21 To disable the function, press the + and – sensors at the same time for several seconds until you hear a beep. Caution In the event of a power failure, your electronic clock settings will be erased and 12:00 will flash on the clock display. Reset the clock and programme again.
3172534-001 EPIFA.QXD:- 19/4/12 16:47 Página 22 5. When the cycle is finished, the oven will turn itself off, an alarm will sound and symbol will flash quickly. 6. Touch any sensor with your fingertip to stop the alarm and to turn off symbol . 7. Turn the control dial to position . 8. Any traces of dirt and excess water can now be removed with a damp cloth.
3172534-001 EPIFA.QXD:- 19/4/12 16:47 Página 23 Changing the oven light bulb ATTENTION Make sure the oven is unplugged before changing the bulb. • Change the bulb. • Reassemble the glass cover and ensure that everything fits in the correct position. • Detach the chrome supports by loosening the screw (A). A ENGLISH • Release the bulb-holder glass cover with a tool. The replacement bulb must be resistant to temperatures up to 300 ºC. You can order one from Technical Service.
3172534-001 EPIFA.QXD:- 19/4/12 16:47 Página 24 Panneau avant de commande 3 2 1 1 Sélecteur de fonctions. 2 Horloge électronique. 3 Sélecteur de températures. Fonctions du Four Arrêt du four Conventionnel Utiliser pour les gâteaux et les tartes qui doivent recevoir une chaleur uniforme et pour obtenir une texture moelleuse. Conventionnel avec turbine Recommandé pour les rôtis et la pâtisserie. Le ventilateur répar tit la chaleur de façon uniforme à l'intérieur du four.
3172534-001 EPIFA.QXD:- 19/4/12 16:47 Página 25 Décongeler Cette fonction est réalisée grâce à un système d'air chaud sur 2 niveaux. Niveau LO pour les poissons, les pâtisseries et le pain. Niveau HI (avec une température plus élevée à l’intérieur du four) pour les viandes en général. Remarque La lumière reste allumée pendant toutes les fonctions de cuisson. En revanche, celle-ci est éteinte pendant le processus de nettoyage.
3172534-001 EPIFA.QXD:- 19/4/12 16:47 Página 26 REMARQUE L’horloge est pourvue du mode d’éclairage nocturne, de sorte que l’intensité lumineuse de l’écran diminue entre minuit et 6 heures. • Ce symbole s’éteint lorsque la température sélectionnée est atteinte. • Pour éteindre le four, placez les commandes sur la position . Fonctionnement manuel MISE EN GARDE • Une fois l’horloge réglée, votre four est prêt à fonctionner. Sélectionnez une fonction de cuisson et une température.
19/4/12 16:47 Página 27 Programmation de la durée de cuisson 1. Appuyez sur le capteur jusqu’à ce que le symbole AUTO se mette à clignoter et que l’indication 00:00 s’affiche à l’écran. 2. Sélectionnez la durée en appuyant sur les capteurs + ou –. 3. 2 bips sonores consécutifs sont alors émis. Le symbole AUTO se met à clignoter lentement et le temps restant avant que le four ne s’éteigne automatiquement s’affiche à l'écran. 4. Sélectionnez une fonction et une température de cuisson. 5.
3172534-001 EPIFA.QXD:- 19/4/12 16:47 Página 28 10.Pendant la cuisson, le temps de cuisson restant s’affiche à l’écran et le symbole AUTO clignote lentement. 11.À l’heure de fin de cuisson programmée, le four s’éteint, un signal sonore retentit et le symbole AUTO se met à clignoter rapidement. 12.Appuyez sur n’importe quel capteur pour couper le signal sonore et éteindre le symbole AUTO. Le four se remet alors sous tension. 13.Placez les commandes sur la position pour éteindre le four.
3172534-001 EPIFA.QXD:- 19/4/12 16:47 Página 29 Mise en garde IMPORTANT Ne nettoyez jamais le four et la plaque en même temps avec la fonction Teka Hydroclean®. Vous n’obtiendrez aucun résultat concluant. Pour nettoyer la plaque, suivez les instructions indiquées ci-après. Laissez la porte du four fermée jusqu’à ce que le cycle de nettoyage soit terminé. La phase de refroidissement est nécessaire au bon déroulement de celui-ci. 2.
3172534-001 EPIFA.QXD:- 19/4/12 16:47 Página 30 Résistance du Grill Rabattable Pour nettoyer la partie supérieure du four, • Attendez que le four soit froid. • Poussez la tige de la résistance du grill (A) à l’aide des deux mains jusqu’à ce qu’elle se dégage de la fixation supérieure. A • Tournez la résistance et nettoyez la partie supérieure du four. • Replacez la résistance du grill dans sa position d’origine. Remplacement de l'ampoule du four ATTENTION • Remplacez l’ampoule.
72534-001 EPIFA.QXD:- 19/4/12 16:47 Página 31 Bedienfeld 3 2 1 1 Funktionswahl. 2 Elektronische Schaltuhr. 3 Temperaturregler. Funktionen des Herds Normal Verwendung für Kuchen und Tortenböden, bei denen die Wärmeeinwirkung gleichmäßig sein muß, damit diese gut aufgehen. Normal mit Umluft Geeignet zum Braten und für Gebäck. Der Lüfter verteilt die Wärme gleichmäßig im Herd. Grill und Unterhitze Besonders geeignet zum Braten. Kann für Stücke mit beliebiger Größe eingesetzt werden.
3172534-001 EPIFA.QXD:- 19/4/12 16:47 Página 32 Turbo Der Lüfter verteilt die von einem an der Rückseite des Herds angeordneten Heizwiderstand erzeugte Wärme. Auf Grund der erzeugten gleichmäßigen Temperatur ver teilung ist ein Garen in 2 Etagen gleichzeitig möglich. Auftauen Dies er folgt durch ein zweistufiges Heißluftsystem. Stufe LO für Fisch, Gebäck und Brot. Stufe HI (höhere Temperatur im Backofen) für Fleisch allgemein.
3172534-001 EPIFA.QXD:- 19/4/12 16:47 Página 33 Uhrzeit einstellen • Wenn Sie den Backofen anschließen, zeigt die Uhr blinkend 12:00 an. • Die Uhrzeit kann durch Betätigen der + oder – Bedienfelder eingestellt werden. Anschließend erklingen zwei aufeinander folgende Pieptöne zur Bestätigung der gewählten Uhrzeit. • Um die Uhrzeit zu ändern, berühren Sie die Sensoren + und – gleichzeitig. Nun blinkt die aktuelle Uhrzeit auf der Anzeige. Berühren Sie den Sensor + bzw. –, um die Uhrzeit einzustellen.
3172534-001 EPIFA.QXD:- 19/4/12 16:47 Página 34 Wenn Sie anschließend die Uhrzeit des Timers ändern wollen, müssen Sie nur das Bedienfeld mit dem Finger berühren und anschließend die + oder – Bedienfelder betätigen. Anschließend erklingen 2 aufeinanderfolgende Pieptöne zur Bestätigung der Änderung. Der Countdown wird ab der angewählten Zeit dargestellt und das Symbol blinkt langsam. HINWEIS Bei der Timer-Funktion kann die aktuelle Uhrzeit nicht auf der Anzeige dargestellt werden.
19/4/12 16:47 Página 35 4. Drücken Sie so lange auf das Bedienfeld , bis das AUTO-Symbol schnell zu blinken beginnt. Auf der Anzeige werden die aktuelle Uhrzeit und die eingestellte Gardauer dargestellt. 5. Wählen Sie die Uhrzeit für das Ende der Garzeit, indem Sie die + oder – Bedienfelder betätigen. 6. Danach sind 2 aufeinander folgende Pieptöne zu hören. Die aktuelle Uhrzeit wird auf der Anzeige dargestellt. 7. Wählen Sie eine Funktion und eine Gartemperatur. 8.
3172534-001 EPIFA.QXD:- 19/4/12 16:47 Página 36 Teka Hydroclean® Reinigungsfunktion Mit dieser Funktion wird anhand der gemeinsamen Wirkung des Wasserdampfs und der ausgezeichneten Eigenschaften des neuen Teka Hydroclean® Emaille erreicht, dass Fett und Schmutzreste, die an den Backofenwänden haften geblieben sind, mühelos entfernt werden können. Dank der neuen Teka Hydroclean®-Technologie muss der Backofen mit keinem Fettlöser nachgereinigt werden.
3172534-001 EPIFA.QXD:- 19/4/12 16:47 Página 37 Der Reinigungszyklus wird bei niedriger Temperatur durchgeführt. Wenn er beendet ist, können Sie die Schmutzreste im Inneren mit einem feuchten Tuch entfernen, ohne dass die Gefahr von Verbrennungen besteht. Allerdings kann die Abkühlzeit je nach Außentemperatur verschieden sein. Versichern Sie sich, dass die Innenflächen des Ofens die richtige Temperatur haben, bevor Sie sie berühren.
3172534-001 EPIFA.QXD:- 19/4/12 16:47 Página 38 Auswechseln der Backofenlampe ACHTUNG • Ersetzen Sie die Lampe. Bevor Sie die Lampe auswechseln, stellen Sie sicher, dass der Backofen vom Stromnetz getrennt ist. • Montieren Sie wieder das Vorsatzglas und achten Sie darauf, dass es in der richtigen Position sitzt. • Demontieren Sie die Chromlaufschienen, indem Sie die Muttern loslösen (A). A • Nehmen Sie das Vorsatzglas der Lampenfassung mittels eines Werkzeugs heraus.
3172534-001 EPIFA.
3172534-001 EPIFA.QXD:- 19/4/12 16:47 Página 40 FICHA / FICHA / SPECIFICATIONS / FICHE / DATENBLATT Fabricante Fabricante Modelo Modelo Model Modèle Modell Clase de eficiencia energética, en una escala que abarca de A (más eficiente) a G (menos eficiente). Classe de eficiência energética, numa escala de A (eficiente) a G (ineficiente). Energy efficiency class on a scale of A (more efficient) to G (less efficient).