- Data Brochure D 033 tekmarNet®4 Timer 033 1 Information Brochure 2 Application Brochure Choose controls to match application Design your mechanical applications 10/07 3 4 Rough In Wiring Wiring Brochure Wiring and installation of specific control Rough-in wiring instructions 5 Data Brochure Control settings and sequence of operation 6 Job Record Record settings & wiring details for future reference Introduction The tekmarNet®4 Timer 033 can be programmed to operate up to four events each
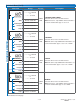
Table of Contents Table of Contents............................................................2 Display and Switch Settings ...........................................2 Switch Settings .......................................................2 Access Levels .........................................................2 Display and Symbols Description............................3 User Interface .........................................................3 Setup .......................................................
Display Item Field Menu Field Displays an abbreviated name of the selected item Displays the current menu Number Field Displays the current value of the selected item Status Field Displays the current status of the timer operation Symbols SCHEDULE MASTER A schedule is in use on this timer. WARNING An error is present. tN4 COMMUNICATION Communication is present. SCHEDULED EVENT Displays the current scheduled event. LOCK The Access Levels are locked. A menu option is visible but not adjustable.
Display Menus Time Menu (1 of 2) The Time menu items set the time clock, day and date. Item Field Range SUNDAY, MONDAY, TUESDAY, WEDNESDAY, THURSDAY, FRIDAY, SATURDAY Access Description LTD CURRENT TIME AND DAY Displays the current time and day of the week. The time and date flash if the time is not set.
Time Menu (2 of 2) Item Field Range Access Description USER ADV DAY OF THE MONTH Set the day of the month. Note: This item is only available when Daylight Savings Time is set to Mode 1 or 2. USER ADV YEAR Set the current year. Note: This item is only available when Daylight Savings Time is set to Mode 1 or 2. ADV MODE Select whether time should be displayed using a 12 or a 24 hour clock.
Schedule Menu (1 of 3) The Schedule menu is the same for each of the four schedules. The schedule number is indicated along with the On/Off selection as each Schedule menu is displayed. The Schedule menu items set the schedule type, the number of events per day, and the event times. The following settings can be applied to each of the four schedules. Use the Menu button to advance to the next schedule.
Schedule Menu (2 of 3) Item Field Range Access Description – –:– – to 11:50 PM or – –:– – to 23:50 USER Wake Default = 6:00 AM UnOccupied Default = 8:00 AM Occupied Default = 6:00 PM Sleep Default = 10:00 PM ADV SATURDAY AND SUNDAY Select the times for the scheduled events. Note: This item is only available when Schedule is set to On and Schedule Type is set to 5-2.
Schedule Menu (3 of 3) Item Field Range Access Description – –:– – to 11:50 PM or – –:– – to 23:50 Wake Default = 6:00 AM UnOccupied Default = 8:00 AM Occupied Default = 6:00 PM Sleep Default = 10:00 PM USER ADV TUESDAY Select the times for the scheduled events. Note: This item is only available when Schedule is set to On and Schedule Type is set to 7DAY.
Misc (Miscellaneous) Menu (1 of 1) The Miscellaneous menu items set display and control options such as access level and temperature units. Range MISC MENU Item Field Access Description LTD ACCESS LEVEL The access level of the Timer. The access column shows which items are visible in each access level.
Time Clock The Timer has a built-in time clock to allow the Timer to operate the schedules. A battery backup allows the Timer to keep time for up to 4 hours without power. The Timer display will revert to the Time Clock display after 60 seconds of button inactivity. The time clock supports automatic adjustment for Daylight Saving Time (DST) once the day, month, and year are entered. Use the Time menu to set the correct time, day, month, and year if DST is selected.
Programming the Relay This is only applicable if switch 3 is set to “4 Schedules” and the Timer is connected to a tekmarNet®4 system. The relay contact on the back can be programmed to follow one of the four schedules available in the Timer. The schedule must first be turned to “On” before the relay contact can be programmed to follow it. When the schedule is in the “Wake” or “Occupied” events, the relay will be in the normal state.
Cleaning the Timer The Timer’s exterior can be cleaned using a damp cloth. Moisten the cloth with water and wring out prior to wiping the timer. Do not use solvents or cleaning solutions. Limited Warranty and Product Return Procedure Limited Warranty The liability of tekmar under this warranty is limited.