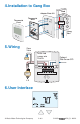
518_Q 03/13 Thermostat 518 Zoning Replaces: New Quick Setup Guide 1. Location Interior Wall 5 feet 1.5 m Exterior Wall 2. Remove Mounting Base 3.
4. Installation to Gang Box Stud Adapter Plate 012 Thermostat Front Thermostat Base 3 1/4” (83 mm) Gang Box 5. Wiring Zone Valve Install field jumper wire R to Rh RC 518 Optional Slab Sensor 079 No Power C R Rh W1 S1 Com 24 V LN 6.
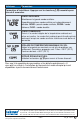
7. Critical Settings The following settings are essential to the successful operation of the heating system. Press + Together Display • Press and hold down both the and buttons for 3 seconds to change from one step to the next. • Release both buttons once the step has been reached. • Press the or the button to change the setting, if available.
Display Setting Installer settings. Press the and buttons together for 5 more seconds. AUXILIARY SENSOR Select the type of auxiliary sensor. Available when an auxiliary sensor is automatically detected. NONE = no auxiliary sensor, ROOM = Indoor Sensor, OUT = Outdoor Sensor, FLOR = Slab Sensor ROOM SENSOR Select if the built-in room temperature sensor is on or off. The builtin room sensor can only be disabled when an auxiliary room or slab sensor is connected.
18_Q 03/13 Thermostat 518 Zonage Remplace: Nouveau Guide d’installation rapide 1. Emplacement Mur intérieur 5 pi. 1,5 m Mur extérieur 2. Retirez la base de montage 3.
4. Installation à la boîte électrique Plaque adaptrice 012 Façade du thermostat Base de thermostat Goujon 3 1/4” (83 mm) Boîte électrique 5. Filage soupape de zone cavalier entre “R” et “Rh”. Mise au champ RC 518 sonde de sol optionnelle 079 No Power C R Rh W1 S1 Com 24 V LN 6.
. Paramètres critiques Les paramètres suivants sont essentiels au bon fonctionnement du système de chauffage. Appuyez + Ensemble Afficheur • Appuyez et maintenez les deux boutons pendant 3 secondes pour passer d’une étape à l’autre. • Relâchez les deux boutons une fois que l’étape a été atteinte. • Appuyez sur le bouton ou pour changer le réglage si disponible.
Afficheur Paramètres Paramètres d’installateur. Appuyez sur les touches plus de 5 secondes. ensemble pour SONDE AUXILIAIRE Sélectionnez le type de sonde auxiliaire. Disponible quand une sonde auxiliaire est automatiquement détectée. NONE = pas de sonde auxiliaire, ROOM = sonde intérieure, FLOR = sonde de dalle SONDE D’AMBIANCE Choisir si la sonde intégrée de la température ambiante est active ou inactive.