USER’S GUIDE Rev. 1.
M205 User's Manual nnn FCC NOTICE This equipment has been tested and found to comply with limits for a Class B digital device, pursuant to Part 15 of the FCC rules. These limits are designed to provide reasonable protection against harmful interference in residential installations. This equipment generates, uses, and can radiate radio frequency energy, and if not installed and used in accordance with the instructions, may cause harmful interface to radio communications.
M205 User’s Manual nnn CONTENTS INTRODUCTION ......................................................................................... 5 n KEY FEATURES .....................................................................................................5 Television on your PC! ........................................................................................5 Live Video Display..............................................................................................5 Image Capture..............
M205 User's Manual Selecting the Video Source and Adjusting the Picture Properties .......................18 Selecting Overlay / Preview Mode .....................................................................19 Setting the Video Display Size and Format........................................................19 Selecting View/Capture Mode ...........................................................................20 Creating New Palette.......................................................................
nnn 1 INTRODUCTION Congratulations on your purchase of the CaptureTV M205, the video capture and TV tuner card! The M205 is actually two cards in one: • A built-in TV tuner brings television to your computer screen, allowing you to work and watch TV at the same time. • The Video and Still Image Capture function gives you the ability to capture video from various sources, such as your VCR or camcorder, and compose your own movies or still photos.
INTRODUCTION The VideoCapture Utility Lets you watch up to 125 cable television channels and 70 antenna channels in smooth, full-motion video in a window or full screen. You can capture still frames and movie clips, channel surf, or create your own TV transcripts. Composite Video and SVideo inputs support VCRs, video cameras, laser-disc players, video game consoles, etc. Still image and live video capturing is easy with a simple mouse click.
nnn 2 HARDWARE INSTALLATION n Components in the Package The following components should be included in your CaptureTV M205 box: 1. 2. 3. 4. 5. CaptureTV M205 board “Tekram Multimedia Drivers & Utilities” CD-ROM IR Sensor Remote Control Audio Cable (for Sound card) Make sure all of the above components are accounted for before you begin the installation.
HARDWARE INSTALLATION n Hardware Installation Installing the Capture Card Important: Handle circuit boards by the edges or bracket. Touch the bare metal of your computer case before handling any circuit boards to prevent static discharge damage. 1. Turn OFF all power to your system, including any peripherals (printer, external drives, modem, etc.). 2. Disconnect the power cord and the monitor cable from the back of the computer. 3. Remove the computer cover.
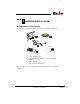
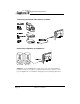
HARDWARE INSTALLATION Connecting to Cable TV or Antenna Connecting the IR Sensor Connecting to External Video Sources (RCA jack) M205 User’s Manual Page 9
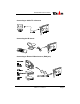
HARDWARE INSTALLATION Connecting to External Video Sources (S-video) Connecting to Speakers or Headphones NOTE: The CaptureTV M205 audio output jack is a low-gain output suitable for headphones and powered speakers, as well as an input into stereo systems or other types of amplifiers. It is not suitable for driving unpowered external speakers alone.
HARDWARE INSTALLATION If your system already has a sound card, hook the CaptureTV M205 card’s audio output to your sound card’s audio input, usually marked “LINE-IN” (sometimes called “AUX-IN” or “CD-IN”) with a 1/8” stereo cord, as shown below.
nnn 3 SOFTWARE INSTALLATION n Installing the Windows 95 Device Drivers After the capture card is properly installed in the system, power on your system. Windows 95 will automatically detect the card as a Multimedia Device upon boot-up, and display a “New Hardware Found” screen like the one shown below.
SOFTWARE INSTALLATION n Installing the Windows 98 Device Drivers 1. 2. After the capture card is properly installed in the system, power on your system. Windows 98 will automatically detect the card as a PCI Multimedia Video Device upon boot-up, and display a “New Hardware Found” screen, then “Add New Hardware Wizard” dialog box will appear like the one shown below. Then select “Search for the best drive for your device. (Recommended).” 3. 4.
SOFTWARE INSTALLATION n The Autorun Screen After rebooting, insert the “Tekram Multimedia Utilities & Drivers” CD-ROM into the CD-ROM drive. The Autorun screen will show up. If it does not appear, run D:\AUTORUN (where D: is your CD-ROM drive). Double-clicking the appropriate product model name M205 brings up the “Function Selector” submenu.
SOFTWARE INSTALLATION n Installing the VideoCapture utility 1. Select Install Application on the Autorun Screen. The following dialog box appears: 2. In the Installation Directory, type the drive and directory where you want the software installed. The default path is C:\CapTV. Click Continue to start copying of the files. Click on the Exit button after the installation is complete. The “CapTV” program group is added to your Windows desktop, containing the application icons as shown: 3. 4.
nnn 4 VideoCapture UTILITY The VideoCapture Utility lets you watch television and playing video in a window or full screen. This application is also used for capturing still images and full-motion video from TV or a video device. The VideoCapture utility saves the captured still image as DIB file format. The video is saved as AVI file format. Note : This application program cannot run under 256 or lower color mode. Double-click the CAPTV icon from the “CapTV” program group to start the program.
VideoCapture UTILITY n Control Panel To show/hide the control panel, check Show Panel from the TV menu. 1. 2. 3. 4. 5. 6. 7. 8. POWER: Quits the M205 VideoCapture application. PC/TV: Switches between viewing in a window and full screen. (*) ICONIC: minimize the program to an icon. CAPTURE MOTION: Captures motion video. CAPTURE STILL: Captures still image. (*) SETUP: Brings up the setup options dialog box. ONTOP: Enable/disable the video display window always on the top layer.
VideoCapture UTILITY n Video Display Selecting the Video Source and Adjusting the Picture Properties From the Options menu, choose Video Source. The Video Source dialog box appears: • Video Connector: Select video input source (TV, Composite or S-video). • Video Standard: Select video system type for the current input source. For proper operation, you must make sure that the Video System is correctly set for any given Video Source.
VideoCapture UTILITY Selecting Overlay / Preview Mode Select Overlay or Preview mode from the Options menu. In Overlay mode, video is transferred directly from the capture card to the memory of the display card without using any CPU resources. This results in better on-screen viewing. However, the capturing operation automatically uses the Preview mode, therefore, the quality of the captured image or video is the same regardless of the setting.
VideoCapture UTILITY Selecting View/Capture Mode To display video only, select the View Mode from the Options menu. In this mode, you can display video full screen or in a scalable window, but capture is not allowed. In the Capture Mode, you can only display the video in the size you specify in the Video Format dialog box described above. Creating New Palette If the image type of the displayed video is 256 colors (8-bit color) or less, setting a new color palette may improve the picture dramatically.
VideoCapture UTILITY Displaying Close Captioned Text If you are watching TV in NTSC standard or playing an NTSC videotape containing closed captioned material, you can enable the close captioned text to be displayed with the video. Choose Video Display from the Options menu. The following dialog box appears: • Enable CC: Check this box to display the close captioned text. The text overlays the video as in standard TV. Select Channel 1 or Channel 2 for the source of the close captioned text.
VideoCapture UTILITY n Video Capture Note: Make sure that you have selected the Capture Mode under the Options menu. Please refer to page 20. Changing the Settings for Video Capture Choose Capture Settings from the Capture menu to change the preferences for video capturing. The dialog box appears: * All the values will return to default after exiting the program. • Frame Rate: Number of still video frames that can be captured and converted to digital format in one second.
VideoCapture UTILITY • Mouse to Abort Capture: Select the mouse button to be used for ending video capture. • Hit OK to Capture: By default the capturing begin as soon as you choose the capture command from the Capture menu. Click this check box to have a dialog box appear before the capturing start for reconfirmation. • Use DOS Memory: With this option enabled, the program will try to use the DOS memory for faster performance. However, the memory capacity is limited to under 1 Megabyte.
VideoCapture UTILITY Selecting the Video Compressor From the Options menu, choose Compression to select the video compression algorithm. The dialog box appears: • Compressor: Selects the compressor to be used. • Compression Quality: Sets the compression rate. The higher number will result in less distortion but bigger AVI file. • Key Frame: The bigger the interval between the key frames, the more the distortion will be. • Configure: Configures the settings for the selected compressor.
VideoCapture UTILITY Specifying the File Name for Motion Video Capture Before capturing a motion video, you should first decide the name of the captured file and the location on the hard drive that the image will be stored in, or the file will be saved to the default name and path c:\capture.avi Choose Set Capture File from the File menu.
VideoCapture UTILITY Capturing Motion Video Click Capture Video under the Capture menu to initiate video capture. After the movie is saved to disk, you will be shown the amount and percentage of dropped frames. After the capturing is complete, the video display will remain still. Click Preview or Overlay from the Options menu to resume the playing. Capturing a Still Image Click Capture Frame from the Capture menu to freeze the motion video.
VideoCapture UTILITY n The TV Tuner Show / Hide Control Panel From the TV menu, check Show Panel to display/hide the control panel (See page 17). All the options described below are also available on the control panel. Selecting Antenna / Cable Input From the TV menu, click on Air or Cable to select antenna (air) or cable input. Auto Scanning for TV Channels When you click on Auto Scan, the TV Tuner scans for all active channels and stores them to a list.
VideoCapture UTILITY Note: M205 supports full screen viewing up to 1024×768×16bit color VGA setting, however, some problem may occur with certain VGA cards. If you find the image centered to the left of the screen and has image residue when refreshing, check the option Max 640×480 to solve the problem. On Top Enable/disable the M205 application window to be always on the top layer. Channel Browsing To view all channels simultaneously, click Channel Browsing. The option is then toggled to Exit Browsing.
nnn 5 THE REMOTE CONTROL n Using the Remote Control Included with your CaptureTV package is an infrared remote control. To use the remote, you must first hook up the IR Sensor, as shown on Chapter 2. You must aim the remote at the IR Sensor during use, so it’s recommended that you place the sensor near your monitor. Following is a summary of the Remote Control’s major function buttons: • POWER: Quits the VideoCapture software. • SOURCE: Switches between TV, S-video and composite video sources.
nnn 6 TROUBLESHOOTING The following troubleshooting tips may help you if you experience problems. Contact your dealer for more advanced troubleshooting information. Basic Troubleshooting Tips • Check that the card is seated properly in its expansion slot. If the problem still exists, try a different PCI expansion slot. • Ensure the monitor cable is securely fastened to the card. • Make sure that the monitor and computer are plugged in and receiving power.
n n n APPENDIX n DirectX 5 Installation for Microsoft Windows 95 1. Ensure that Windows 95 is up and running properly. 2. Insert the Tekram Multimedia Drivers & Utilities CD-ROM into your CD-ROM drive. 3. Under Start… Run of the task bar, TYPE in X:\DIRECTX5\DIRECTX\DXSETUP (X is the letter of your CD-ROM drive). The following dialog box will appear: 4. Check “Direct 3D Hardware Acceleration Enabled” option and then click the “ReInstall DirectX” button. 5. Restart Windows 95 to complete installation.