
User's Manual


Brief Procedures
4–14
TDS 684A, TDS 744A, & TDS 784A Service Manual
e. Save the settings:
H Press SETUP.
H Press the main-menu button Save Current Setup; then press the
side-menu button To File.
H Turn the general purpose knob to select the file to save. Choose
(or ). With this choice, you will save a file
starting with , then containing 5-numbers, and a extension.
For example, the first time you run this on a blank, formatted disk or
on the Example Programs Disk, the oscilloscope will assign the
name to your file. If you ran the procedure again, the
oscilloscope would increment the name and call the file
.
H Press the side-menu button Save To Selected File.
2. Verify the file system works:
H Press the main-menu button Recall Factory Setup and the side-menu
button OK Confirm Factory Init to restore the 500 ms time base and
the five cycle waveform.
H Press the main-menu button Recall Saved Setup; then press the
side-menu button From File.
H Turn the general purpose knob to select the file to recall. For example, if
you followed the instructions above and used a blank disk, you had the
oscilloscope assign the name TEK00000.SET to your file.
H Press the side-menu button Recall From Selected File.
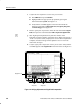
H Verify that Digitizing Oscilloscope retrieved the saved setup from the
disk. Do this by noticing the horizontal SCALE for the M (main) time
base is again 200 ms and the waveform shows only two cycles just as it
was when you saved the setup.
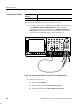
3. Remove the test hookup:
H Disconnect the probe from the channel input and the probe-compensa-
tion terminals.
H Remove the disk from the disk drive. Do this by pushing in the tab at the
bottom of the disk drive.