P H A S E R® 7 5 0 COLOR PRINTER P h a s e r S h a r e® N e t w o r k i n g Setup Guide ® www.tek.
Phaser® 750 Color Printer PhaserShare® Networking Setup Guide V1 November 1999
Copyright © Tektronix, Inc. Unpublished rights reserved under the copyright laws of the United States. Contents of this publication may not be reproduced in any form without permission of Tektronix, Inc. Tektronix®, Phaser®, PhaserShare®, the TekColor logo, ColorStix®, ColorCoat®, and Made For Each Other® are registered trademarks of Tektronix, Inc. Finepoint™, PhaserLink™, PhaserPrint™, and the TekColor name are trademarks of Tektronix, Inc.
Contents Network Printing with Tektronix Color Printers Before you begin network configuration The printer’s Configuration Page 2 The printer’s networking software 2 1 Connecting Your Printer to a Network 3 Direct Ethernet Connection to Macintosh or PC The printer’s Ethernet interface 4 Token Ring connection 4 Using the Tektronix Installer 1 3 5 Tektronix Installer for Windows 5 Tektronix Installer for Macintosh 6 Novell NetWare 7 Configuration software for NetWare Networks 7 Printing the Config
Contents Setting the IP address from the Phaser 750 front panel 23 Setting the IP address: DHCP 24 Supported DHCP fields 26 Setting the IP address: PhaserLink Printer Management Software DNS (Domain Name Service) 27 EtherTalk and TokenTalk Configuration 28 Setting up the Macintosh Ethernet port for EtherTalk 28 Setting up the printer for EtherTalk or TokenTalk 28 Finding the printer’s name in the Chooser 28 Changing the printer’s name (optional) 29 Changing the printer’s EtherTalk/TokenTalk zone (option
Network Printing with Tektronix Color Printers Network Printing with Tektronix Color Printers This guide provides information to help you quickly install your printer in the following environments: ■ Windows 95 and Windows 98 ■ Windows NT ■ Novell NetWare ■ EtherTalk or TokenTalk For information on installing the printer in UNIX environments, see the PhaserShare Networking Manual.
Network Printing with Tektronix Color Printers The printer’s Configuration Page The information supplied on the Configuration Page is helpful when you are installing and configuring the printer on a network. There are two ways to print the Configuration Page: ■ Use the printer’s front panel. Use this method if your printer is not yet configured on the network. Refer to Printing a Configuration Page from the Phaser 750 front panel on page 2. ■ Use PhaserLink Printer Management Software.
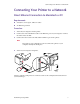
Connecting Your Printer to a Network Connecting Your Printer to a Network Direct Ethernet Connection to Macintosh or PC Requirements ■ Two RJ-45, twisted-pair, 10Base-T cables ■ An Ethernet-port hub Procedure 1. Turn off your computer and the printer. 2. Connect one end of an Ethernet cable to the Ethernet port on your computer. Connect the other end to the hub. 3. Connect the other cable to the hub and the Ethernet port on the printer. Note The printer is not a SCSI device.
Connecting Your Printer to a Network The printer’s Ethernet interface ■ Conforms to IEEE 802.3 and Ethernet II standards. ■ Twisted pair (10BaseT or 100BaseTx) connection. ■ Thick coax (10Base5) and thin coax (10Base2) connections require adapters; contact your dealer to obtain adapters, cables, and terminators. Caution To avoid damaging the Ethernet interface, turn off the printer before making any Ethernet connections. Ethernet connections and indicators 1.
Using the Tektronix Installer Using the Tektronix Installer Tektronix Installer for Windows The Tektronix installer for Windows is on your printer’s software CD-ROM. A single integrated installer is used to install printer drivers and other software. The Tektronix installer automatically performs printer installation tasks and creates a printer. In most cases, you are required only to make a few installation choices, clicking Next to move from screen to screen.
Using the Tektronix Installer For more information on PhaserLink Printer Management Software, see PhaserLink Printer Management Software on page 33. Tektronix Installer for Macintosh Running the installer from the printer’s CD-ROM 1. Insert the printer’s software CD-ROM into the CD-ROM drive. 2. Click Start Me First. 3. Follow the on-screen instructions to complete the installation.
Novell NetWare Novell NetWare Configuration software for NetWare Networks For Windows environments, the following software is available: ■ PhaserShare Administrator (Tektronix). Use this application to configure the printer and the network when using NetWare 3.x and 4.x. ■ NWAdmin (Novell). Use this utility to manage existing queues on networks running NetWare 4.x in NDS mode. For DOS environments, see the PhaserShare Networking Manual.
Novell NetWare Setting up the printer on a NetWare network Note If a password is used in Bindery mode, it must be set on the printer with the PhaserShare Administrator (or PhaserLink Printer Management Software) and on the file server with PCONSOLE. If a password is used in NDS mode, it must be set on the printer with the PhaserShare Administrator (or PhaserLink Printer Management Software) and on the file server with the NWAdmin utility or PCONSOLE.
Novell NetWare Select a print server In the Main window Printer List, click the print server name/printer name. Note If the printer is not in the list of available printers, there could be a network hardware problem, an incorrect frame type, or incorrect search options settings. See Troubleshooting Windows configurations on page 10. Launch the Quick Configuration Wizard Click Quick Configuration to launch the Quick Configuration Wizard. Configure the printer and set up queues 1.
Novell NetWare Verify information and finish After you have entered the configuration information, the Quick Configuration Wizard displays the Configured Printer Information dialog box, which reports the information you have entered. 1. Verify that the information is correct. ■ If the information is correct, click Apply Changes. ■ If the information is not correct, click Back to return to previous dialog boxes and correct the information.
Novell NetWare In the printer list, if the Printer Name is listed as , the Administrator is unable to communicate with the printer using SNMP over IPX; this indicates that either the printer selected is an unsupported printer or the network configuration is incorrect. If the printer is not listed, check the printer’s Configuration Page for network errors.
Novell NetWare 4. Click Assignment; this view displays the print servers and printers assigned to service this print queue. Assign the appropriate objects to this print queue. Note For the print server to attach and service the print queue, the print server object name in the tree must match the print server name in the printer. Job appears in queue, but printer does not service it 1. 2. Verify that the printer has been set up to service the queue. a. Log in as ADMIN and launch NWAdmin.
Novell NetWare Job is serviced, but does not print ■ Check the PhaserShare Administrator Printer Info dialog box for reported error conditions. ■ Download the PostScript Error Handler to the printer. For information on using the Tektronix PostScript Error Handler, see your printer’s user documentation. ■ Use the correct Tektronix driver for your printer. ■ Verify that the Print Server protocol is enabled; use the printer’s front panel or check the Administrator’s Print Server tab.
TCP/IP Configuration Overview TCP/IP Configuration Overview Setting the printer’s IP address The Tektronix Installer for Windows automatically sets the printer’s IP address under the following conditions: ■ The printer has a network connection. ■ TCP/IP is installed on the computer. ■ The IP address has not already been assigned (for example, from the front panel or by DHCP). During the installation process, you can accept the automatically assigned address or assign a different one.
Windows 95 and Windows 98: PhaserPort Software Windows 95 and Windows 98: PhaserPort Software TCP/IP configuration for a PC If you don't already have a TCP/IP address configured for your PC, contact your system administrator to ensure that the configuration is made according to your company guidelines. If there is no TCP/IP network already in place, configure your PC with a unique address such as 192.1.1.1. To check the IP address for your PC, follow these steps: 1. From the Start menu, click Run. 2.
Windows 95 and Windows 98: PhaserPort Software Installation on workstations for peer-to-peer printing 1. Run the installer as described in Tektronix Installer for Windows on page 5. 2. When prompted, select Easy Install, Minimal Install, or Custom Install. Continue following the on-screen instructions. 3. The installer attempts to find your printer on the network; if it cannot find the printer, a dialog is displayed prompting you for more information.
Windows 95 and Windows 98: PhaserPort Software 5. Highlight PhaserPort and click OK; this displays the Add PhaserPort dialog. a. In the Description field, enter a name for the port (this can be the printer name/model, location, or any other descriptive name of your choice), such as Phaser 850. b. In the Name/Address field, enter the IP address or DNS name of the printer (for example, 192.1.1.2), and click OK.
Windows NT Windows NT These procedures are valid for Windows NT 4.x. For information about driver installation for later versions of Windows NT, visit the Tektronix web site: www.tektronix.com/Color_Printers/support/ The following procedures describe how to use the Tektronix installer for Windows to set up the printer in Windows NT 4.x environments.
Windows NT Installation on workstations for client-server printing Use this procedure to install the printer on workstations when print jobs are to be sent through a print server to the printer. 1. Run the installer as described in Tektronix Installer for Windows on page 5. 2. When prompted, select Easy Install, Minimal Install, or Custom Install. Continue following the on-screen instructions. 3.
TCP/IP for Macintosh TCP/IP for Macintosh Setting up the Macintosh Ethernet port for TCP/IP If your Macintosh is not already set up for TCP/IP, perform this procedure to set it up. 1. From the Apple menu, select Control Panels > TCP/IP. 2. From the Connect via menu, select Ethernet. 3. Specify how the Macintosh will obtain it’s IP address: Manually or by DHCP. 4. If you select Manually, specify the IP address in the dialog box. 5. Close the dialog box. Creating an LPR Printer with LaserWriter 8.
TCP/IP for Macintosh PhaserPort for MacOS System Requirements ■ Macintosh PowerPC. ■ Apple's LaserWriter version 8.6 or later, with Desktop Printing enabled. ■ OpenTransport version 1.1 or later networking. TCP/IP networking provided by MacTCP software is not supported. The Macintosh must be properly configured to communicate with the printer (see Setting up the Macintosh Ethernet port for TCP/IP on page 20).
Setting the Printer’s IP Address Setting the Printer’s IP Address Automatic IP addressing The Tektronix Installer for Windows sets the printer’s IP address under the following conditions: ■ The printer has a network connection. ■ TCP/IP is installed on the computer. ■ The IP address has not already been assigned (for example, from the front panel or by DHCP). During the installation process, you can accept the automatically assigned address or assign a different one.
Setting the Printer’s IP Address Note When two or more IP address methods are used simultaneously, the printer uses the first address that it successfully obtains. Information needed for IP addressing Information Comments Internet (IP) address for the printer Format is x.x.x.x, where x represents a decimal number from 0 - 255. Network mask If you are unsure, leave this blank; the printer will choose an appropriate mask. Default Router/Gateway address Router address.
Setting the Printer’s IP Address 6. 7. 8. Set the network mask: a. Press the right-arrow (---->) button until Network Mask is displayed. Press the Select button. b. Press the right-arrow (---->) button to highlight the part of the address that you want to set. Press + button to change the numbers. c. When the network mask is correct, press the Set button. d. Press the Confirm button. Set the gateway address: a. Press the right-arrow (---->) button until Gateway Address is displayed.
Setting the Printer’s IP Address 2. Configure DHCP with a scope; a scope is a range of IP addresses available for allocation to DHCP clients. For example, the scope could be the IP addresses 192.2.194.101 through 192.2.194.254. Defining a scope in Windows NT 4.x a. Click Start, Programs, Administrative Tools, DHCP Manager. b. Double-click Local Machine. c. Click Scope, Create. d. Enter the IP information to define the scope. Defining a scope in Windows NT 3.5.x a.
Setting the Printer’s IP Address Supported DHCP fields The printer recognizes the DHCP fields listed in the following table. Field Description Values gw Gateway address list List of IP addresses separated by spaces. ha Hardware address Hexadecimal; the ha tag must be preceded by the ht tag.
Setting the Printer’s IP Address DNS (Domain Name Service) The printer supports DNS through an embedded DNS stub resolver. The DNS resolver protocol communicates with one or more DNS servers to request the IP address for a given host name or the host name for a given IP address. To use an IP host name for the printer, the system administrator must have already configured one or more DNS servers and a local DNS domain name space database.
EtherTalk and TokenTalk Configuration EtherTalk and TokenTalk Configuration Setting up the Macintosh Ethernet port for EtherTalk 1. From the Apple menu, select Control Panels > AppleTalk. 2. From the Connect via menu, select Ethernet built-in. Setting up the printer for EtherTalk or TokenTalk 1. Print the Configuration Page. It reports the printer’s default name, which you need for EtherTalk and TokenTalk configurations.
EtherTalk and TokenTalk Configuration Changing the printer’s name (optional) There are three ways to change the printer’s name: ■ Use the Apple Printer Utility; see Changing the printer’s name: Apple Printer Utility on page 29. ■ With a TCP/IP connection and a World Wide Web browser, you can use PhaserLink Printer Management Software; see Changing the printer’s name: PhaserLink Printer Management Software on page 30.
EtherTalk and TokenTalk Configuration Changing the printer’s name: PhaserLink Printer Management Software 1. Connect to the printer via PhaserLink (see Accessing the printer from a browser on page 33). 2. On the left side of any PhaserLink page, click Settings. 3. In the INTERFACES group, click EtherTalk or TokenTalk. 4. In the Printer Name field, enter the desired printer name, then click Apply at the bottom of the page.
EtherTalk and TokenTalk Configuration Troubleshooting If the printer is not in the Chooser, use the following troubleshooting procedure. 1. Check that the Configuration Page shows a printer name, a node number, and a zone. ■ If there is no node number, verify that the printer is properly cabled to the network. Test the cable segment by plugging in a new cable segment or using the cable segment of a printer that is in the Chooser.
IPP (Internet Printing Protocol) IPP (Internet Printing Protocol) Run the Tektronix Installer 1. Run the Tektronix installer as described under Tektronix Installer for Windows on page 5. 2. Complete the installation by following the on-screen instructions. Obtain the printer’s URL (Network Path) 1. Connect to the printer via PhaserLink (see Accessing the printer from a browser on page 33). 2. On the left side of the page, click Settings. 3. In the INTERFACES group, click IPP. 4.
PhaserLink Printer Management Software PhaserLink Printer Management Software PhaserLink Printer Management software is a printer administration and support tool using World Wide Web technology. With PhaserLink software, you can access printer status and manage your printer over a TCP/IP network using a web browser. PhaserLink Printer Management software gives you the following capabilities: ■ Receive printer status and manage printers, independent of network servers and operating systems.
Printer Management Printer Management Job accounting The printer stores information about jobs printed in a log file. The log file is stored either in the printer’s memory or on a hard disk, if one is connected to the printer. If the log file is stored in the printer’s memory, it is lost when the printer is reset; therefore, it is recommended that a hard disk be used for job accounting. The log file is a list of job accounting records.
Printer Management Intelligent Ready Intelligent Ready is an automated system that monitors the printer’s usage and warms up the printer when you are most likely to need it. You can turn Intelligent Ready on or off from the printer’s front panel. PhaserLink Printer Management Software provides full control of the printer’s automatic warm-up and standby settings. Enabling and disabling Intelligent Ready from the Phaser 750 front panel 1. While Ready is displayed, press Menu. 2.
Printer Management PhaserLink Status Notification PhaserLink Status Notification allows the printer to automatically send email to the system administrator and others under the following conditions: ■ When printer errors, warnings, and alerts occur. ■ When the printer requires attention (for example, when service is required). ■ When a reply to a PhaserLink Remote Internet Printing message is desired.
Printer Management Usage Profile reports The printer can generate reports detailing printer usage. Usage profile reports track over 160 items, including: ■ Unique printer information, such as printer name, date installed, total pages printed, options installed, and network ID. ■ Supplies usage data (for example, toner or ink). By tracking supplies usage, you can order supplies in advance, so your printer will always be well-stocked with supplies.
Printer Management Printing reports from the Phaser 750 front panel 1. When the front panel displays Ready, press the Help button. 2. Press the right-arrow (---->) button until Printer Administration is displayed. Press the Menu button. 3. Press the right-arrow (---->) button until Usage Profile is displayed. Press the Menu button. 4. Press the right-arrow (---->) button until Print Report is displayed. Press the Print button. 5.
Printer Management For more information on PhaserLink Printer Management Software, see PhaserLink Printer Management Software on page 33. Sending reports via email from the Phaser 750 front panel Note To send Usage Profile reports via email, the printer must be properly set up via PhaserLink Printer Management Software. For more information, see Setting up Usage Profile reporting on page 39. 1. When the front panel displays Ready, press the Help button. 2.
Printer Management For complete information on Usage Profile reporting, including descriptions of each field in the report, see the PhaserLink Help (click Help on the left side of the Usage Profile Setup page).
Printer Management Usage Analysis The Tektronix Usage Analysis Tool is a Windows client/server application that allows system administrators to automatically track Tektronix printer usage and obtain job accounting records. The tool supports large networks, with many users and printers. Job accounting and printer usage data is stored in a database. The application can be run on multiple clients using a single server. The data can be exported to a spreadsheet for viewing, analysis, and billing.
Disabling and Enabling Protocols Disabling and Enabling Protocols After your network configuration is complete, you may want to disable protocols that you are not using to avoid unnecessary network traffic. There are four ways to disable protocols: ■ Use the printer’s front panel; see Disabling and enabling protocols: Phaser 750 front panel on page 43. ■ In NetWare environments, you can use the PhaserShare Administrator; see Disabling protocols: PhaserShare Administrator on page 43.
Disabling and Enabling Protocols Disabling and enabling protocols: Phaser 750 front panel 1. When the front panel displays Ready, press the Menu button. 2. Press the right-arrow (---->) button until Configuration is displayed. Press the Menu button. 3. Press the right-arrow (---->) button until Network Settings is displayed. Press the Menu button. 4. Press the right-arrow (---->) button until the desired protocol is displayed (for DHCP/BOOTP, display TCP/IP at this point). Press the Menu button.
Disabling and Enabling Protocols Disabling protocols: PhaserLink Printer Management Software 1. Connect to the printer via PhaserLink (see Accessing the printer from a browser on page 33). 2. On the left side of any PhaserLink page, click Settings. 3. In the INTERFACES group, click the link for the protocol you want to disable; this displays the page for that protocol. 4.
Getting Help Getting Help Help from the World Wide Web Tektronix Color Printer web site www.tek.com/Color_Printers/ Documentation www.tek.com/Color_Printers/userdoc/introduction.html Technical support www.tek.com/Color_Printers/support/colcare.html Color use tips for novices and experts www.colorize.com PhaserLink Printer Management software www.tek.com/Color_Printers/products/phaserlink.html TekSMART™ Knowledge Base www2.tek.com/TekSMART/ Anonymous FTP server ftp.tek.
Index Index A F Apple Printer Utility to change printer's name 29 B broadcast address 23 C cables 4 Chooser 28 Configuration Page printing from PhaserLink Printer Management Software 2 printing from the front panel 2 reports what protocols are enabled 42 customer support 45 frame type (IPX) 13 front panel enabling and disabling protocols 43 printing a Configuration Page 2 printing Usage Profile OCR reports 38 printing Usage Profile reports 38 printing Usage Profile reports (all fields shown) 38 send
Index M S Macintosh Chooser 28 EtherTalk and TokenTalk TCP/IP setup 20 Status Notification 28 N name, EtherTalk or TokenTalk NetWare configuration software 7 IPX frame types 8 printer setup 8 troubleshooting 10 network mask 23 Network Path 32 networking software 2 NWAdmin 7 29 O OS/2 36 T TCP/IP configuration overview Macintosh 20 PC configuration 15 Windows NT 18 technical support 45 terminators Ethernet 4 Token Ring 4 TokenTalk 28 troubleshooting EtherTalk 31 NetWare 10 14 U 1 P PhaserLink Pri
® Printed on recycled paper