
User guide
2
Phaser 750 Color Printer
Network Printing with Tektronix Color Printers
The printer’s Configuration Page
The information supplied on the Configuration Page is helpful when you are installing
and configuring the printer on a network. There are two ways to print the Configuration
Page:
■
Use the printer’s front panel.
Use this method if your printer is not yet configured on
the network. Refer to
Printing a Configuration Page from the Phaser 750 front panel
on page 2.
■
Use PhaserLink Printer Management Software.
With a TCP/IP connection and a
World Wide Web browser, you can use PhaserLink Printer Management Software; see
Printing a Configuration Page: PhaserLink Printer Management Software
on page 2.
Printing a Configuration Page from the Phaser 750 front panel
1.
When the front panel displays
Ready,
press the
Menu
button.
2.
Press the right-arrow (
---->
) button until
Configuration
is displayed. Press the
Menu
button.
3.
Press the
Print
button.
4.
To return the printer to normal operation, press the
Exit
button (the left-most button)
until the front panel displays
Ready.
Printing a Configuration Page: PhaserLink Printer Management
Software
1.
Connect to the printer via PhaserLink (see
Accessing the printer from a browser
on
page 33).
2.
On the left side of any PhaserLink page, click
Settings.
3.
In the
REPORTS
group, click
Print Configuration Page.
For more information on PhaserLink Printer Management Software, see
PhaserLink Printer
Management Software
on page 33.
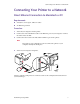
The printer’s networking software
The printer’s software CD-ROM contains software for installing your printer on a network.
The CD-ROM also contains online documentation, printer drivers, and other printer
software. A single integrated installer is used to install printer drivers and other software.
For information on running the installer, see
Using the Tektronix Installer
on page 5.