
Manual


Page 4
Screws on top of the focus body. A brass clamp ring sits in a recessed
groove within the interior wall of the focuser body and the Focus
Tension Screws tighten against it. The brass clamp ring in turn,
cinches around the Teflon sleeve within which the Draw Tube rides.
The end of the Draw Tube is threaded to accept the Field
Flattener. It also contains two 8-32 screws which tighten against
a brass clamp ring to hold either the Field Flattener or 2” star
diagonal.
The single knob on one side of the focuser is a direct 1:1
drive. The other side has the Focusmate
tm
. Focusmate
tm
contains
both 1:1 and 6:1 ratios, with the outer knob being the finer of the
two. If so desired, the Focusmate
tm
can be switched to the left
side of the instrument. Please call Tele Vue for instructions.
6) Field
Flattener: The two-element Tele Vue-60is Field Flattener simply
threads into the end of the focuser Draw Tube. The input side is
threaded for 48mm filters. The output side is threaded for camera
T-rings. When attaching a camera, it is recommended to leave the
Field Flattener in the telescope and thread your T-ring on to it. Then,
attach the camera to the T-ring.
The Field Flattener is optimized for 55mm back focus as
used by 35mm SLR and DSLR cameras. Extension tubes may be
required to achieve the 55mm distance from the face of the Field
Flattener to the CCD chip for other camera types.
To change the orientation of the camera for image compo-
sition, leave the Lock Screws loose and unscrew the Field
Flattener until the desired camera angle is achieved (remember,
less than 180° is required). Tighten the two 8-32 Lock Screws
to solidly lock your camera in place.
7) Diagonal Bushing and insert tool: When you want to use the
Tele Vue-60is visually you will need to insert a 2” Star Diagonal
into the draw tube in place of the Field Flattener. The Diagonal
Bushing will add more bearing surface for the diagonal. Holding
the scope horizontally, unscrew the Field Flattener. Thread the
Diagonal Bushing, with the spanner slots facing out, into the
Focuser Draw Tube. As the bushing threads in you may find it
easier to continue by using the insert tool. The tool will also
make removal of the bushing easier. To use the tool, just span
the shorter length of the tool across the slots and continue to
turn. The Diagonal Bushing only needs to be threaded in until
the face is flush with the end of the draw tube.
8) Optional Micrometer: Focusing for CCD imaging
can be frustrating. The combination of the
Focusmate
tm
and Digital Micrometer Kit, which can
detect 0.00005” of focus travel, can make the task
easier and quicker. By having an index, the photog-
rapher can always go back to a previous focus point.
For installation, set-up and use of the Micrometer Kit
see the instructions included with the kit.
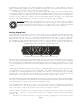
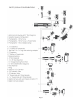
Insertion of the Diagonal Bushing using the insert tool. It is
easiest to start the threading with your finger and use the tool
for removal.
Detail showing the threading for the Field Flattener, Field
Flattener Lock screws and brass clamp ring.
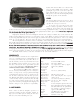
Field Flattener optimized for 55mm distance from T-ring’s
mating face to image plane.
Optional Digital Micrometer Kit
provides an easy way to index
focus position when focusing by
finding smallest diameter of a
star using the full width
halfmaximum value of a star.