Installation Instructions WaveRunner 6 Zi Oscilloscope Rackmount Accessory
WaveRunner 6 Zi Oscilloscope Rackmount Accessory Installation Instructions © 2013 Teledyne LeCroy, Inc. All rights reserved. Unauthorized duplication of Teledyne LeCroy documentation materials other than for internal sales and distribution purposes is strictly prohibited. However, clients are encouraged to distribute and duplicate Teledyne LeCroy documentation for their own internal educational purposes. WaveRunner 6 Zi Oscilloscope and Teledyne LeCroy are registered trademarks of Teledyne LeCroy, Inc.
Installation Instructions Welcome Thank you for purchasing a Rackmount Accessory for the Teledyne LeCroy WaveRunner 6 Zi Oscilloscope. The following topics explain proper installation and usage procedures. Upon receiving your shipment, remove all parts from the packaging. Refer to Package Contents to ensure that all items have shipped correctly. Check the Pre-Installation Requirements, then follow the Installation Procedure to set up your Rackmount properly.
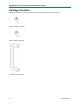
WaveRunner 6 Zi Oscilloscope Rackmount Accessory Package Contents Please take a moment to ensure all parts have correctly shipped with your Rackmount: M4 X 10 Phillips Screw (15) M5 X 12 Phillips Screw (4) 12.
Installation Instructions Top Bracket (1) Face Plate (1) 922300-00 Rev A 3
WaveRunner 6 Zi Oscilloscope Rackmount Accessory Left Wall (1) Right Wall (1) 4 922300-00 Rev A
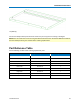
Installation Instructions Tray Base (1) Contact the Teledyne LeCroy Service Center nearest to you if any parts are missing or damaged. NOTE: Parts are shown in this manual using the aforementioned names. See the Part Reference Table for the exact Teledyne LeCroy part numbers when ordering replacements. Part Reference Table Use the following numbers when ordering replacement parts. Description Teledyne LeCroy Part Number Qty.
WaveRunner 6 Zi Oscilloscope Rackmount Accessory Pre-Installation Requirements Tools A standard Phillips (#2 head) screwdriver is required for the light assembly of your 6 Zi Oscilloscope Rackmount. Oscilloscope Be sure to prepare your 6 Zioscilloscope for rack mounting by performing the following: l Power down the oscilloscope. l Unplug the AC Power Plug from the back panel of the oscilloscope. l Flip up the feet of your oscilloscope so the instrument lies flat.
Installation Instructions Installation Procedure 1. Attach the two 12.2mm Front Handles to the Face Plate using the four provided M5 X 12 Phillips Screws. 2. Attach the Face Plate, Left and Right Walls to the Tray Base using 11 of the 15 provided M4 X 10 Phillips Screws.
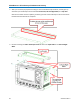
WaveRunner 6 Zi Oscilloscope Rackmount Accessory 3. With your oscilloscope prepared according to the Pre-Installation Requirements, carefully pick up and lower your oscilloscope into the assembled Face Plate, Left and Right Walls, and Tray Base. Seat the instrument into the Tray Base, positioning the rear of the oscilloscope in front of the seamlocated toward the back of the Tray Base. 4. Use the remaining four M4 X 10 Phillips Screws to attach the Top Bracket to the Left and Right Walls.
Installation Instructions Contact Teledyne LeCroy United States and Canada World Wide Corporate Office United States - Protocol Solutions Group Teledyne LeCroy Corporation 700 Chestnut Ridge Road Chestnut Ridge, NY, 10977-6499, USA Ph: 800-553-2769 / 845-425-2000 FAX: 845-578-5985 teledynelecroy.com Support: contact.corp@teledynelecroy.com Sales: customersupport@teledynelecroy.com Teledyne LeCroy Corporation 3385 Scott Boulevard Santa Clara, CA, 95054, USA FAX: 408-727-0800 teledynelecroy.