WaveAce EasyScope EasyScope Operator's Manual September, 2008
LeCroy Corporation 700 Chestnut Ridge Road Chestnut Ridge, NY, 10977-6499 Tel: (845) 578-6020, Fax: (845) 578 5985 Internet: www.lecroy.com © 2008 by LeCroy Corporation. All rights reserved. LeCroy, ActiveDSO, JitterTrack, WavePro, WaveMaster, WaveSurfer, WaveLink, WaveExpert, Waverunner, and WaveAce are registered trademarks of LeCroy Corporation. Other product or brand names are trademarks or requested trademarks of their respective holders.
EasyScope Operator's Manual TABLE OF CONTENTS EasyScope Overview ........................................................................................................ 4 Installing EasyScope ........................................................................................................ 5 Installing the USB Driver .............................................................................................. 6 Uninstalling EasyScope ..................................................................
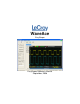
WaveAce EasyScope Overview The EasyScope software utility is provided to connect your WaveAce series oscilloscope to your PC. The EasyScope application lets you view waveforms, waveform data, waveform measurements, and bitmap images of your waveforms. You can also upload/download oscilloscope settings. You can connect your WaveAce series oscilloscope to your PC using the USB serial interface or RS-232 interface.
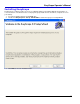
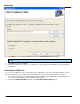
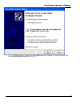
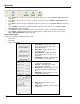
EasyScope Operator's Manual Installing EasyScope The EasyScope software provides an easy-to-use Wizard. Simply run the SETUP.EXE file and follow the onscreen instructions. The wizard creates a new program group, installs the files and drivers, and puts an icon on your desktop. 1. 2. Insert the installation CD into the CD-ROM drive. Double-click EasyScope3.0→Set up→SETUP.EXE to start the EasyScope 3.0 Setup Wizard. 3. Click Next to select an installation folder.
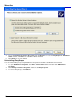
WaveAce 4. Click Next to use the default installation folder. The Confirm Installation window opens. Note: If you want to install EasyScope 3.0 to a different folder, click the Browse button and choose a location. 5. 6. Click Next to start the installation. When the installation is complete, a confirmation message is displayed. Click Close to exit the EasyScope installation.
EasyScope Operator's Manual 3. Choose Install from a list or specific location (Advanced) and click Next. The Please choose your search and installation options window opens.
WaveAce 4. 5. Choose Include this location in the search and click Browse to locate the EasyScope3.0→USB Driver folder and then click Next. The USB Driver will be installed. Click Finish to close the wizard. Uninstalling EasyScope You can uninstall EasyScope using Add/Remove Programs in the Microsoft Windows Control Panel. 1. 2. 3. 8 To open Add/Remove Programs, click Start→Control Panel and then double-click Add/Remove Programs. Click Change or Remove Programs, and then click EasyScope3.0.
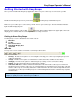
EasyScope Operator's Manual Getting Started with EasyScope Once you have installed the EasyScope application, make sure your oscilloscope is connected to your PC. Double-click the EasyScope iconon your desktop. The EasyScope main window opens. Make sure your oscilloscope is connected to your PC. Turn on your oscilloscope. The left Link Status indicator light should be displayed green. Click the Connect button on the toolbar.
WaveAce Toolbar The Toolbar lets you quickly access EasyScope functions. Press Connect to connect to your oscilloscope (this is the same as choosing Panel→Connect from the menu bar). Press Disc to disconnect your oscilloscope (this is the same as choosing Panel→Disconnect from the menu bar). Press Exit to exist the EasyScope application (this is the same as choosing Panel→Exit from the menu bar).
EasyScope Operator's Manual Status Bar 1. 2. 3. 4.
WaveAce Wave Graphs You can use the Wave Graph function to view waveforms. 1. 2. 3. 4. 5. Graph Oper - lets you save, copy, open, and print waveform graphs. Refresh Oper - lets you obtain and display waveform graphs. Graph Show - lets you indicate the channels you want to display in the Graph display area. Graph Display - displays the waveform graph(s).
EasyScope Operator's Manual 6. Click the Refresh button. Note: When you choose Manual refresh mode, you must click the Refresh button to refresh the display. In Auto refresh mode, the waveform is automatically refreshed. Opening Waveform Graphs You can open saved waveform graph files by clicking the Open button in the Graph Oper area or by clicking the button next to Graph File in the Open Files area. An Open File window is displayed. Select the file you want to open and click OK.
WaveAce Saving Waveform Graphs 1. You can save the waveform graph data by clicking the Save button in the Graph Oper area. The Select the Channel window opens. 2. 3. Select a channel and click OK. In the Save Graph window, click Browse to choose a location for the saved file. Type a filename and click OK to save the data. The wave graph data is saved as a comma separated file (.csv). You can then open this file in other programs, such as Microsoft Excel.
EasyScope Operator's Manual Wave Data You can use the Wave Data function to obtain and display waveform data. To display waveform data, click the Wave Data button. Copying Wave Data You can copy waveform data quickly by clicking the Copy button at the top of the window. This takes a screen print of the wave data so you can paste it in another application. Printing Wave Data To print the wave data click the Print button at the top of the wave data window. The Select the list item to print window opens.
WaveAce To print the wave data, click the Print toolbar button. Saving Wave Data 1. You can save the waveform data by clicking the Save button at the top of the window. The Select the Channel window opens. 2. 3. Select a channel and click OK. In the Save Data window, click Browse to choose a location for the saved file. Type a filename and click OK to save the data. The wave data is saved as a wave data file (.wdf). Note: You can open a wave data file (.wdf) using the Data File...
EasyScope Operator's Manual Wave Measurements The WaveAce series oscilloscope can automatically measure 32 parameters. Once you have a waveform graph displayed, you can view its' waveform measurements. You can copy, print, and save the waveform measurements. You can also set Pass/Fail ranges for each measurement. Note: You should use Auto mode when displaying waveform graphs to display waveform measurement values. To display waveform measurements, click the Wave Measure button.
WaveAce Click the Print button on the toolbar to print the waveform measurements. Saving Wave Measurements 1. You can save the waveform measurements by clicking the Save button at the top of the window. The Select the Channel window opens. 2. 3. Select a channel and click OK. In the Save Data window, click Browse to choose a location for the saved file. Type a filename and click OK to save the data. The wave data is saved as a waveform measurement file (.wmf).
EasyScope Operator's Manual Setting Pass/Fail Ranges The WaveAce series oscilloscope can automatically measure 32 parameters. You can set the Pass/Fail ranges for each of these measurements. 1. To set pass/fail ranges, in the Wave Measure window click the Pass/Fail button. The Pass/Fail setting window opens. 2. Click the drop-down arrow to select a measure type, such as Vpp, Vmax, Vmin, etc. and click the Enable checkbox. Under Pass Range Settings, type a minimum and maximum limit. 3.
WaveAce DSO Bitmaps Displaying Bitmap Images You can use the DSO Bitmap function to display a bitmap (.bmp) image of the current waveform in the display area. Once you have displayed a bitmap image, you can copy, print, and save it. Click Refresh to display a bitmap image of the current waveform. OR Click Open to open a previously saved bitmap image file (.bmp). Copying Bitmap Images You can copy bitmap images quickly by clicking the Copy button at the top of the DSO Bitmap window.
EasyScope Operator's Manual To print the bitmap image, click the Print toolbar button. Saving Bitmap Images 1. 2. You can save the waveform bitmap image by clicking the Save button at the top of the window. In the Save Bmp file window, click Browse to choose a location for the saved file. Type a filename and click OK to save the data. The image is saved as a bitmap file (.bmp). Note: You can open a previously saved bitmap image file (.bmp) using the DSO Bitmap... button in the Open Files area.
WaveAce Device Settings Transferring Device Settings You can transfer the oscilloscope's settings to your PC and save it for use at another time. You can also download the oscilloscope setup data from a saved scope setting file to the oscilloscope. Uploading Device Settings to your PC 1. 2. In the Device Setting Oper area, click the Upload button. The current oscilloscope settings are uploaded to your PC and a default filename is listed in the Current file field.
EasyScope Operator's Manual Virtual Panel Using the Virual Panel You can use the EasyScope Virtual Panel to control your oscilloscope using your PC. The Virtual Panel is arranged to be the same as your Front Panel Controls on your WaveAce oscilloscope. To access the Virtual Panel, click the Panel toolbar button. The Virtual Panel is displayed.
WaveAce Menu Control Buttons Menu Option buttons (1-5) - Press to choose menu options. Press a menu option button adjacent to your selection. Menu Function Buttons CURSORS - Press to turn on the cursors and display the Cursor menu. You can use the Cursor menu to set the Cursor Mode (Auto, Off, Manual, Track). When Cursors are on (CURSORS button is lit), press the left/right arrow buttons to "turn" the Adjust knob to position the cursors. ACQUIRE - Press to display Acquire menu.
EasyScope Operator's Manual Run Control Buttons SINGLE - Press to acquire a single waveform. Each time you press the SINGLE button, the oscilloscope acquires another waveform. When the oscilloscope detects a trigger it completes the acquisition and stops. RUN/STOP - Press when you want the oscilloscope to acquire waveforms continuously. Press RUN/STOP again to stop the acquisition.
WaveAce Horizontal Controls Horizontal Position knob - Click the left/right arrow buttons to "turn" the Horizontal Position knob to adjust the horizontal position of all channels and math waveforms (the position of the trigger relative to the center of the screen). The resolution of this control varies depending on the timebase setting. Press to set the horizontal position to zero. HORI MENU - Press to display the Horizontal menu.
EasyScope Operator's Manual Refresh - Press to refresh the data. Close - Press to close the Virtual Panel. Knob Controls Knob Scale - Displays the knob scale when you press the left/right Adjust knob arrows. Knob Done - Press Knob Done when you want to apply the knob scale setting.
WaveAce Exiting EasyScope Disconnecting and Exiting EasyScope Before you can exit the EasyScope application, you must first disconnect the oscilloscope. Disconnecting the Oscilloscope To disconnect, click the Disc toolbar button or choose Panel→Disconnect from the menu bar. The right Link Status indicator light will turn red when the oscilloscope is no longer communicating with EasyScope. Exiting EasyScope To exit EasyScope, click the Exit toolbar button 28 or choose Panel→Exit from the menu bar.