
Portable Oxygen Monitor OPERATING & SERVICE INSTRUCTIONS MX300-I


Operation MX300-I
Teledyne Analytical Instruments 20
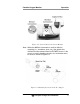
4. Re-install the battery compartment door. When the unit is
first turned on the display will momentarily display all LCD
segments. During this period diagnostic tests are being
conducted to insure the circuits are functioning correctly.
The unit will activate the audible and visual alarms for about
1 second. The LCD will flash continuously indicating the
unit is in the unlocked position ready for calibration.
Note: When batteries are first installed or power is lost for any
reason the instrument defaults to the calibration mode. All
keys except the CAL and ON/Off (I/O) keys are inoperable
until a successful calibration is achieved.
5. To test the batteries. Press the BATT TEST key once. The
battery display, located below the oxygen readout display,
should show a bar graph of the remaining life to the batteries.
In the case of fresh batteries, it should illuminate all 5
segments from the left to the right end of the bar.
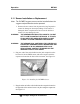
2.1.3 Calibration
The MX300-I should be calibrated before each use and every 8
hours to maintain accuracy.
Whenever new batteries are installed or removed for
any reason, the oxygen monitor defaults to the calibration
mode with the LCD display flashing 00.0. Only the CAL
and ON/OFF (I/O) keys are functional at this point. The
alarm set points will also need to be reset after calibration
is completed.
Note: For first time and for routine maintenance
calibrations, make sure the sensor and sensor
cable are installed correctly before attempting
to calibrate the instrument
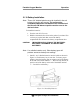
To calibrate the instrument (See Figure 2-7):
1. Turn the unit on by pressing the ON/OFF (I/O)
key.
2. Check the batteries by pressing the BAT key.
3. If the LCD is not flashing, press the LOCK/UNLOCK key to
unlock the keys. LCD will flash indicating changes can be
Figure 2-7: Calibration Sequence