TED ' PORTABLE OXYGEN MONITOR INSTRUCTION MANUAL TYPE B EQUIPMENT: Equipment providing a particular degree of protection against electric shock, particularly regarding— • allowable LEAKAGE CURRENT • Reliability of the protective earth connection (if present).
COPYRIGHT © 1996 TELEDYNE ELECTRONIC TECHNOLOGIES – ANALYTICAL INSTRUMENTS All Rights Reserved No part of this manual may be reproduced, transmitted, transcribed, stored in a retrieval system, or translated into any other language or computer language in whole or in part, in any form or by any means, whether it be electronic, mechanical, manual, or otherwise, without the prior written consent of Teledyne Electronic Technologies Analytical Instruments, 16830 Chestnut Street, City of Industry, CA 91749-1580 P
TABLE OF CONTENTS SECTION TOPIC PAGE NUMBER INTRODUCTION 4 APPLICATIONS 5 DESCRIPTIONS OF FUNCTIONAL ZONES: FRONT PANEL REAR PANEL 6 7 OPERATIONS: 1. 1.1 1.2 1.3 1.4 1.5 1.6 SET-UP INSTALL THE BATTERIES INSTALL THE SENSOR CALIBRATE THE INSTRUMENT NORMAL OPERATION SET THE ALARMS 8 9 10 11 12 13 2. ANAESTHETIC AGENTS 14 3. CLEANING 15 4. DO’S AND DON’T’S 16 5. ROUTINE MAINTENANCE 6. TROUBLESHOOTING 18 7. TECHNICAL SPECIFICATIONS 20 8. EFFECT OF PRESSURE 22 9.
INTRODUCTION The TED 191 Portable Oxygen Monitor is an easy-to-use, portable instrument that provides fast and accurate oxygen monitoring and audio-visual alarm capability. The TED 191 is designed to monitor concentrations of up to 100% oxygen in medical gas mixtures. The TED 191 Portable Oxygen Monitor is designed and manufactured in accordance with strict performance and quality protocols and subject to ISO 9002 Quality System protocols.
APPLICATIONS The instrument is designed for the measurement of oxygen concentrations in a variety of medical gas mixtures. It is recommended that the instrument be used only as a secondary measuring device to verify the concentration of oxygen in gas mixtures prepared using a gas blender or similar apparatus. The use of this monitor as a primary or only means of preparing gas mixtures is not advised.
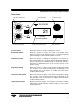
DESCRIPTION OF FUNCTIONAL ZONES FRONT PANEL High Alarm Setting Knob 50 Alarm Mute Button Calibration Control 60 TELEDYNE 70 40 30 80 HI 90 21 50 X 102 60 70 40 30 80 LO % OXYGEN OXYGEN MONITOR 90 21 21 I O 102 Liquid Crystal Display (LCD) Low Alarm Setting Knob On / Off Switch On / Off Switch Allows the operator to turn the instrument on and off. Alarm Mute Switch Allows the operator to “mute” the sound of the audible alarm signal for ± 60 seconds.
DESCRIPTION OF FUNCTIONAL ZONES REAR PANEL Sensor Cable Connector Plug Battery Drawer Battery Drawer The Battery Drawer contains 4 x AA (Penlight) batteries required to power the instrument. Sensor Cable Connector Plug The Oxygen Sensor Connector Cable is plugged into this “one way” socket.
SECTION ONE OPERATIONS Note : Upon receipt, inspect the entire unit and accompanying accessories for damage or broken or loose parts. If damaged, do not use. Notify the Shipper, and consult Teledyne Electronic Technologies Analytical Instruments 1.1 SET-UP To set-up your TED 191 Portable Oxygen Monitor : 1.1.1 Install the Batteries See 1.2 below for procedure 1.1.2 Install the Sensor See 1.3 below for procedure 1.1.3 Calibrate the Instrument See 1.4 below for procedure 1.1.4 Normal Operation See 1.
OPERATIONS 1.2 INSTALLING THE BATTERIES Withdraw the battery drawer from the monitor casing, by grasping the side lugs located on either side of the battery drawer, and, firmly pinching them inwards, simultaneously pull the drawer outwards. When new, this action can be somewhat stiff and difficult to execute. Care should be taken not to damage either the drawer or the casing of the monitor when executing this procedure.
OPERATIONS 1.3 INSTALLING THE OXYGEN SENSOR The T-7 Oxygen Sensor must be installed before the instrument can be used. Ensure that the monitor is switched off. Remove the sensor from its protective bag. Inspect the sensor for damage or electrolyte leakage. If the sensor is damaged obtain a replacement. Do not use the defective sensor as it may be damaged. Caution: the sensor electrolyte is caustic. Do not let it come into contact with skin. If it does, immediately flush the affective area with water.
OPERATIONS 1.4 CALIBRATE THE INSTRUMENT Calibration should be effected at least once per shift, and always prior to the use of the instrument. Note: Never expose the sensor to varying temperatures while calibrating (i.e never hold the sensor in your hand) Ensure that the instrument is switched on, and that the oxygen sensor is connected to the instrument via the coiled cable. Expose the sensor tip to pure (100%) free flowing oxygen (a flow rate of approximately 6 to 8 litres per minute is recommended).
OPERATIONS 1.5 NORMAL OPERATION Switch the instrument on using the On–Off Switch. Validate the calibration of the instrument by exposing the oxygen sensor to room air, and verifying that the display on the instrument reads 100% (± 2 %). A further check can be carried out by exposing the sensor to a stream of 21% oxygen, and verifying that the display on the instrument reads 100% (± 2 %).
OPERATIONS SET THE ALARMS The lines indicating the 100% graduations around the High and Low Alarm Settings Knobs are only intended as guides, and not as precise settings. Once the desired oxygen concentration has been set, bring the high alarm setting down, by turning the High Alarm Setting Knob anti-clockwise, until the alarm is triggered, and then take the high alarm setting up by approximately 5%.
SECTION TWO 2. ANAESTHETIC AGENTS ANAESTHETIC AGENTS The anaesthetic agents listed in the following table (Halothane, Enflurane, Isoflurane Sevoflurane, and Desflurane) were vaporised into a stream of 30%oxygen / 70% nitrous oxide. The resultant drops in displayed oxygen concentration after a 2 hour exposure period were observed. Exposurers in excess of 2 hours will provide marginally greater errors. The errors listed are typical for all gas permeable membrane oxygen sensors.
SECTION THREE CLEANING AND STERILISATION 3.1 CLEANING THE TED 191 PORTABLE OXYGEN MONITOR The instrument itself should be cleaned using a damp cloth. In the event of an excessive build-up of dirt, a mild alcohol solution (isopropyl) may be used to wipe over the instrument, which should be allowed to air-dry afterwards. In extreme cases, the monitor casing may be cleaned using a mild detergent. Note: 3.2 The Accurox Oxygen monitor cannot be liquid sterilised or autoclaved – irreparable damage may result.
SECTION FOUR DO’S AND DON’TS DO’S ; Read the Operators Manual thoroughly before using the instrument. ; Calibrate once per shift, and prior to each and every use. ; Check the high and low alarm threshold settings prior to use. ; Replace the batteries immediately when required. ; Keep the instrument, cable and sensor dry at all times. ; Re-calibrate after changing the sensor or batteries. ; Visually inspect the whole instrument prior to use. ; Check the integrity of all cable connections routinely.
SECTION FIVE ROUTINE MAINTENANCE 5.1 ROUTINE VISUAL INSPECTION Always inspect the instrument prior to use for obvious damage or for parts or components missing. Make a point of checking the oxygen sensor cell for signs of electrolyte leakage, water condensation on the sensing surface. Also check the integrity of the cable and all cable connections. 5.2 CHANGING BATTERIES From time to time the 4 x AA (penlight) dry cell batteries that power the instrument will require replacement.
SECTION SIX TROUBLESHOOTING SYMPTOM CURE / REMARK 1) Check battery drawer is properly located. No numeric display on the LCD when powered on 2) Check battery polarity . 3) Check batteries for replacement 4) External power : check polarity and voltage of supply; : check if functional on batteries. 1) Check calibration process (as described in section 1.4). 2) Check flow rate of calibrating gas (6 – 8 lpm) 3) Check sensor cell connection. 4) Check sensor cable connection.
TROUBLESHOOTING SYMPTOM CURE / REMARK 1) Remove the sensor tip from the T-adaptor, unscrew the “flow diverter” and gently swab any excess moisture off the sensor cell membrane, then flow dry gas over the membrane. The displayed readings are unstable 2) Check for a source of RFI emission. Relocate the instrument. 3) Check that the calibration control knob is properly locked in position. 1) The sensor is not plugged in. Instrument reads “00” 2) There is bad sensor/cable or cable/monitor connection.
SECTION SEVEN TECHNICAL SPECIFICATIONS Complies to IEC 601 – Safety of Medical Equipment Internally powered equipment SAFETY CLASSIFICATION Drip proof – IPX 1 Not suitable for used with flammable anaesthetic mixture POWER Internal : DC 6V, 4 dry cell batteries – size AA/penlight MASS 525 grams (with T-7 oxygen sensor) DIMENSIONS 59mm (H) x 152mm (W) x 115mm (D) Approximately 900 hours of continuous non-alarming operation BATTERY DURATION Low battery status indication is provided Replace batteries
TECHNICAL SPECIFICATIONS SENSOR RESPONSE TIME Less than 6 seconds to 90% of final measured value in response to a step change in the actual oxygen concentration being measured. Technical manual will be supplied on request to user’s appropriately qualified personnel for repair of components designated as repairable by the manufacturer. SERVICE No parts (other than the sensor cell, and dry cell batteries) deteriorate during normal use.
SECTION EIGHT EFFECT OF PRESSURE Virtually all gas sensors and analysers measure the partial pressure, not the percentage, of the gas that they sense. The only time that these instruments can accurately read percentages is when the total pressure does not vary over time between calibration and use. This is why it is important to calibrate the TED 191 Portable Oxygen Monitor at regular intervals. It is recommended that the instrument be calibrated prior to each use or every 8 hours.
SECTION NINE HUMIDITY EFFECT OF Humidity does not directly affect the accuracy of the sensor's measurement. However, when a nebuliser or other device is used to increase moisture levels in gas mixtures, the moisture actually dilutes the mixture. This dilution effect decreases the oxygen concentration. For example, if an 80% oxygen gas mixture is humidified to saturation at room temperature, the resulting gas mixture will contain only 77.5% oxygen.
SECTION TEN TEMPERATURE EFFECT OF The Teledyne Electronic Technologies Analytical Intruments sensors adjust for ambient temperature changes in the range of 0 - 40ºC (32 - 106ºF). Since the thermistor that compensates for these changes is located in the rear of the sensor assembly, it is important that gas mixtures, flowing over the front of the sensor, be at room temperature. Reading errors may occur if hot gases from a heated humidifier are directed past a sensor teed into a breathing circuit.
SECTION ELEVEN READINGS DISCREPANCY IN The TED 191 is intended to be used as a secondary oxygen monitor, meaning that it is intended to verify the accuracy of and check the oxygen concentration leaving another oxygen mixing device or primary life support system (i.e a blender or anaesthesia machine). Whenever there is a significant difference in the oxygen readings between the primary and secondary monitors, the discrepancy must be resolved immediately.
SECTION TWELVE SERVICE REPAIR In the event that your TED 191 Portable Oxygen Monitor requires service, the following steps will help to ensure that the repair request is processed promptly : Contact your authorised Teledyne Electronic Technologies Analytical Instruments distributor or factory for return instructions. Do not ship your monitor without first obtaining authorisation. Include a copy of the sales invoice or other proof of purchase date.
SENSOR CELL REPLACEMENT LOG DATE WARRANTY? SERIAL NUMBER N/A REMARKS MANUFACTURED TELEDYNE ELECTRONIC TECHNOLOGIES Analytical Instruments 27
TECHNICAL SERVICE LOG DATE WARRANTY? DETAILS REMARKS TELEDYNE ELECTRONIC TECHNOLOGIES Analytical Instruments 28
GENERAL NOTES TELEDYNE ELECTRONIC TECHNOLOGIES Analytical Instruments 29
SPARE PARTS LIST SPARE PARTS PART NUMBER A51327 C885 A268 DESCRIPTION Micro-Fuel Cell T-7 with flow diverter P/N A50057 Cable assembly Tee adapter (22mm) OPTIONAL ACCESSORIES PART NUMBER B34102 C53790 A284 A274 A283 DESCRIPTION Mounting Clamp Calibration Assembly Universal adapter set for paediatric circuits (15mm) Tee adapter, autoclaveable Tee adapter, metal A minimum charge of US$20.00 is applicable to spare parts orders.